
This chapter describes the prerequisites that must be completed before installing and configuring HaloENGINE. These steps ensure that the product integrates smoothly with your organization’s security and compliance infrastructure. The following setup tasks are required:
-
Registering an application in Microsoft Entra ID
-
Creating and configuring Sensitivity Labels
-
HaloENGINE Tomcat Service Runtime Conditions
-
Obtaining the HaloENGINE License
-
Configuring User Management Settings in the Azure portal
-
Setting up Microsoft Sentinel
Completing these prerequisites in advance helps streamline the deployment process and ensures that HaloENGINE functions as intended within your environment.
Registering an Application in Microsoft Entra ID
This section will guide you through registering an application, obtaining the Client ID and Directory ID, and assigning permissions to the application.
Microsoft documentation
Registering an application in Microsoft Entra ID establishes a trust connection between your application and the identity provider, the Microsoft identity platform.
The information in the Microsoft documentation overrides any information published in this section. For a comprehensive description, refer to Microsoft documentation.
Prerequisite: You must have sufficient permissions to register an application with your Microsoft Entra ID tenant.
Create an Application
Follow these steps to register the application:
-
Log in to the Microsoft Entra admin center using an account that has administrator privileges.
-
If you have access to multiple tenants, click the Settings icon in the top menu and select the tenant for which you want to register the application from the Directories + subscriptions menu.
-
You will be directed to the homepage.
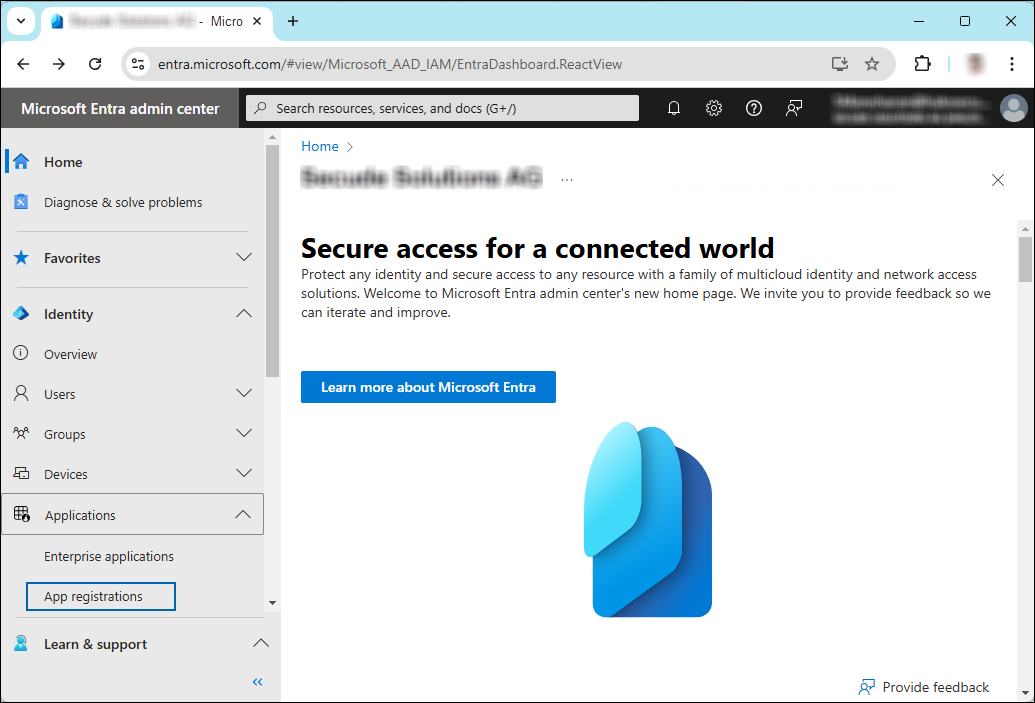
Selecting Microsoft Entra ID
-
Click Identity > Applications > App registrations on the left of the navigation pane.
-
On the App registrations page, click the New registration page or Register an Application button (this button appears only if no applications have already been created).
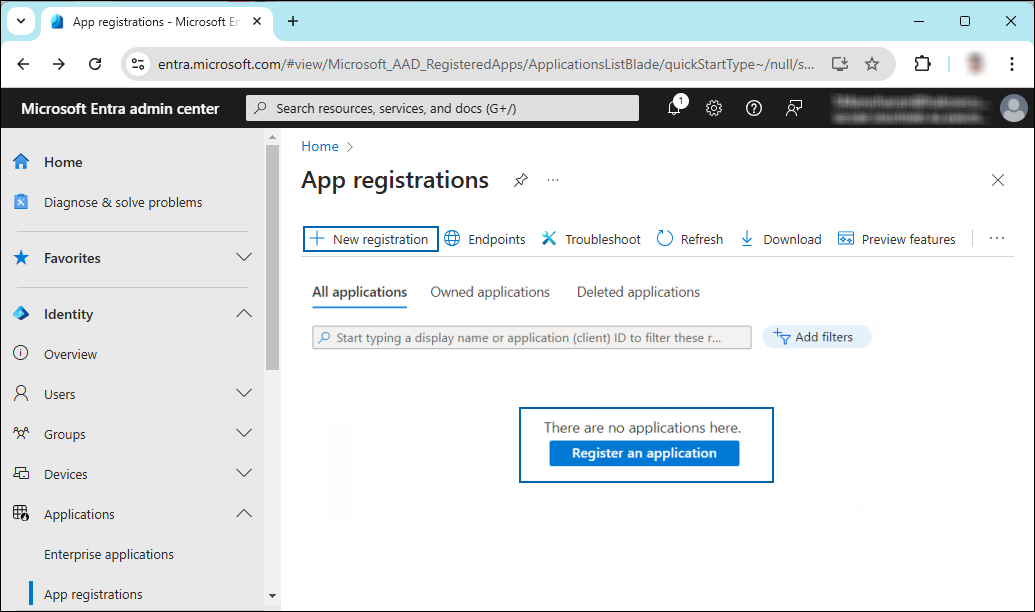
New application registration
-
On the Register an application page, enter the registration details for your application.
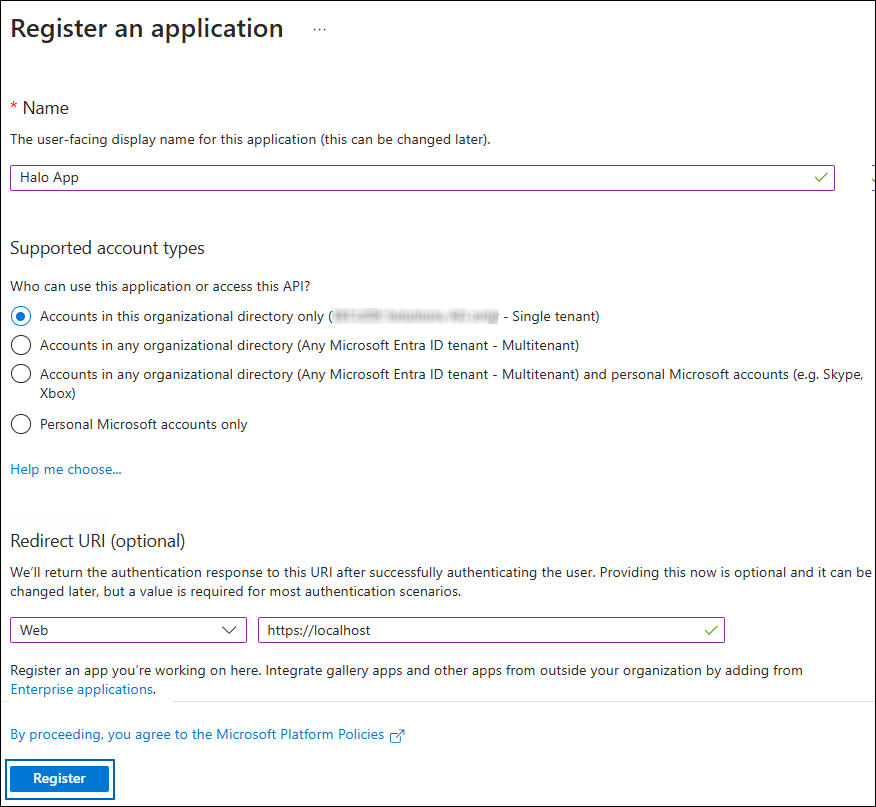
Application details
-
In the Name field, enter an appropriate application name.
-
Under Supported account types, select the option Accounts in this organizational directory only (single tenant). As of now, the HaloENGINE only supports a single tenant.
-
Under Redirect URI: Select Web, and then type a valid redirect URI for your application. For example,
https://localhost. -
When finished, click Register.
-
-
The home page of the new application is created and displayed.

Application ID and Tenant ID
-
The following values are shown on the portal once registration is complete. To copy and save the ID value in a text editor, hover your cursor over it and click the Copy to clipboard icon.
-
Application ID – It is also referred to as Client ID.
-
Directory ID – It is also referred to as Tenant ID.
-
Save the authentication parameters
In a text editor (such as Notepad), copy the value of Application (client) ID and Directory (tenant) ID, and save it for initializing the HaloENGINE Tomcat Service.
Add Required Permissions
To protect content with MIP SDK, you must provide the necessary API permissions to the application created in the previous section.
-
In the sidebar of the application page, select API permissions. The API permissions page for the new application registration appears.
-
Click Add a permission button. The Request API permissions page appears.
-
Under the Select an API setting, select APIs my organization uses. A list appears containing the applications in your directory that expose APIs.
-
In the search box, type in the name of the permission indicated in the "Required Permissions" table below. Alternatively, you could scroll to find the API.
-
For example, type Microsoft Information Protection Sync Service into the search box. The following figure shows how the API is listed:
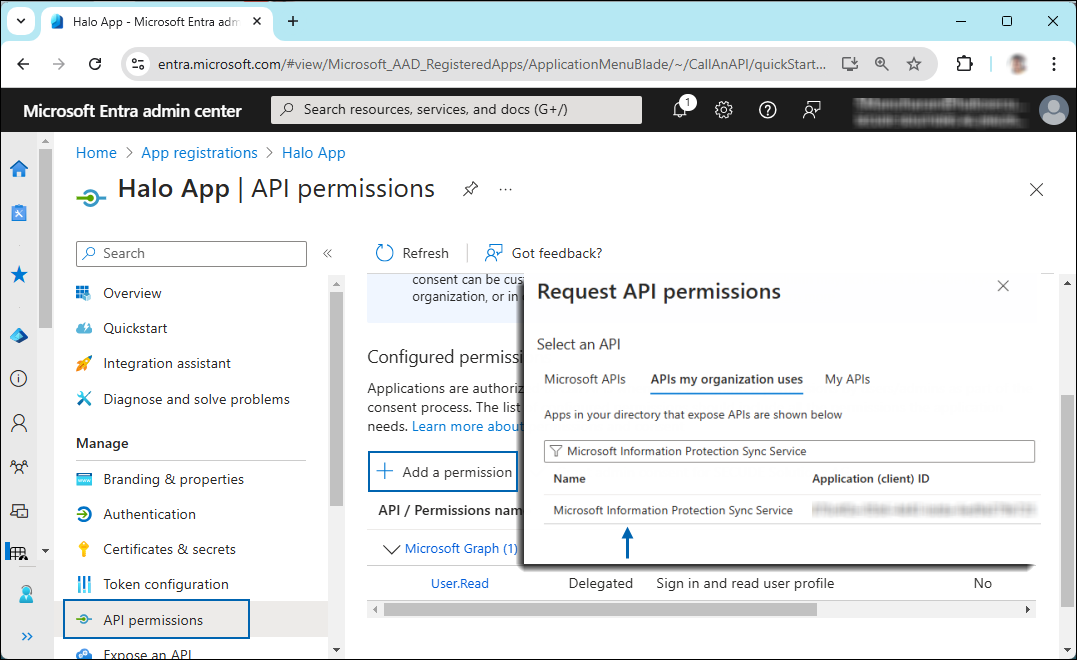
API selection
-
Now, click on the displayed API. You can see two permissions on the page − Delegated permissions and Application permissions.
-
Click Application permissions button and then under the Permission section, select the check box near "Read all unified policies of the tenant."
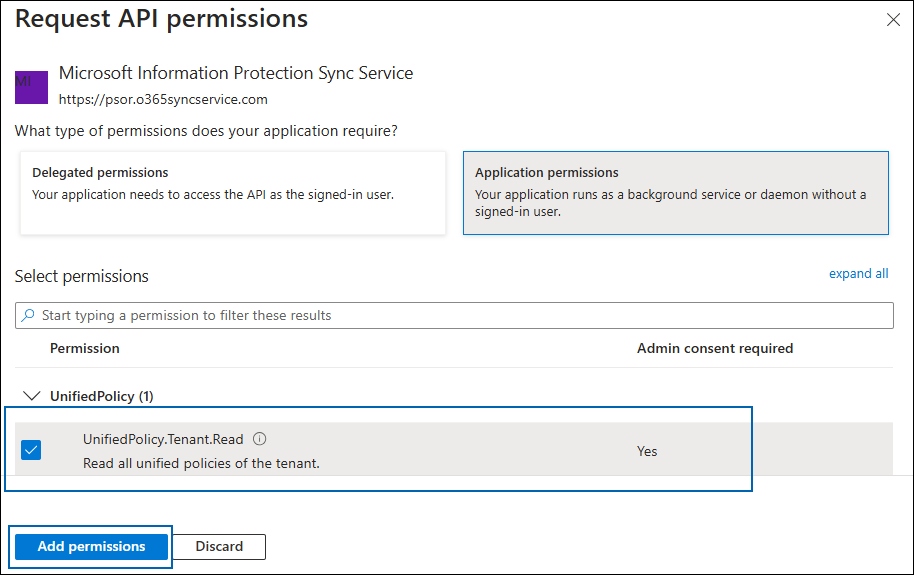
Adding permission
-
Click Add permissions.
-
Repeat the steps outlined above to add the other required permissions listed in the “Required permissions” table below.
-
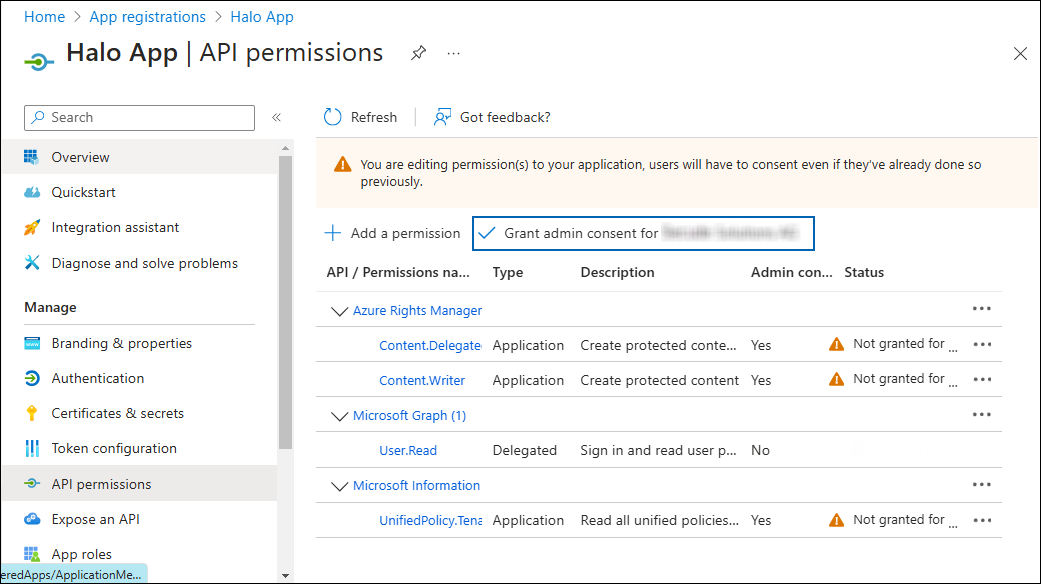
You will be taken back to the API permissions page, where the permissions have been saved and added to the table with the status "Not granted."
Required API Permissions
-
Click Grant admin consent for your company button. You will be prompted to accept the consent confirmation; click Yes to the question.
-
After accepting the admin consent, the Status will change to "Granted."
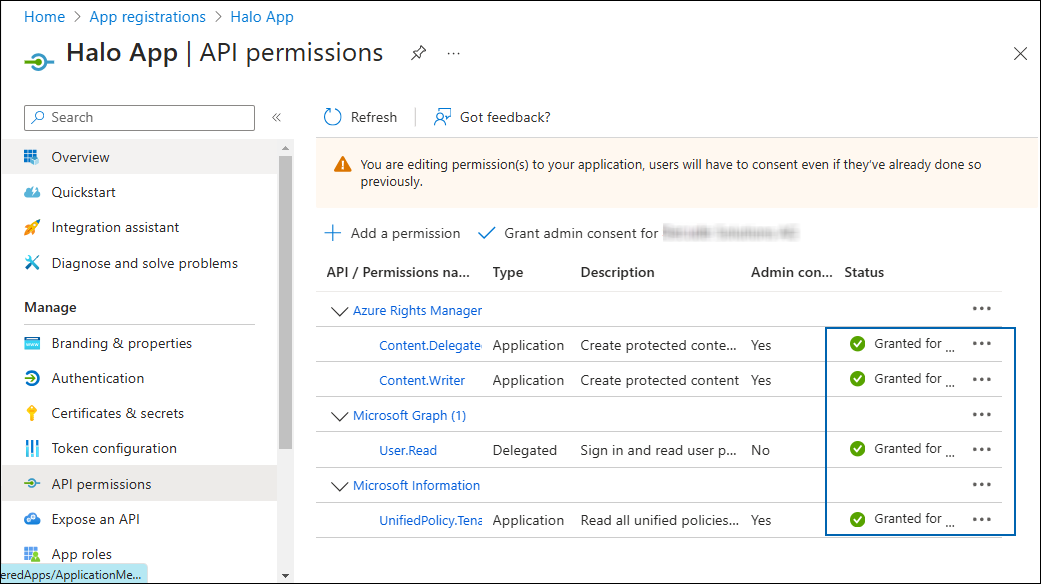
API Permissions with admin consent
-
The following table lists the required permissions.
|
API / Permission Name |
Display Name |
Type |
Description |
|---|---|---|---|
|
Microsoft Graph |
|
Delegated |
Sign in and read the user profile. This API permission is added by default, but it is not used by the HaloENGINE Tomcat Service. |
|
Azure Rights Management Services (Microsoft Rights Management Services) |
|
Application |
Create protected content on behalf of a user |
|
|
Application |
Create protected content |
|
|
Microsoft Information Protection Sync Service |
|
Application |
Read all unified policies of the tenant |
Required permissions #1
Additional Permission (Only for Decryption)
The permissions mentioned above are adequate for applying the MPIP label to a file with the owner as SPN (Service Principal Name) ID or any user email ID. Additionally, the HaloENGINE Tomcat Service requires the following superuser privilege for the decryption function when the owner is not as SPN.
|
API / Permission Name |
Display Name |
Type |
Description |
|---|---|---|---|
|
Azure Rights Management Services (Microsoft Rights Management Services) |
|
Application |
Read all protected content for this tenant in the Azure portal |
Required permissions #2
Upload the Certificate in the Azure Portal
The HaloENGINE Tomcat Service relies on certificate-based authentication to access MPIP services. Therefore, you must enter your certificate information in the registered application before proceeding with the configuration.
Prerequisites:
-
Certificate:
-
Ensure that you have a valid certificate containing the following key properties:
-KeyExportPolicy Exportableand-KeySpec Signature. -
The certificate can also be self-signed. Note: As a best practice and for security reasons, use a self-signed certificate only in a test environment. It is not recommended for production environments.
-
-
Local Computer certificate store: The certificate required for MPIP authentication must be installed in the Local Computer certificate store, along with the Root CA and Intermediate CA certificates.
-
If the certificate is CA-signed, install all related certificates in their respective stores (Root, Intermediate, and Personal).
-
If the certificate is self-signed, install it in both the Trusted Root Certification Authorities and Personal stores of the Local Computer.
-
To upload the public key of the certificate, follow the steps below:
-
In the sidebar of the new application page, select Certificate & secrets.
-
Under the Certificate section, click Upload certificate. The Upload certificate dialog appears as shown in the figure below:
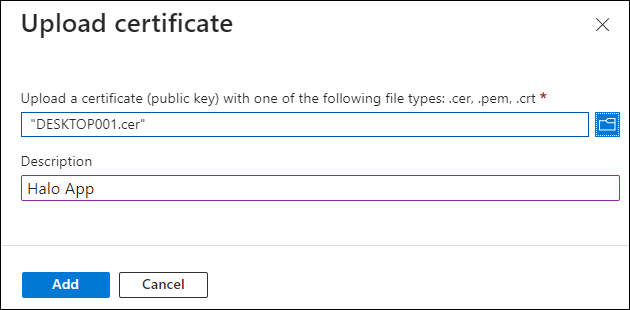
Upload certificate #1
-
Click on the folder icon to select the certificate and click Open. For illustration purposes, the file
DESKTOP001.ceris used. -
Now, click Add. The certificate will get uploaded, and its thumbprint will be displayed on the page as shown in the figure below:
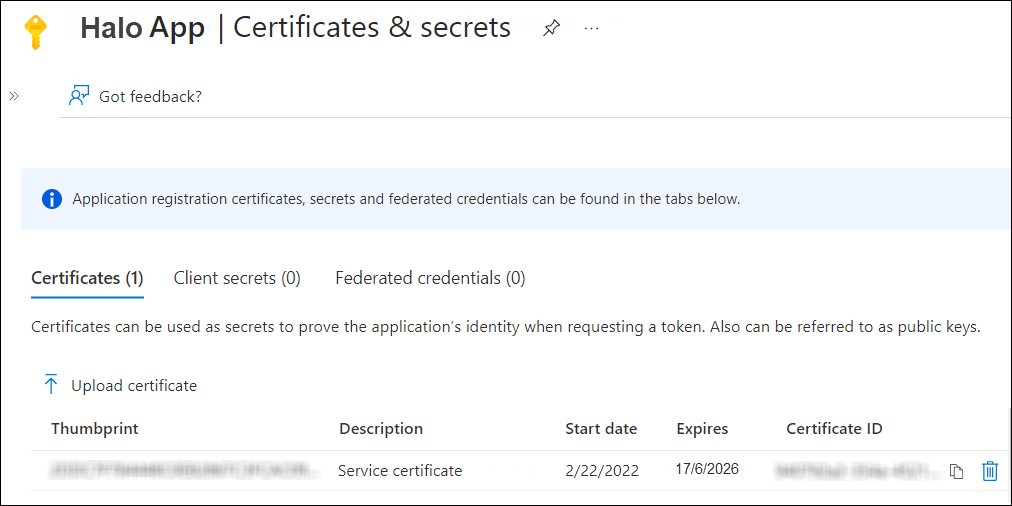
Upload certificate #2
Creating and configuring Sensitivity Labels
As an administrator, you can create, configure, and publish sensitivity labels for various levels of content sensitivity based on your organization's classification taxonomy. Use names or terms that are familiar to your users. Consider starting with label names like Personal, Public, General, Confidential, and Highly Confidential if you don't already have a taxonomy in place. For more details, please refer to Microsoft online documentation.
Conditions for Running the HaloENGINE Tomcat Service
Before you begin, make sure that the following prerequisites are met in your system:
Deny log on as a service policy
If the service is running under a specific user or a specific group, ensure that the user is not restricted by the Deny log on as a service policy (Local Security Policy > Security Settings > Local Policies > User Rights Assignment). If the user(s) exist, the “Error 1069: The Service did not start due to a logon failure” message appears while running the HaloENGINE Tomcat service.
Allow non-admin users to access a private key (without full admin rights)
During installation, the HaloENGINE gets the required Azure tenant details and certificate thumbprint. When the HaloENGINE Tomcat service starts, it tries to connect to the MPIP services using the details entered during installation. As part of this process, it validates the certificate thumbprint against the certificate installed in the Local Computer certificate store. The thumbprint entered in the installation wizard must match the one available in the Local Computer certificate store.
If the service runs under a non-administrative user account, the user may not have sufficient permissions to access the certificate’s private keys when the certificate is installed in the Local Computer store. This restriction prevents successful authentication with MPIP services. To resolve this issue, grant the user Read permission to access the certificate’s private key by following the steps listed below.
Any errors encountered during this process are recorded in the log file. If the verification succeeds, the service proceeds with initialization.
Prerequisites
-
The required certificates (machine certificate, root CA, and intermediate CA) are already installed.
-
The private key is stored in the Windows Certificate Store under Local Computer.
-
You have administrative rights to perform the setup.
Follow the procedure below to grant read access:
-
Open Certificate Manager as Administrator.
-
Press Win + R, type mmc, and press Enter.
-
In the console, go to File and select Add/Remove Snap-in.
-
Select Certificates from the list and click Add.
-
Choose the Computer account, then click Next, followed by Finish, and then OK.
-
In the left panel, expand Certificates (Local Computer), expand Personal, and select Certificates.
-
Identify the certificate that contains the private key.
-
Right-click the certificate, select All Tasks, and then select Manage Private Keys.
-
In the Permissions window, click Add and enter the non-admin username (for example, TESTIL) and click OK.
-
Select the Read permission, click Apply, and then click OK.
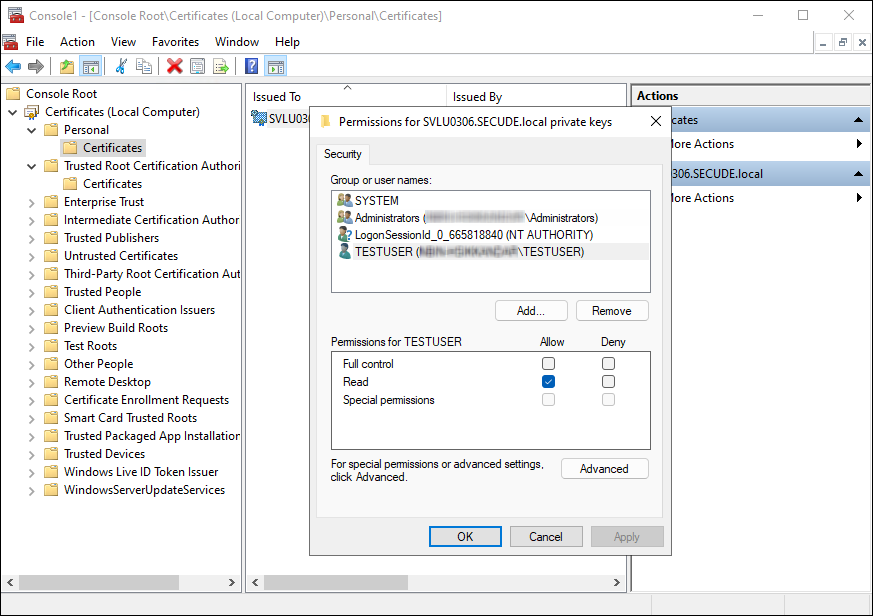
Granting private key access to a non-admin user
Obtaining the HaloENGINE License
Before installing the HaloENGINE, we recommend obtaining the license file (license.lic) from Secude support to enable the HaloENGINE functionalities. The license file you received from Secude will include specific features and system types. This implies that only the system types specified in the license are accessible via their respective endpoints. After configuring the admin portal, import the license as instructed in the section "Phase 2. Activate License".
Avoid renaming the license file.
Once you have received the license file from Secude, use it exactly as is, without changing its name. Renaming the file prevents the license from activating.
The following picture illustrates how the client communicates with the HaloENGINE.
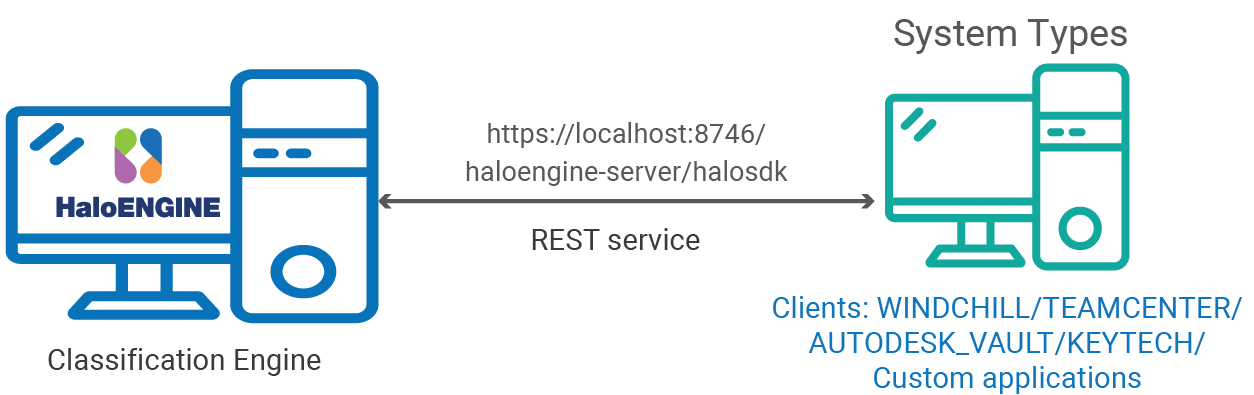
System types and protocol
The table below will assist you in deciding the type of license you should obtain from Secude.
|
Customer Requirement |
License Specification |
Description |
|---|---|---|
|
Monitor |
Monitor |
A customer environment that only needs the monitoring feature. |
|
Block |
Monitor + Block |
A customer environment that just requires the blocking feature. However, monitoring is included as a standard feature. |
|
Block and Protect |
Monitor + Block + Protect |
A customer environment that requires blocking and protecting features. A full license with all three features (Monitor, Block, and Protect) must be used. |
Obtaining license
User Management Settings
Make a default (also known as regular) administrator account after installing the HaloENGINE component. This account is referred to as "Super Admin," and it has greater access than a typical administrator account. This account has full access to your HaloENGINE component.
User Accounts
|
User Account 1 |
User Account 2 |
User Account 3 |
|---|---|---|
|
Default Super Admin account |
Customer_Admin |
Customer_User |
|
Role: ROLE_SUPER_ADMIN |
Role: ROLE_CUSTOMER_ADMIN |
Role: ROLE_CUSTOMER_USER |
|
User validation: Locally validated |
User validation: Microsoft Entra authentication |
User validation: Microsoft Entra authentication |
User Accounts
Settings in Azure Portal
User management is often included with Microsoft Azure and involves several request exchanges between the HaloENGINE Admin Portal and the identity provider, Microsoft Entra ID.
Microsoft documentation
Any application that wants to use Microsoft Entra ID for authentication must be registered in its directory. The information in the Microsoft documentation overrides any information published in this section. For a detailed explanation, please see the Microsoft documentation.
In the Azure portal, follow the steps below to configure user authentication and authorization settings.
Step 1: Create a New Web Application
-
You can either leverage an existing Web (Redirect URI) application or create a new one in Azure Portal. To serve as an example, the Web application User Management is created.
-
When registration is complete, the Overview page displays the Application ID and Tenant ID values. These values uniquely identify your application on the Microsoft identity platform. To preserve the values, copy them to the clipboard and paste them into a text editor (such as Notepad).
Step 2: Authentication Settings
-
In the left navigation pane, select Authentication.
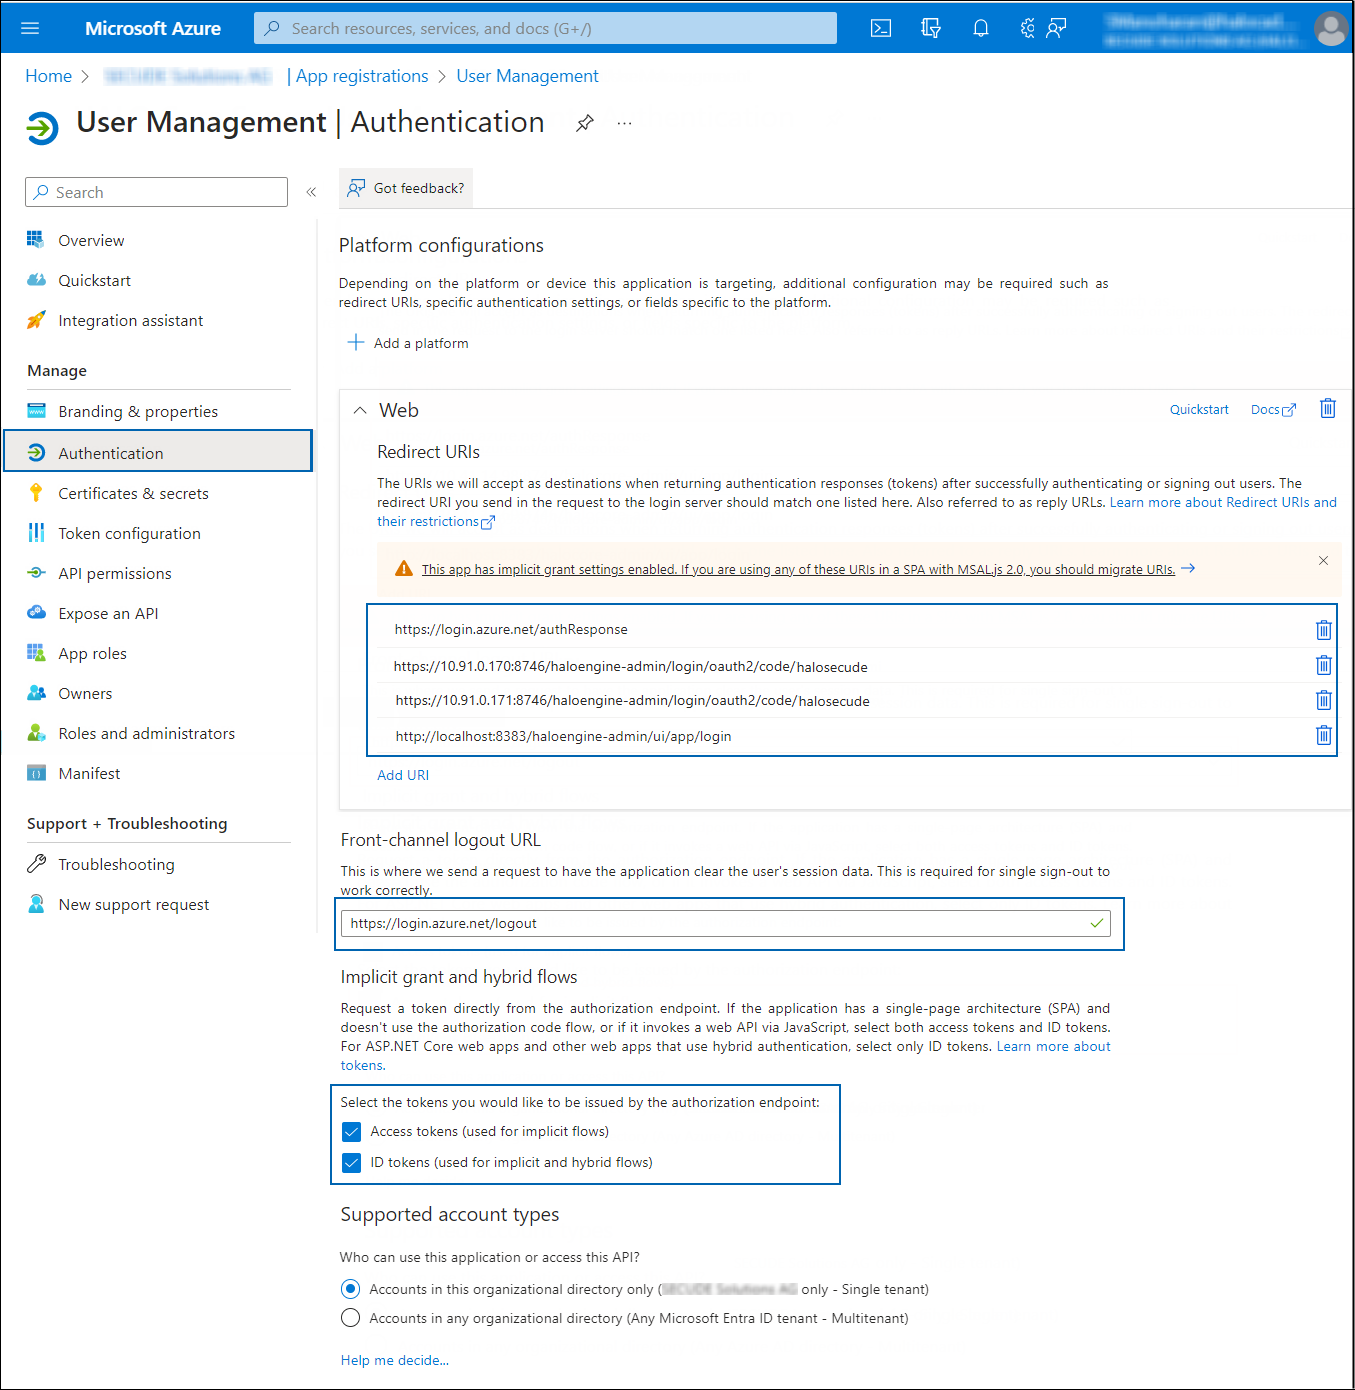
Authentication settings
-
Under the Web section, click Add URI and enter the following reply URLs one by one:
-
https://login.azure.net/authResponse -
HaloENGINE Admin portal URL:
-
https://<ip>:<port>/haloengine-admin/login/oauth2/code/<tenant name>(for example,https://10.91.0.65:8746/haloengine-admin/login/oauth2/code/halosecude) -
Or
http://<localhost>:<port>/haloengine-admin/login/oauth2/code/<tenant name>(for example,http://localhost:8383/haloengine-admin/login/oauth2/code/halosecude)
-
-
-
Under Front-channel logout URL section, enter the URL −
https://login.azure.net/logout. -
Under the Implicit grant and hybrid flows section, select Access tokens, and ID tokens checkboxes.
-
Click Save.
Step 3: Certificates & Secrets
-
In the left navigation pane, click Certificates & secrets.
-
Under Client secrets, click + New client secret.
-
On the Add a client secret page, enter a Description, choose the validity period under Expires, and click Add.
-
After clicking Add, a new row appears under Client secrets.
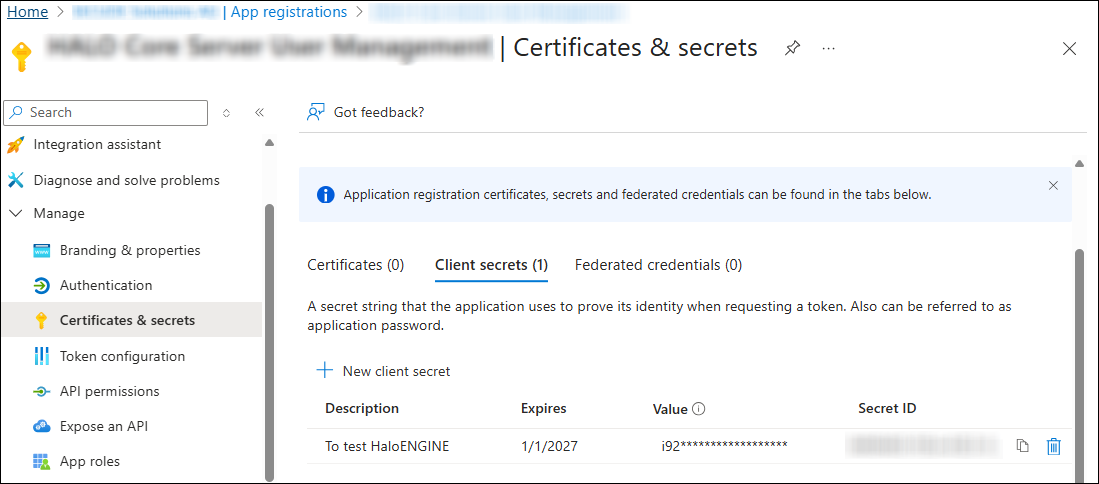
Client secret value
-
Copy the Value field immediately, as it will only be displayed once.
-
Store this value securely and use it for Tenant Configuration.
Step 4: Token Settings
-
In the left navigation pane, select Token configuration and click Add groups claim.
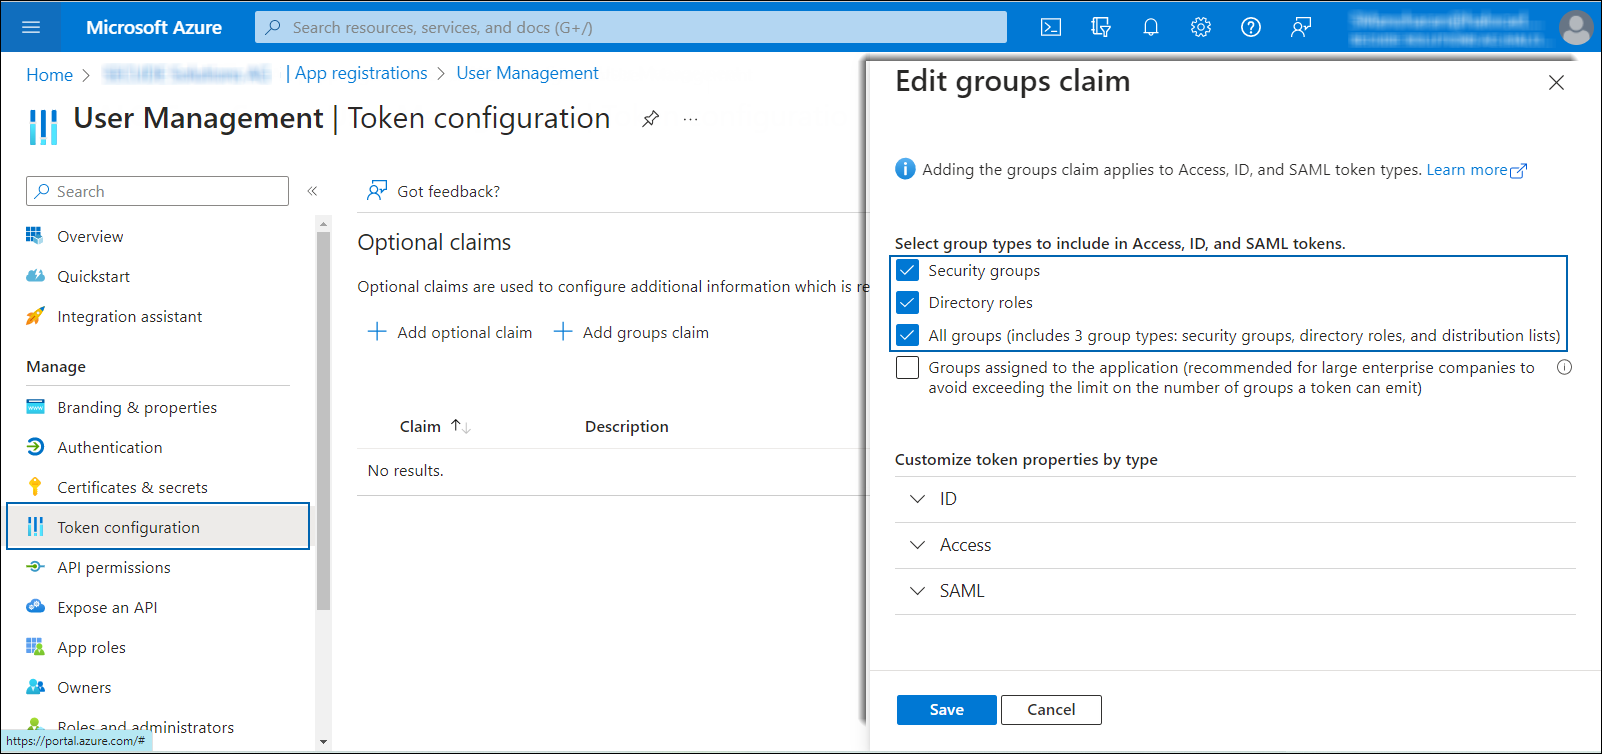
Token Settings
-
Select the following options:
-
Security groups
-
Directory roles
-
All groups
-
-
Click Save.
Step 5: Expose API
-
In the left navigation pane, select Expose an API.
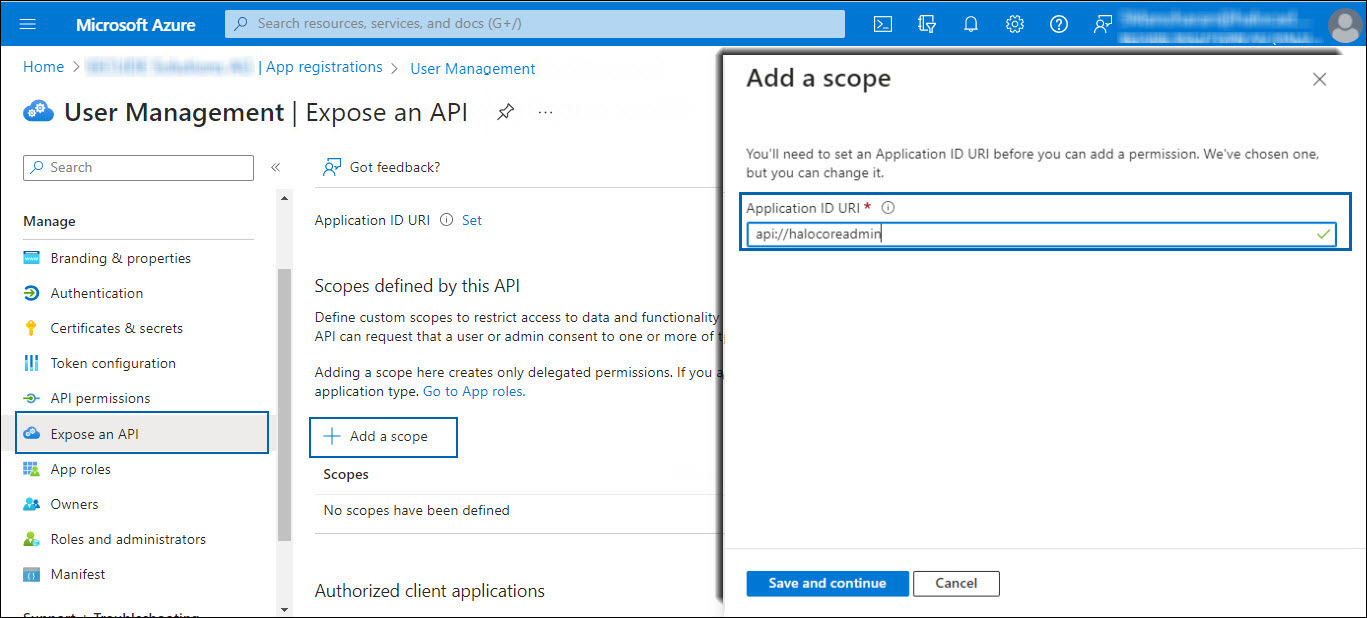
Adding scope#1
-
Click Add a scope and enter the scope following
api://in Application ID URI. In this example,api://halocoreadminis used. -
Click Save and Continue.
-
Again, click Add a scope and enter the following values:
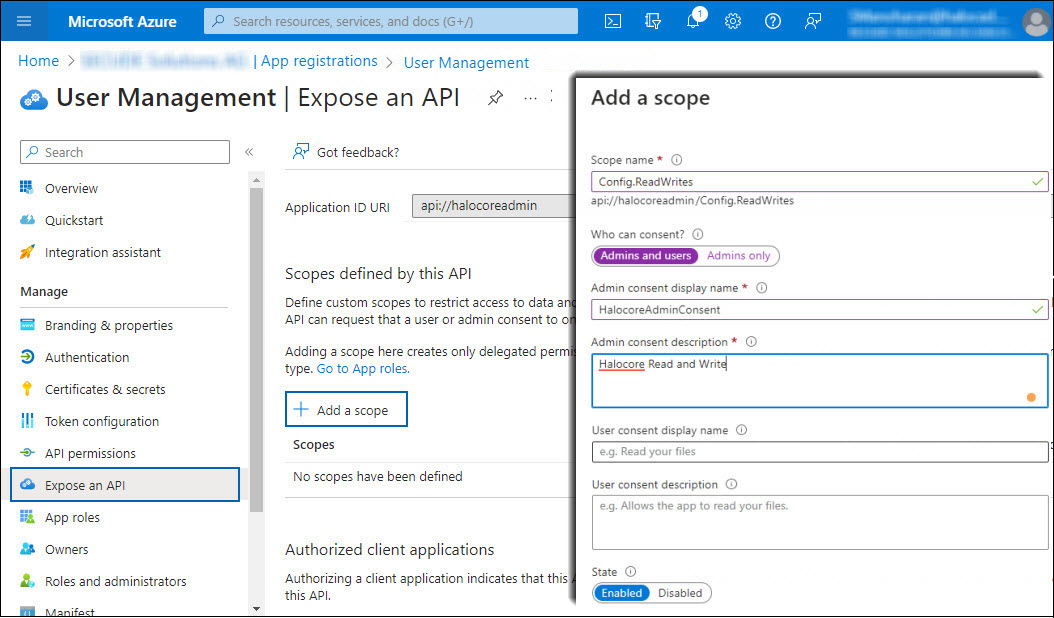
Adding scope #2
-
Scope name: enter
Config.ReadWrites -
Who can consent?: select Admins and users
-
Admin consent display name: enter HalocoreAdminConsent
-
Admin consent description: enter Halocore Read and Write
-
State: select Enabled
-
-
Click Add scope. You can see the scope displayed in the UI.
-
Copy the generated scope
api://halocoreadmin/Config.ReadWritesto the clipboard and save it in a text editor (such as Notepad).
Step 6: Create Roles
-
In the left navigation pane, select APP roles.
-
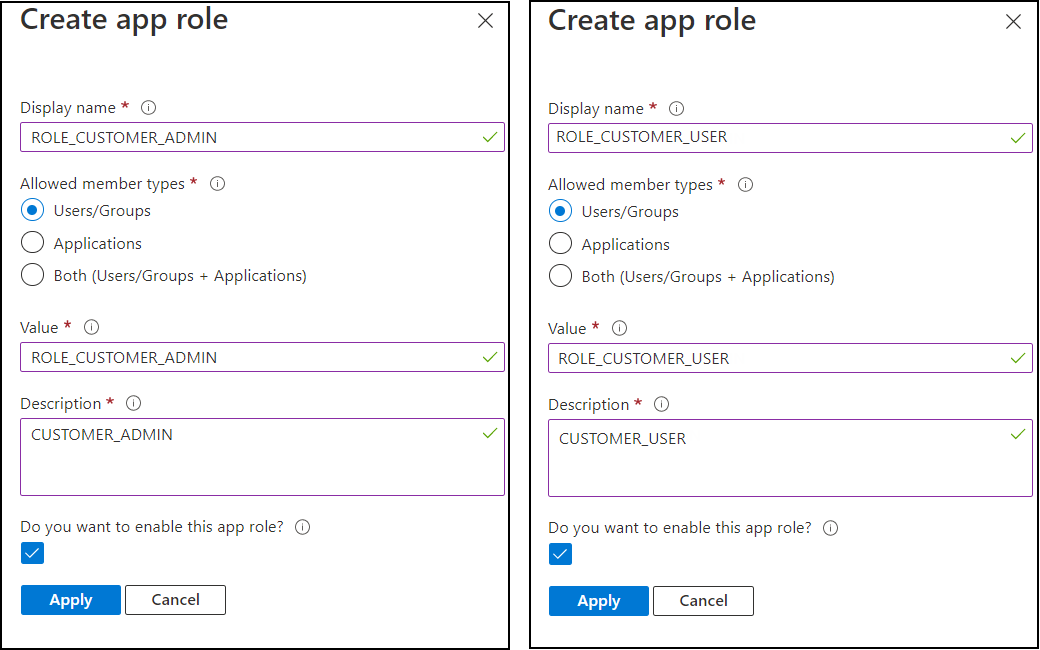
Click Create app role and enter the following values:
-
Display name: ROLE_CUSTOMER_ADMIN
-
Allowed member types: select Users/Groups
-
Value: ROLE_CUSTOMER_ADMIN
-
Description: CUSTOMER_ADMIN
-
Do you want to enable this app role? – Select this option.
-
Repeat the above steps for the role ROLE_CUSTOMER_USER.
Adding Roles
-
-
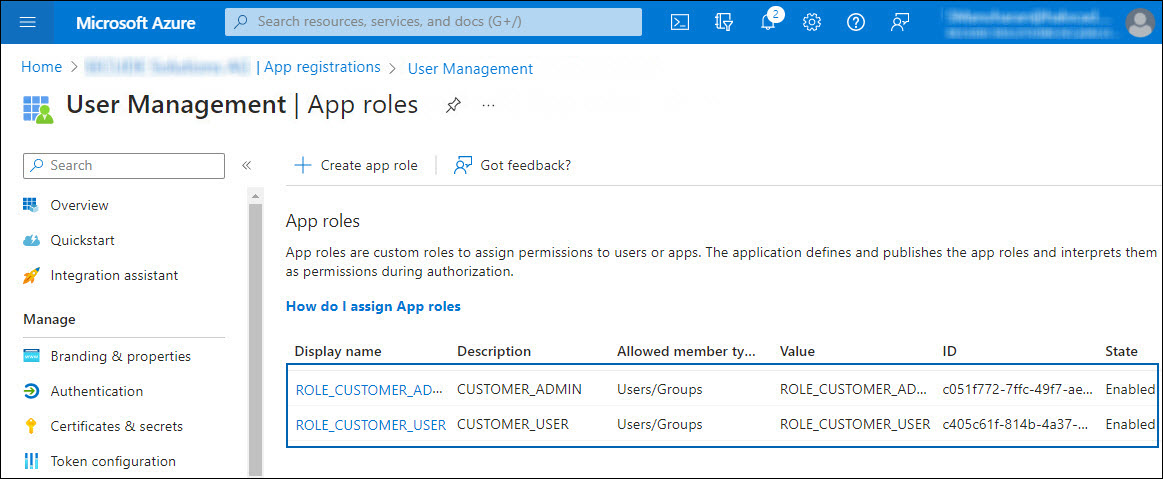
Click Apply.
-
The roles are added to the list.
Create Roles
Step 7: Apply Role to Users
-
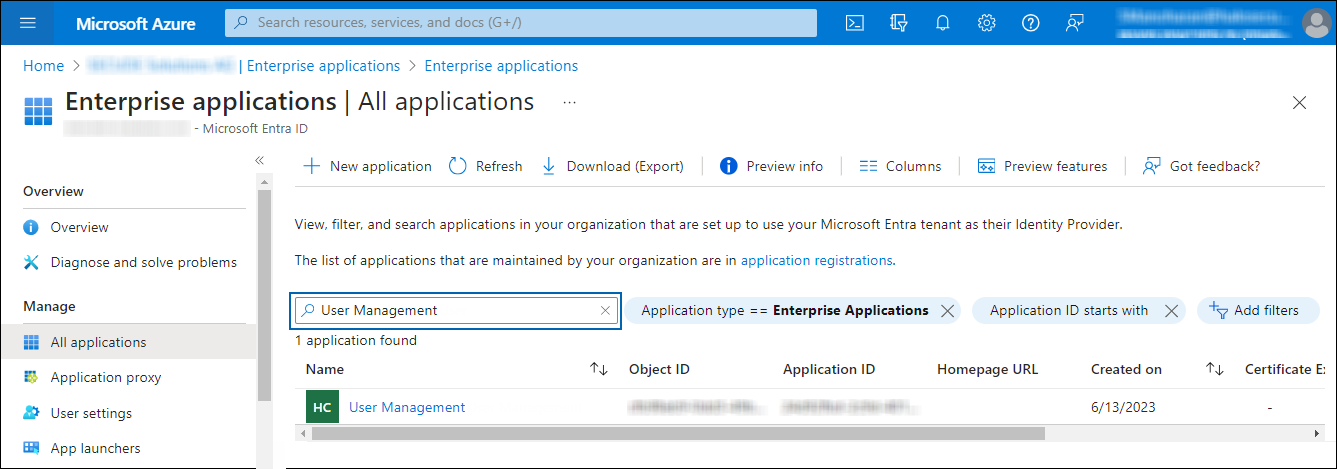
In the Microsoft Entra ID pane, select Enterprise applications.
-
The Enterprise Applications page will appear with a list of existing Service Principals in your tenant.
-
In the search box, enter your application name. In this example, User Management is entered in the search box.
Apply role to user #1
-
The search result will be displayed.
-
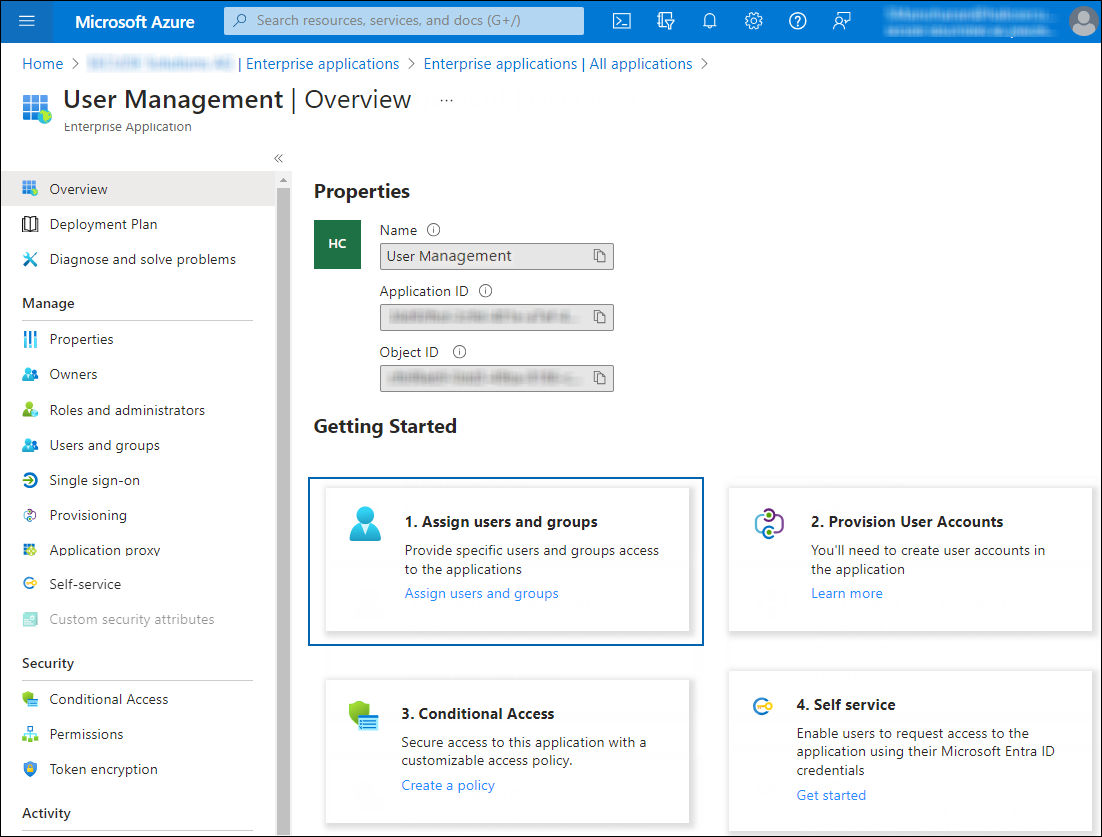
Now, click on the link from the list. The Overview page of the application will appear:
Apply role to user #2
-
Click Assign users and groups. The Users and groups page will appear.
-
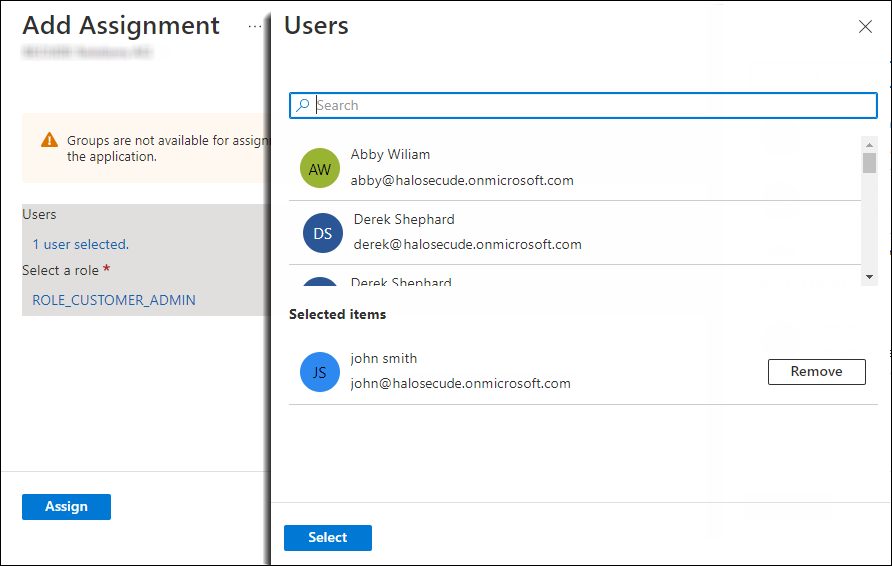
On the Users and groups page, click Add user/group. The Add Assignment page will appear.
-
Under Users and groups:
-
Click None Selected and search for a user (for example, John).
-
Click Select and Assign.
Adding users
-
-
Under Select a role:
-
Click None Selected and search for the role ROLE_CUSTOMER_ADMIN.
-
Click Select and Assign.
Apply role to user #3
-
-
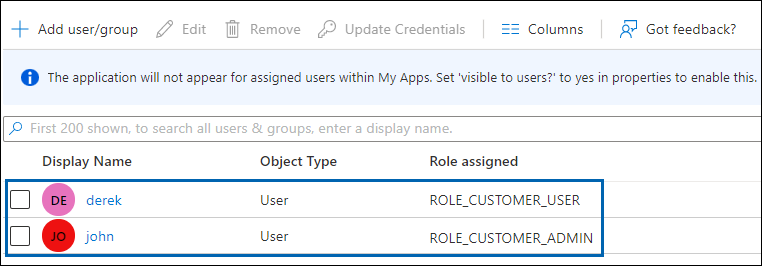
Repeat the above steps for the role ROLE_CUSTOMER_USER (for example, user Derek is assigned to this role).
-
-
Related tasks: After the initial configuration of the HaloENGINE Admin Portal, you need to use the above values to configure tenant details. Please refer to the section "Phase 7. Tenant Configuration".
Forwarding Logs to Microsoft Sentinel
Microsoft Sentinel is a scalable, cloud-native security information and event management (SIEM) that delivers an intelligent and comprehensive solution for SIEM. Microsoft Sentinel provides cyberthreat detection, investigation, response, and proactive hunting, with a bird's-eye view across your enterprise. To begin using Microsoft Sentinel, the log analytics workspace must be configured.
Configuring Microsoft Sentinel
The explanation given in this section is only meant to serve as an example. Only the fundamental procedures for creating a workspace are shown in this section. Please refer to the Microsoft documentation for a detailed explanation of the configuration and settings. The information in the Microsoft documentation overrides any information published in this section.
Prerequisite: Ensure that you have permission to perform this procedure.
-
Log in to the Microsoft Azure portal.
-
In the search bar, type Microsoft Sentinel. As you start typing, the list filters according to your input.
-
Select Microsoft Sentinel from the search results.
-
The Microsoft Sentinel page will appear. Here, you need to click Create at the top of the page.
-
On the Add Microsoft Sentinel to a workspace page, click Create a new workspace.
-
The Create Log Analytics Workspace page will appear as shown below, and you must enter the required details on this page.

Workspace #1
-
Select a resource group from the list.
-
Provide a name for your workspace.
-
Choose a region from the list.
-
-
Once that is done, you can leave other options as-is, and then click on Review + Create and finally click on Create after the validation.
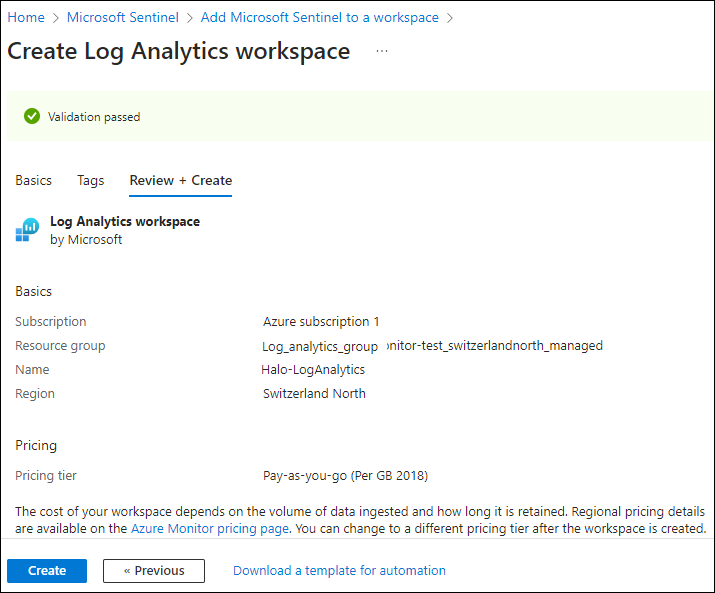
Workspace #2
-
The new workspace will be listed as follows:
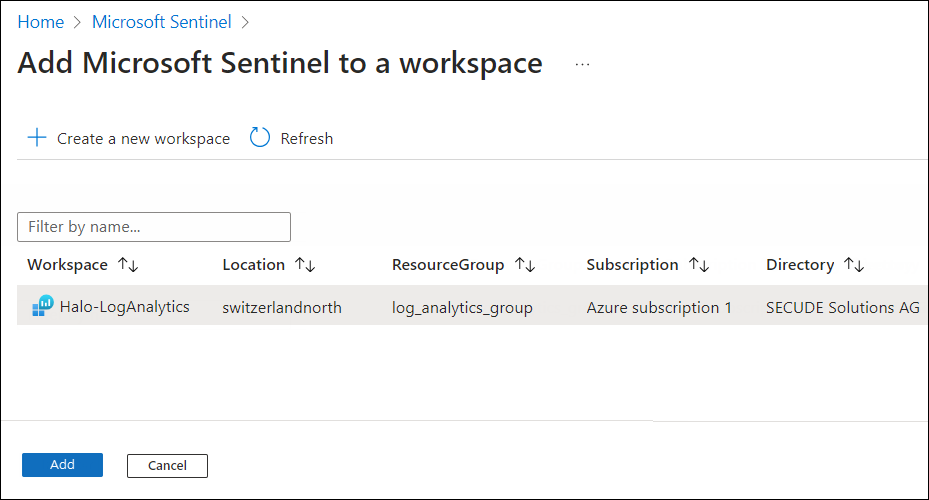
Workspace #3
-
Select the new workspace and click Add. The Add button will only be enabled if you have the required permission.
-
The connection between Microsoft Sentinel and Log Analytics is successfully created.
Fetching Key Details from Log Analytics Workspace
This section describes how to obtain the Log Analytics agent keys. Log Analytics agent keys are required to transfer logs from the HaloENGINE Admin portal to Microsoft Sentinel.
-
On the search bar, type Log Analytics workspace. As you start typing, the list filters according to your input.
-
Select Log Analytics workspace from the search results.
-
The Log Analytics workspace page now includes the new workspace you created in the previous section.
-
Select the new workspace.
-
In the menu, select Settings > Agents.
-
The page will provide the necessary information, including the Workspace ID and Primary Key.
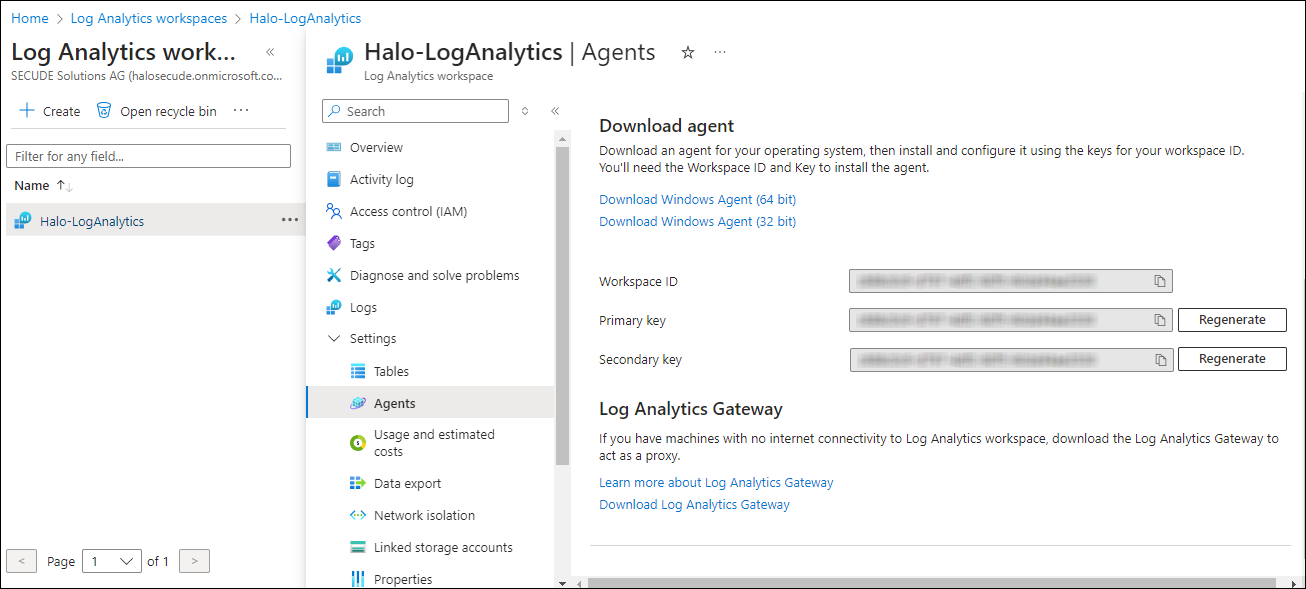
Workspace #4
-
In a text editor (such as Notepad), copy the value of the Workspace ID and Primary key and save it for configuring the “Sentinel Log” in the HaloENGINE Admin portal.