
This section describes two methods (command line and GUI) for configuring the parameters of HaloCAD and HaloENGINE.
Configuration Using Tool (GUI)
Prerequisites: Ensure that HaloCAD for Autodesk Vault is installed before proceeding.
Follow these steps to configure the settings through the GUI:
Step 1. Stop the Tomcat Service.
Use services.msc to stop the service.
Step 2. Run the HaloCAD Configuration Tool.
-
Navigate to the destination folder you specified during installation. The default folder is
C:\Program Files\Secude\HalocadVault\config. -
To run, either double-click the
HaloCAD-for-Autodesk-Vault-config-<version>.jarfile or open Command Prompt with administrative privileges and execute the following syntax.Syntax:
<pathtojar>java -jar HaloCAD-for-Autodesk-Vault-config-<version>.jar
For example:C:\Program Files\Secude\HalocadVault\config>java -jar HaloCAD-for-Autodesk-Vault-config-<version>.jar -
The HaloCAD for Autodesk Vault Config Tool window appears as shown in the figure below.
Step 2a. Enter the following details under the Autodesk Vault Configuration tab.
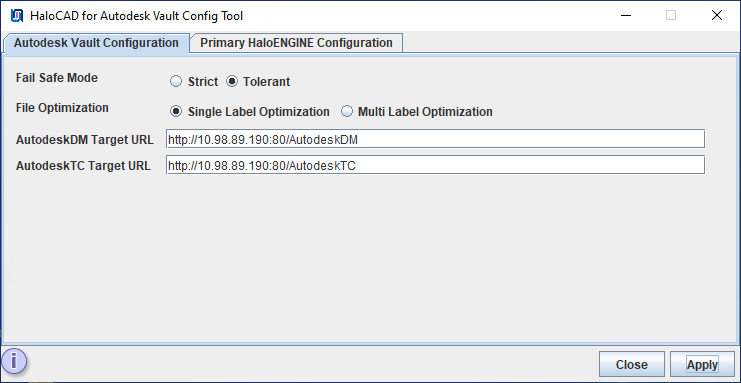
Autodesk Vault configuration tab
-
Fail-Safe Mode: The Fail-Safe Mode controls the system's behavior in case of inconsistencies that prevent the specified protection from being applied (conflicting configuration, server component unreachable, or returning an error message, etc.). You can define any one of the following:
-
Strict: The file upload or download is blocked whenever any error occurs.
-
Tolerant (default): The file upload or download will be allowed, even when an error occurs.
-
-
File Optimization: Choose one of the following options for file optimization. By default, Single Label Optimization is set.
-
Single Label Optimization: The top-level file label is considered and applied to all dependent files.
-
Multi Label Optimization: Each file type group label defined in the Classification Engine is considered and applied to the corresponding group during ASM optimization.
-
-
AutodeskDM Target URL: Enter the AutodeskDM Target URL on which your Autodesk Vault is hosted. For example,
http://10.98.89.190:80/AutodeskDM. -
AutodeskTC Target URL: Enter the AutodeskTC Target URL on which your Autodesk Vault Thin Client is installed. For example,
http://10.98.89.190:80/AutodeskTC. -
Click Apply. A red tooltip message appears if any required values are missing. Enter the missing information and click Apply to continue.
Results:-
A confirmation message dialog box appears.
-
Click OK to close the dialog box.
-
Step 2b. Enter the following information under the Primary HaloENGINE Configuration tab.
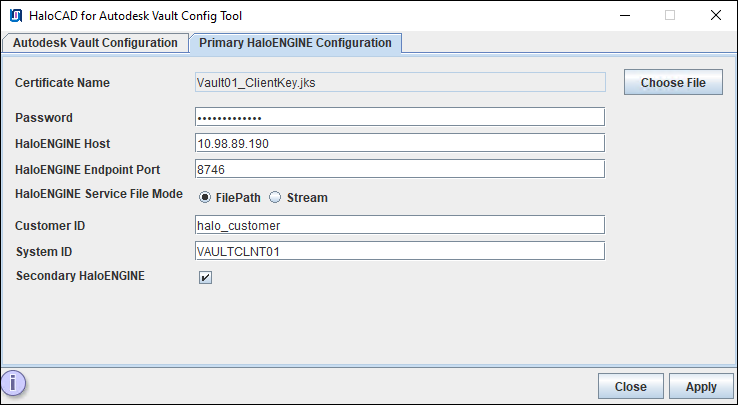
Primary HaloENGINE configuration tab
-
Certificate Name: Click Choose File to browse and select the client Keystore in JKS format, which is generated by the HaloENGINE Admin Portal (through which communication is established between the HaloENGINE and Autodesk Vault). Example,
Vault01_ClientKey.jks -
Password: Enter the password of the selected client Keystore. Example,
Key$T#123 -
HaloENGINE Host: Enter the IP address/FQDN of HaloENGINE. Example,
10.98.89.190 -
HaloENGINE Endpoint Port: Enter the endpoint port from which HaloENGINE can be accessed. For example,
8746 -
HaloENGINE Service File Mode: Select the file transmission method.
-
FilePath (default): File stored in a local temporary location for the encryption and decryption process. Here, file path information is used for transferring.
-
Stream: File as a sequence of bytes.
-
-
Customer ID: Enter the Customer ID that has been assigned in the Admin Portal. For example,
halo_customer. -
System ID: Enter the Autodesk Vault Server’s hostname, and the same must be entered in the System Unique ID (HaloENGINE admin portal). For example,
VAULTCLNT01. -
Secondary HaloENGINE: If you want to set up a failover mechanism in your environment, select this check box. HaloCAD supports connection failover between two HaloENGINEs. For more information, please refer to the section “Failover Mechanism for HaloENGINE in HaloCAD for PLM”.
-
Click Apply. A red tooltip message appears if any required values are missing. Enter the missing information and click Apply to continue.
Results:
-
A confirmation message dialog box appears.
-
Click OK to close the dialog box.
-
After successful configuration, the configuration tool will create a
config.propertiesfile inC:\Program Files\Secude\HalocadVault\config. -
If you have selected the Secondary HaloENGINE option, you can notice that the Secondary HaloENGINE Configuration tab has been added to the configuration tool, as shown in Step 2c below.
-
Step 2c. Enter the following information under the Secondary HaloENGINE Configuration tab.
You can skip this step if you haven't chosen the Secondary HaloENGINE option. This step is only necessary if you want to use the failover mechanism.
Prerequisite: Ensure that the secondary HaloENGINE uses the same configuration profiles and rules as the primary HaloENGINE. Thus, when the primary HaloENGINE fails, the secondary HaloENGINE immediately takes over, assuring continuous operation.
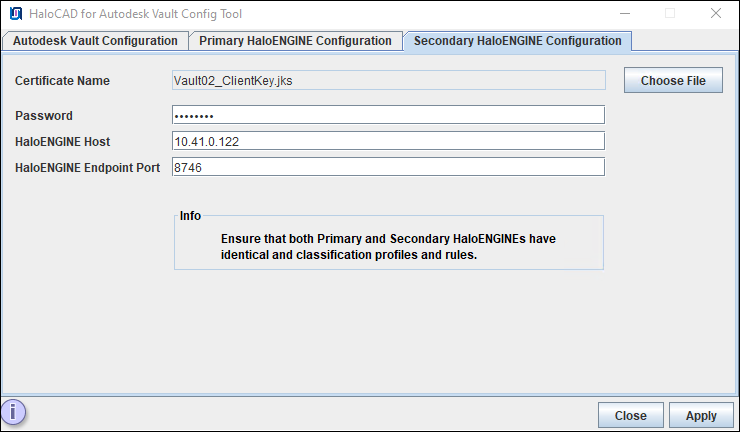
Secondary HaloENGINE configuration tab
-
Certificate Name: Click Choose File to browse and select the client Keystore in JKS format, generated by the HaloENGINE Admin Portal [through which communication is established between HaloENGINE (secondary) and Autodesk Vault]. For example,
Vault02_ClientKey.jks -
Password: Enter the password of the selected client Keystore. For example,
Key$T#1234 -
HaloENGINE Host: Enter the IP address/FQDN of HaloENGINE. For example,
10.41.0.122. -
HaloENGINE Endpoint Port: Enter the endpoint port from which HaloENGINE can be accessed. For example,
8746 -
Click Apply. A red tooltip message appears if any required values are missing. Enter the missing information and click Apply to continue.
Results:
-
A confirmation message dialog box appears.
-
Click OK to close the dialog box.
-
Step 3. Start the Tomcat Service.
Configuration Using the Command Line
This is an alternative method of configuring the HaloCAD and HaloENGINE parameters using the command line.
Prerequisite: Ensure that HaloCAD for Autodesk Vault has been installed.
Follow the command-line instructions. A sample is provided below:
-
Open a command prompt and navigate to the destination folder, type
java -jar HaloCAD-for-Autodesk-Vault-config-<version>.jar -shell, and press Enter.C:\Program Files\Secude\HalocadVault\config>Java -jar HaloCAD-for-Autodesk-Vault-config-<version>.jar -shell -------------------------------------------------------------------------------- HaloCAD for Autodesk Vault Config Path: C:\Program Files\Secude\HalocadVault\config 1. Autodesk Vault Configuration 2. Primary HaloENGINE Configuration 0. Exit Note: If an invalid value is entered, the default value will be applied. Please choose an option:1 -------------------------------------------------------------------------------- Autodesk Vault Configuration -------------------------------------------------------------------------------- Fail Safe Mode: (Default:Tolerant) : 1. Tolerant 2. Strict Please choose an option: 1 File Optimization: (Default:Single Label Optimization) 1. Multi Label Optimization 2. Single Label Optimization Please choose an option: 1 Enter the AutodeskDM Target URL :http://10.98.89.190:80/AutodeskDM Enter the AutodeskTC Target URL :http://10.98.89.190:80/AutodeskTC Saved Successfully. -------------------------------------------------------------------------------- Autodesk Vault Configuration Fail Safe Mode :Tolerant File Optimization :Multi Label Optimization AutodeskDM Target URL :http://10.98.89.190:80/AutodeskDM AutodeskTC Target URL :http://10.98.89.190:80/AutodeskTC 1. Modify all configuration 2. Modify the particular configuration 3. Back to main menu 0. Exit Please choose an option: 3 -------------------------------------------------------------------------------- 1. Autodesk Vault Configuration 2. Primary HaloENGINE Configuration 0. Exit Note: If an invalid value is entered, the default value will be applied. Please choose an option:2 -------------------------------------------------------------------------------- Primary HaloENGINE Configuration Certificate Name : HaloENGINE Host IP : HaloENGINE Endpoint Port : HaloENGINE Service Mode :Local HaloENGINE Service File Mode:File Path Customer ID :halo_customer System ID : Secondary HaloENGINE :Disable Secondary HaloENGINE 1. Modify all configuration 2. Modify the particular configuration 3. Back to main menu 0. Exit Please choose an option: 1 -------------------------------------------------------------------------------- Primary HaloENGINE Configuration Enter the Primary Certificate Path: C:\Users\Administrator\Desktop\Certs\Vault01_ClientKey.jks Enter the Primary certificate Password: Enter the Primary HaloENGINE Host:10.98.89.190 Enter the Primary HaloENGINE Endpoint Port(Default:8746) :8746 Enter the Customer ID:halo_customer Enter the System ID:VAULTCLNT01 Secondary HaloENGINE: (Default:Disable Secondary HaloENGINE) 1. Disable Secondary HaloENGINE 2. Enable Secondary HaloENGINE Please choose an option: 1 Saved Successfully. -------------------------------------------------------------------------------- Primary HaloENGINE Configuration Certificate Name :Vault01_ClientKey.jks HaloENGINE Host IP :10.98.89.190 HaloENGINE Endpoint Port :8746 HaloENGINE Service Mode :Local HaloENGINE Service File Mode:File Path Customer ID :halo_customer System ID :VAULTCLNT01 Secondary HaloENGINE :Disable Secondary HaloENGINE 1. Modify all configuration 2. Modify the particular configuration 3. Back to main menu 0. Exit Please choose an option: -
Click Close to close the command prompt.