This chapter explains the requirements, prerequisites, and how to install HaloCAD for Windchill.
System Requirements
The following system requirements table specifies the minimum and recommended technical specifications, such as software and network resources, necessary to run the product.
|
Components |
Details |
|---|---|
|
Supported Operating Systems |
Windows Server 2022 and above with updates installed. |
|
Supported file types |
|
|
Office 365 Subscription |
Refer to the Technical Reference Manual for details on TLS 1.2 and application registration. |
|
Others |
Install HaloENGINE and HaloCAD for PLM separately on Windows servers. |
Requirements
Prerequisites
The following preparatory steps or conditions must be met before installing the product.
-
Make sure you have administrative access to install the HaloCAD component.
-
Make sure the client computer running the HaloCAD Add-on for Creo can connect to the Windchill Server.
-
If you download your files from a Replication Server, install HaloCAD for Windchill on the Replication Server.
-
If you want to use custom attributes as metadata while protecting, make sure the Type and Attribute Management Utility page is configured.
-
Make sure your HaloENGINE complies with the requirements listed below:
-
License file (enabled with WINDCHILL system type).
-
Proper action rules
-
Client certificate (
.JKS)
-
-
Make sure that
PATHis added to the System variable to run the HaloCAD Configuration Tool:
For example,PATH=C:\WINDOWS\system32;C:\WINDOWS;C:\Program Files\Java\jdk1.8.0_241\bin -
In a Windchill setup with Single Sign On (SSO) implemented on the master/main server and a replica server connected to it, HaloCAD has a limitation when obtaining metadata from the replica server using SSO-based authentication. In this case, we recommend that you enable split authentication for the HaloCAD rest endpoint. Please refer to the section “Enabling Split Authentication” and for more information, see PTC Knowledge Base Article CS291543.
-
If you want to implement a failover mechanism in HaloENGINE, please refer to the section “Failover Mechanism for HaloENGINE in HaloCAD for PLM”.
-
Ensure that both HaloCAD for Windchill and HaloENGINE are installed using the same Azure tenant details. A mismatch in the tenant details will result in configuration errors.
-
Ensure that the previously installed HaloENGINE Service is completely uninstalled.
Conditions for Running the HaloENGINE Tomcat Service
Before you begin, make sure that the following prerequisites are met in your system:
Deny log on as a service policy
If the service is running under a specific user or a specific group, ensure that the user is not restricted by the Deny log on as a service policy (Local Security Policy > Security Settings > Local Policies > User Rights Assignment). If the user(s) exist, the “Error 1069: The Service did not start due to a logon failure” message appears while running the HaloENGINE Tomcat service.
Allow non-admin users to access a private key (without full admin rights)
During installation, the HaloENGINE gets the required Azure tenant details and certificate thumbprint. When the HaloENGINE Tomcat service starts, it tries to connect to the MPIP services using the details entered during installation. As part of this process, it validates the certificate thumbprint against the certificate installed in the Local Computer certificate store. The thumbprint entered in the installation wizard must match the one available in the Local Computer certificate store.
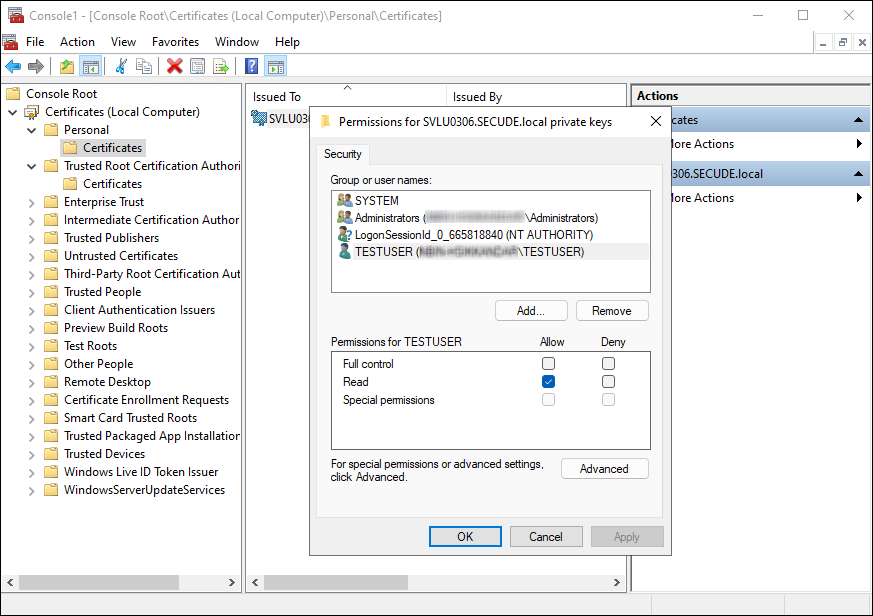
If the service runs under a non-administrative user account, the user may not have sufficient permissions to access the certificate’s private keys when the certificate is installed in the Local Computer store. This restriction prevents successful authentication with MPIP services. To resolve this issue, grant the user Read permission to access the certificate’s private key by following the steps listed below.
Any errors encountered during this process are recorded in the log file. If the verification succeeds, the service proceeds with initialization.
Prerequisites
-
The required certificates (machine certificate, root CA, and intermediate CA) are already installed.
-
The private key is stored in the Windows Certificate Store under Local Computer.
-
You have administrative rights to perform the setup.
Follow the procedure below to grant read access:
-
Open Certificate Manager as Administrator.
-
Press Win + R, type mmc, and press Enter.
-
In the console, go to File and select Add/Remove Snap-in.
-
Select Certificates from the list and click Add.
-
Choose the Computer account, then click Next, followed by Finish, and then OK.
-
In the left panel, expand Certificates (Local Computer), expand Personal, and select Certificates.
-
Identify the certificate that contains the private key.
-
Right-click the certificate, select All Tasks, and then select Manage Private Keys.
-
In the Permissions window, click Add and enter the non-admin username (for example, TESTIL) and click OK.
-
Select the Read permission, click Apply, and then click OK.

Granting private key access to a non-admin user
