
Introduction
Companies across industries, such as automotive, aviation, and high tech, create and manage their intellectual property (IP) based on drawings. These drawings are created digitally using computer-aided design (CAD) applications and are shared with users outside the organization owing to business considerations. It's essential to understand the potential risks associated with sharing business information. Comprehensive security measures are essential to reducing risks and safeguarding sensitive data. HaloCAD, a purpose-built data protection solution, is designed to help organizations achieve this objective effectively.
How does HaloCAD protect your Data?
HaloCAD effortlessly integrates Microsoft Purview Information Protection (MPIP), formerly known as Microsoft Information Protection (MIP), the leading technology for Enterprise Digital Rights Management (EDRM). It acts as a shield for your CAD files by automatically labeling them with MPIP and manages data assets across your environment. HaloCAD modules can be used either in standalone mode or in combination with HaloCAD for PLM, which automatically protects file downloads, decrypts files during upload, and returns them to the PLM vault.
HaloCAD Add-on for CAD applications
About this Manual
This manual provides administrators with the information required to successfully deploy HaloCAD components. It explains how to set up the HaloCAD environment, describes the overall architecture, lists the prerequisites and system requirements for each component, and offers step-by-step guidance for installation and configuration. The manual covers the HaloCAD Add-on for CAD, the HaloCAD Reader Add-on for CAD, and HaloCAD for PLM and PDM, along with detailed explanations to ensure smooth implementation and usage.
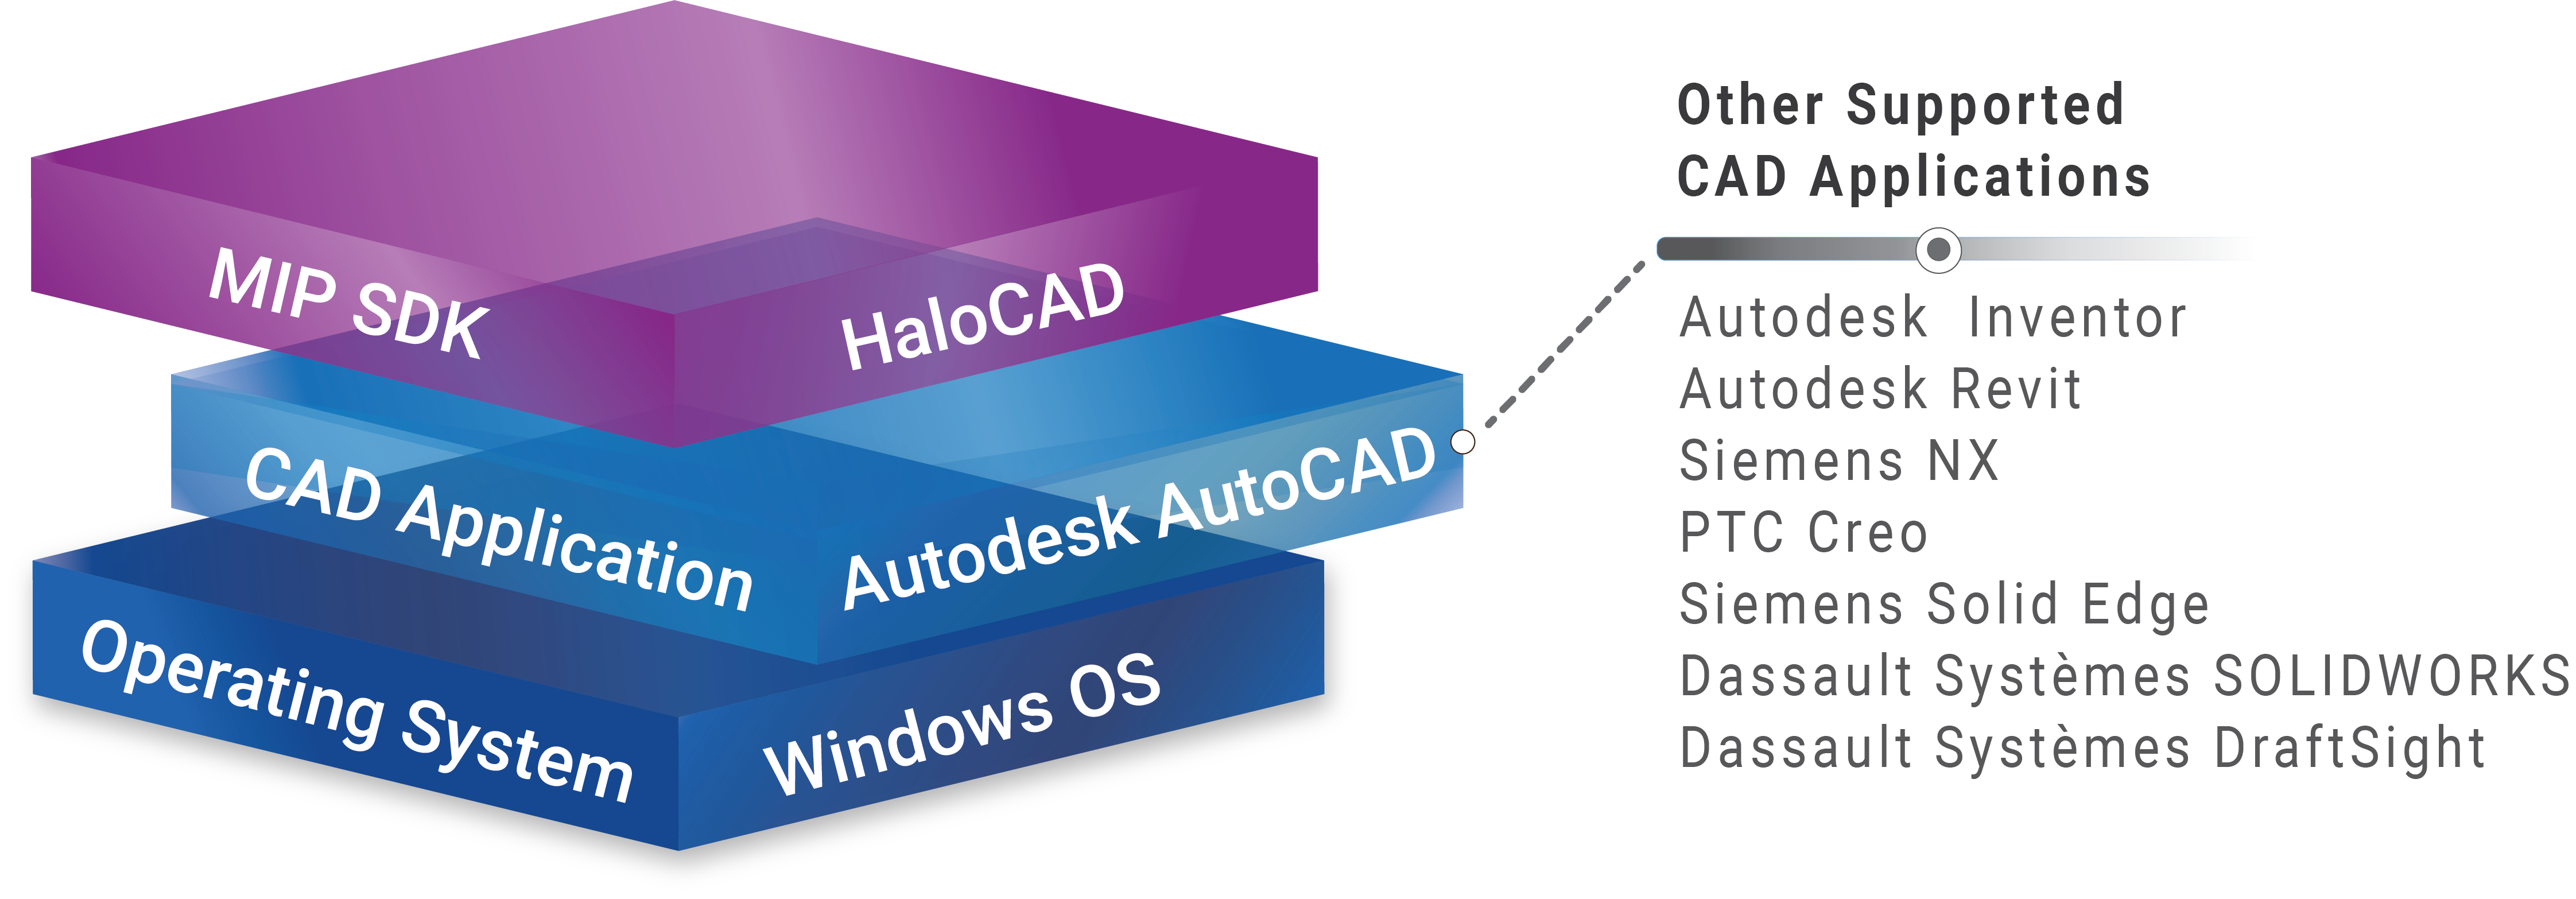
The term HaloCAD Add-on for CAD is a generic reference to supported CAD applications such as AutoCAD, Inventor, Revit, Creo, Solid Edge, NX, SOLIDWORKS, and DraftSight. Wherever this term appears in the manual, it refers to these supported CAD applications.
This is the primary document that administrators should read before installing the HaloCAD components. After completing this, proceed with the installation and operations manuals.
Features
-
Business infrastructure: HaloCAD connects effortlessly with existing infrastructure, making it simple to use and manage.
-
CAD: HaloCAD add-on seamlessly extends MPIP security to CAD files.
-
Usage rights: Both template-based (or static) labels and user-defined (custom permissions) labels are integrated for seamless protection.
-
Data security: Sensitive information is protected persistently regardless of where it is moved, including mobile and cloud platforms.
-
Data Access and Usage: Policy enforcement for managing sensitive file access and usage.
-
Policies specify who has access to sensitive files and what actions they can do with them.
-
Furthermore, it specifies how data may be used, such as restrictions on viewing, editing, copying, printing, exporting, relabeling, or modifying the rights. Watermarks can be applied to documents that contain sensitive information.
-
-
Seamless integration with PLM: Automatically protects file downloads, decrypts files during upload, and returns them to the PLM vault.
Quick Start Installation Summary - Standalone HaloCAD Add-on
The image below illustrates the high-level process of setting up the HaloCAD Add-on for CAD.
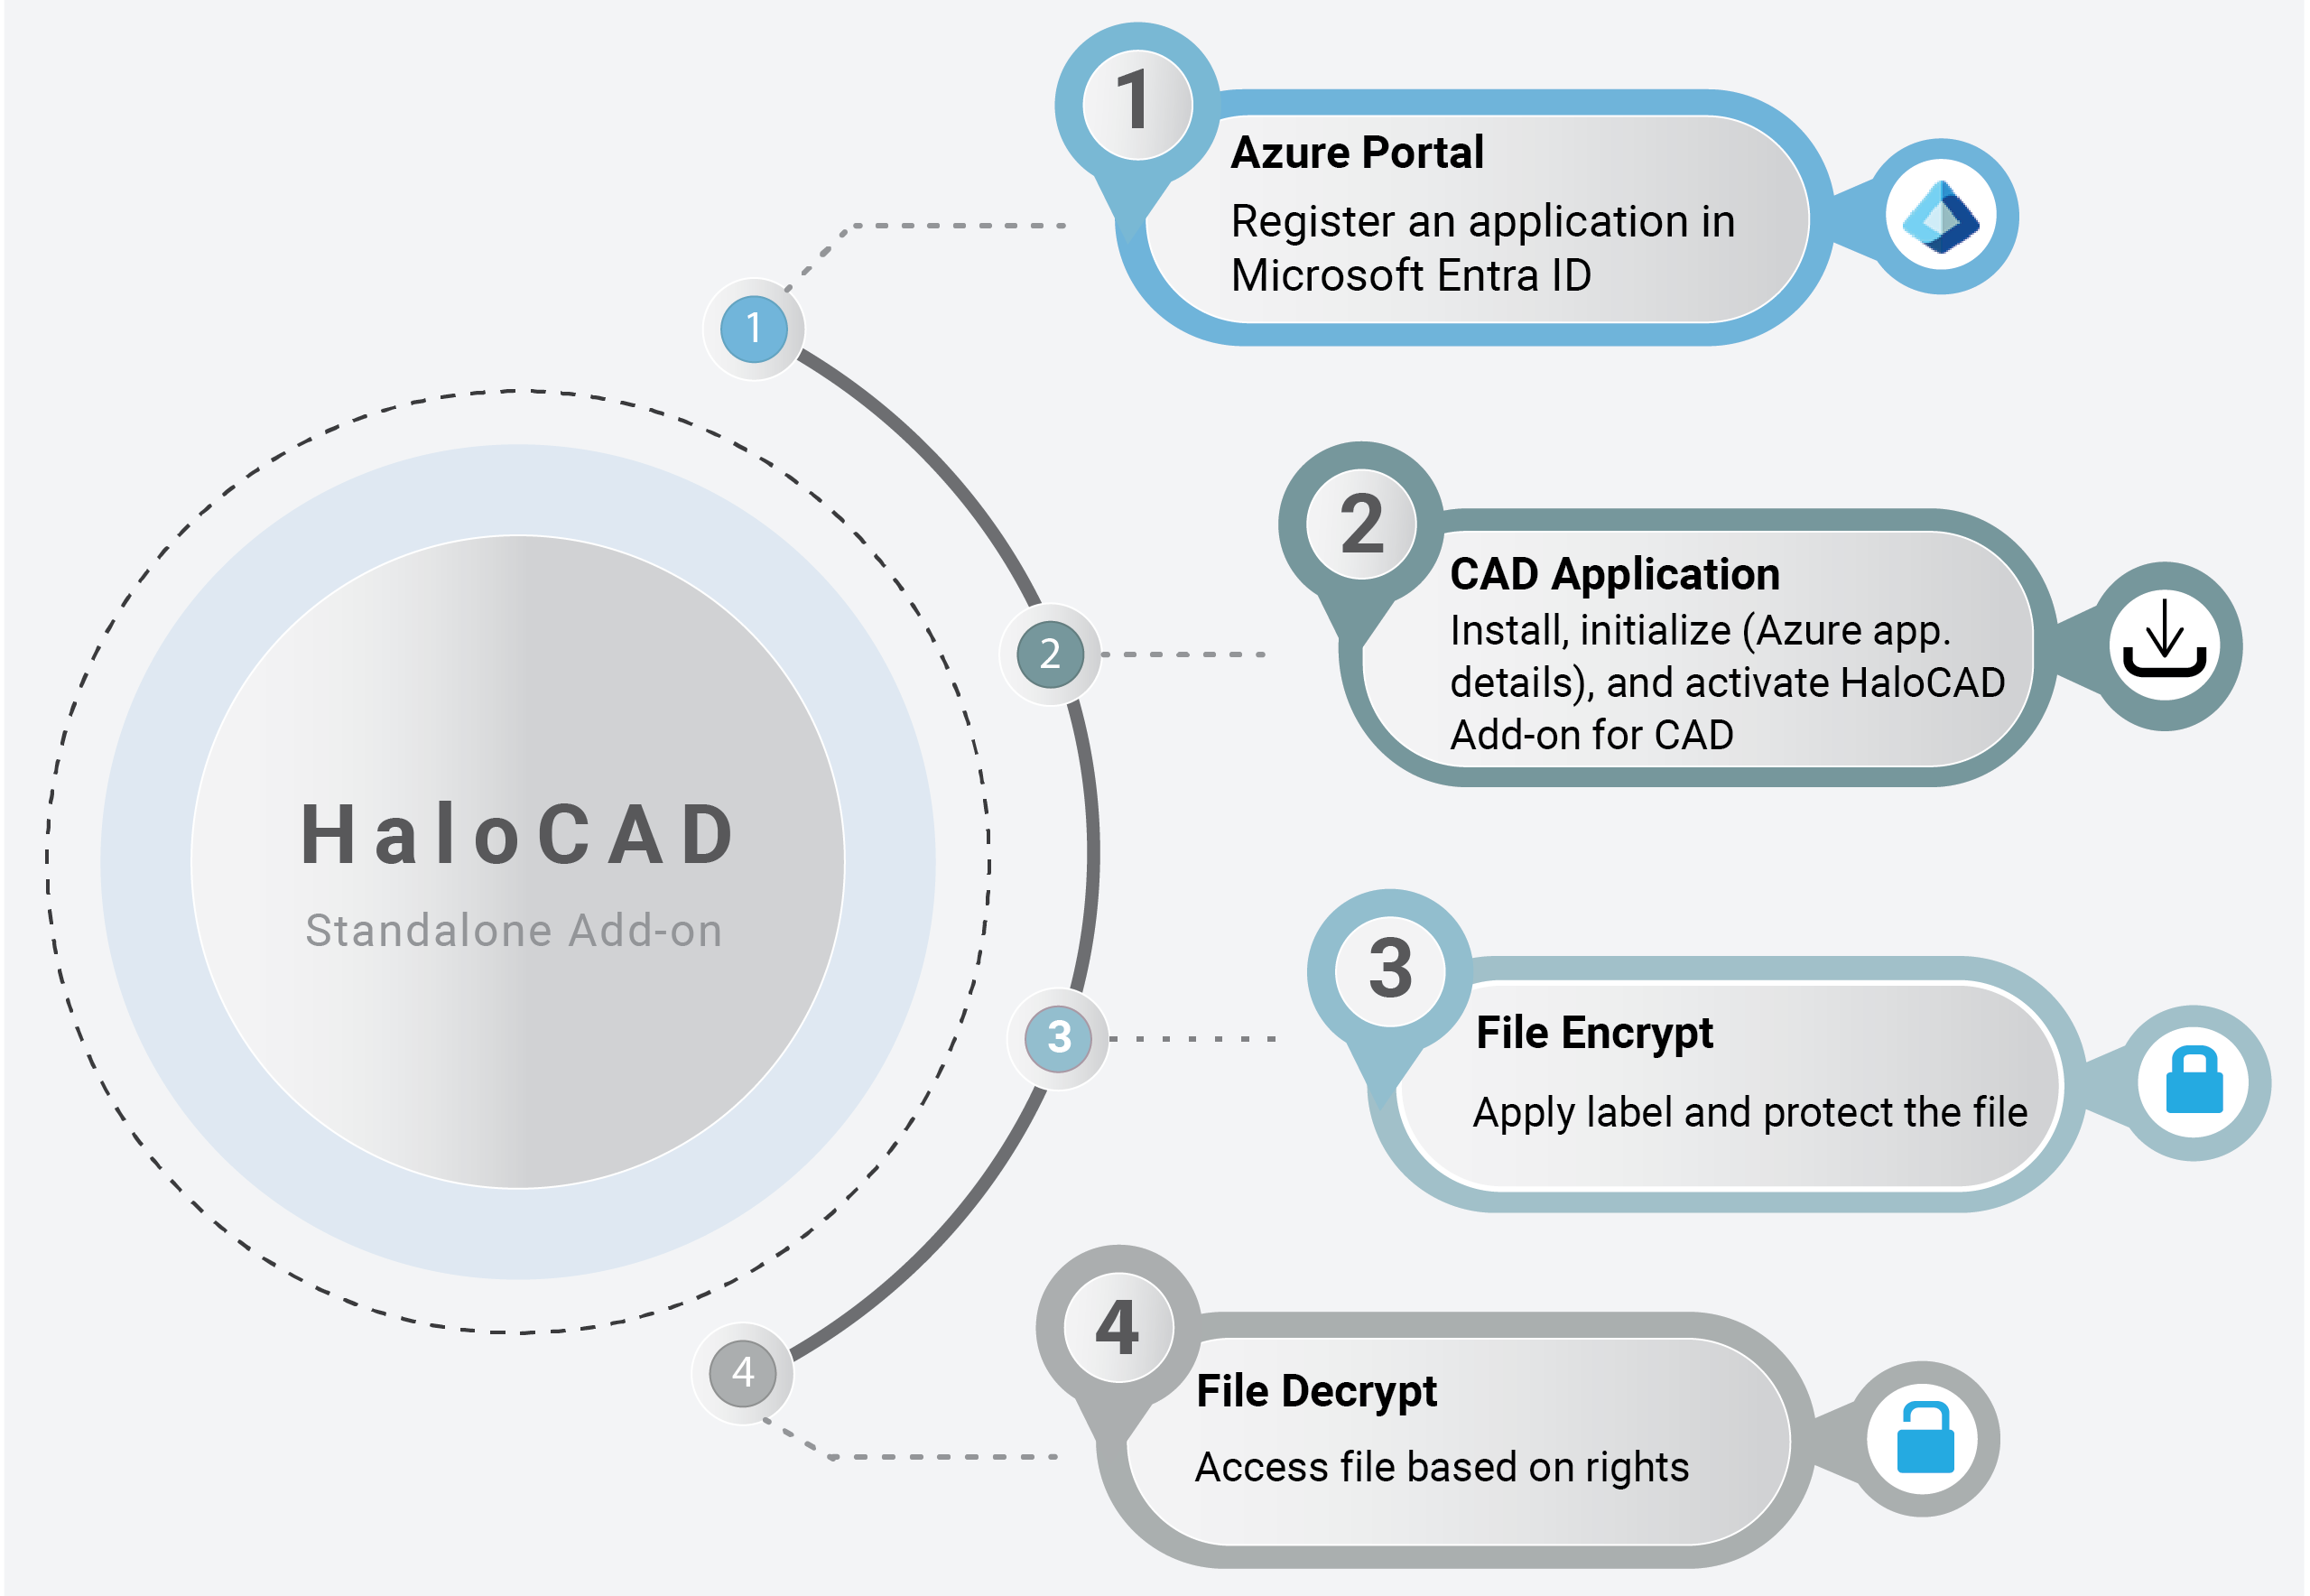
Quick start installation steps for HaloCAD Standalone Add-on
Reference Manuals
The table below describes where to obtain information in the HaloCAD documentation set.
|
For information on |
Name of the Reference |
|---|---|
|
Please refer to the current manual.
|
|
HaloCAD Installation Options – UI, Silent, and SCCM |
Refer to the Installation Manual for the add-on you purchased. |
|
HaloCAD features, operations, and troubleshooting, if you face any issues |
Refer to the Operations Manual for the add-on you purchased. |
|
Overview of new features, resolved issues, known issues, and supported file types |
Refer to the Release Notes for the add-on you purchased. |
HaloCAD standalone add-on reference documentation
Quick Start Installation Summary - Integrated with PLM/PDM
The image below illustrates the high-level process of setting up the HaloCAD Add-on for CAD with HaloCAD for PLM/PDM environment.
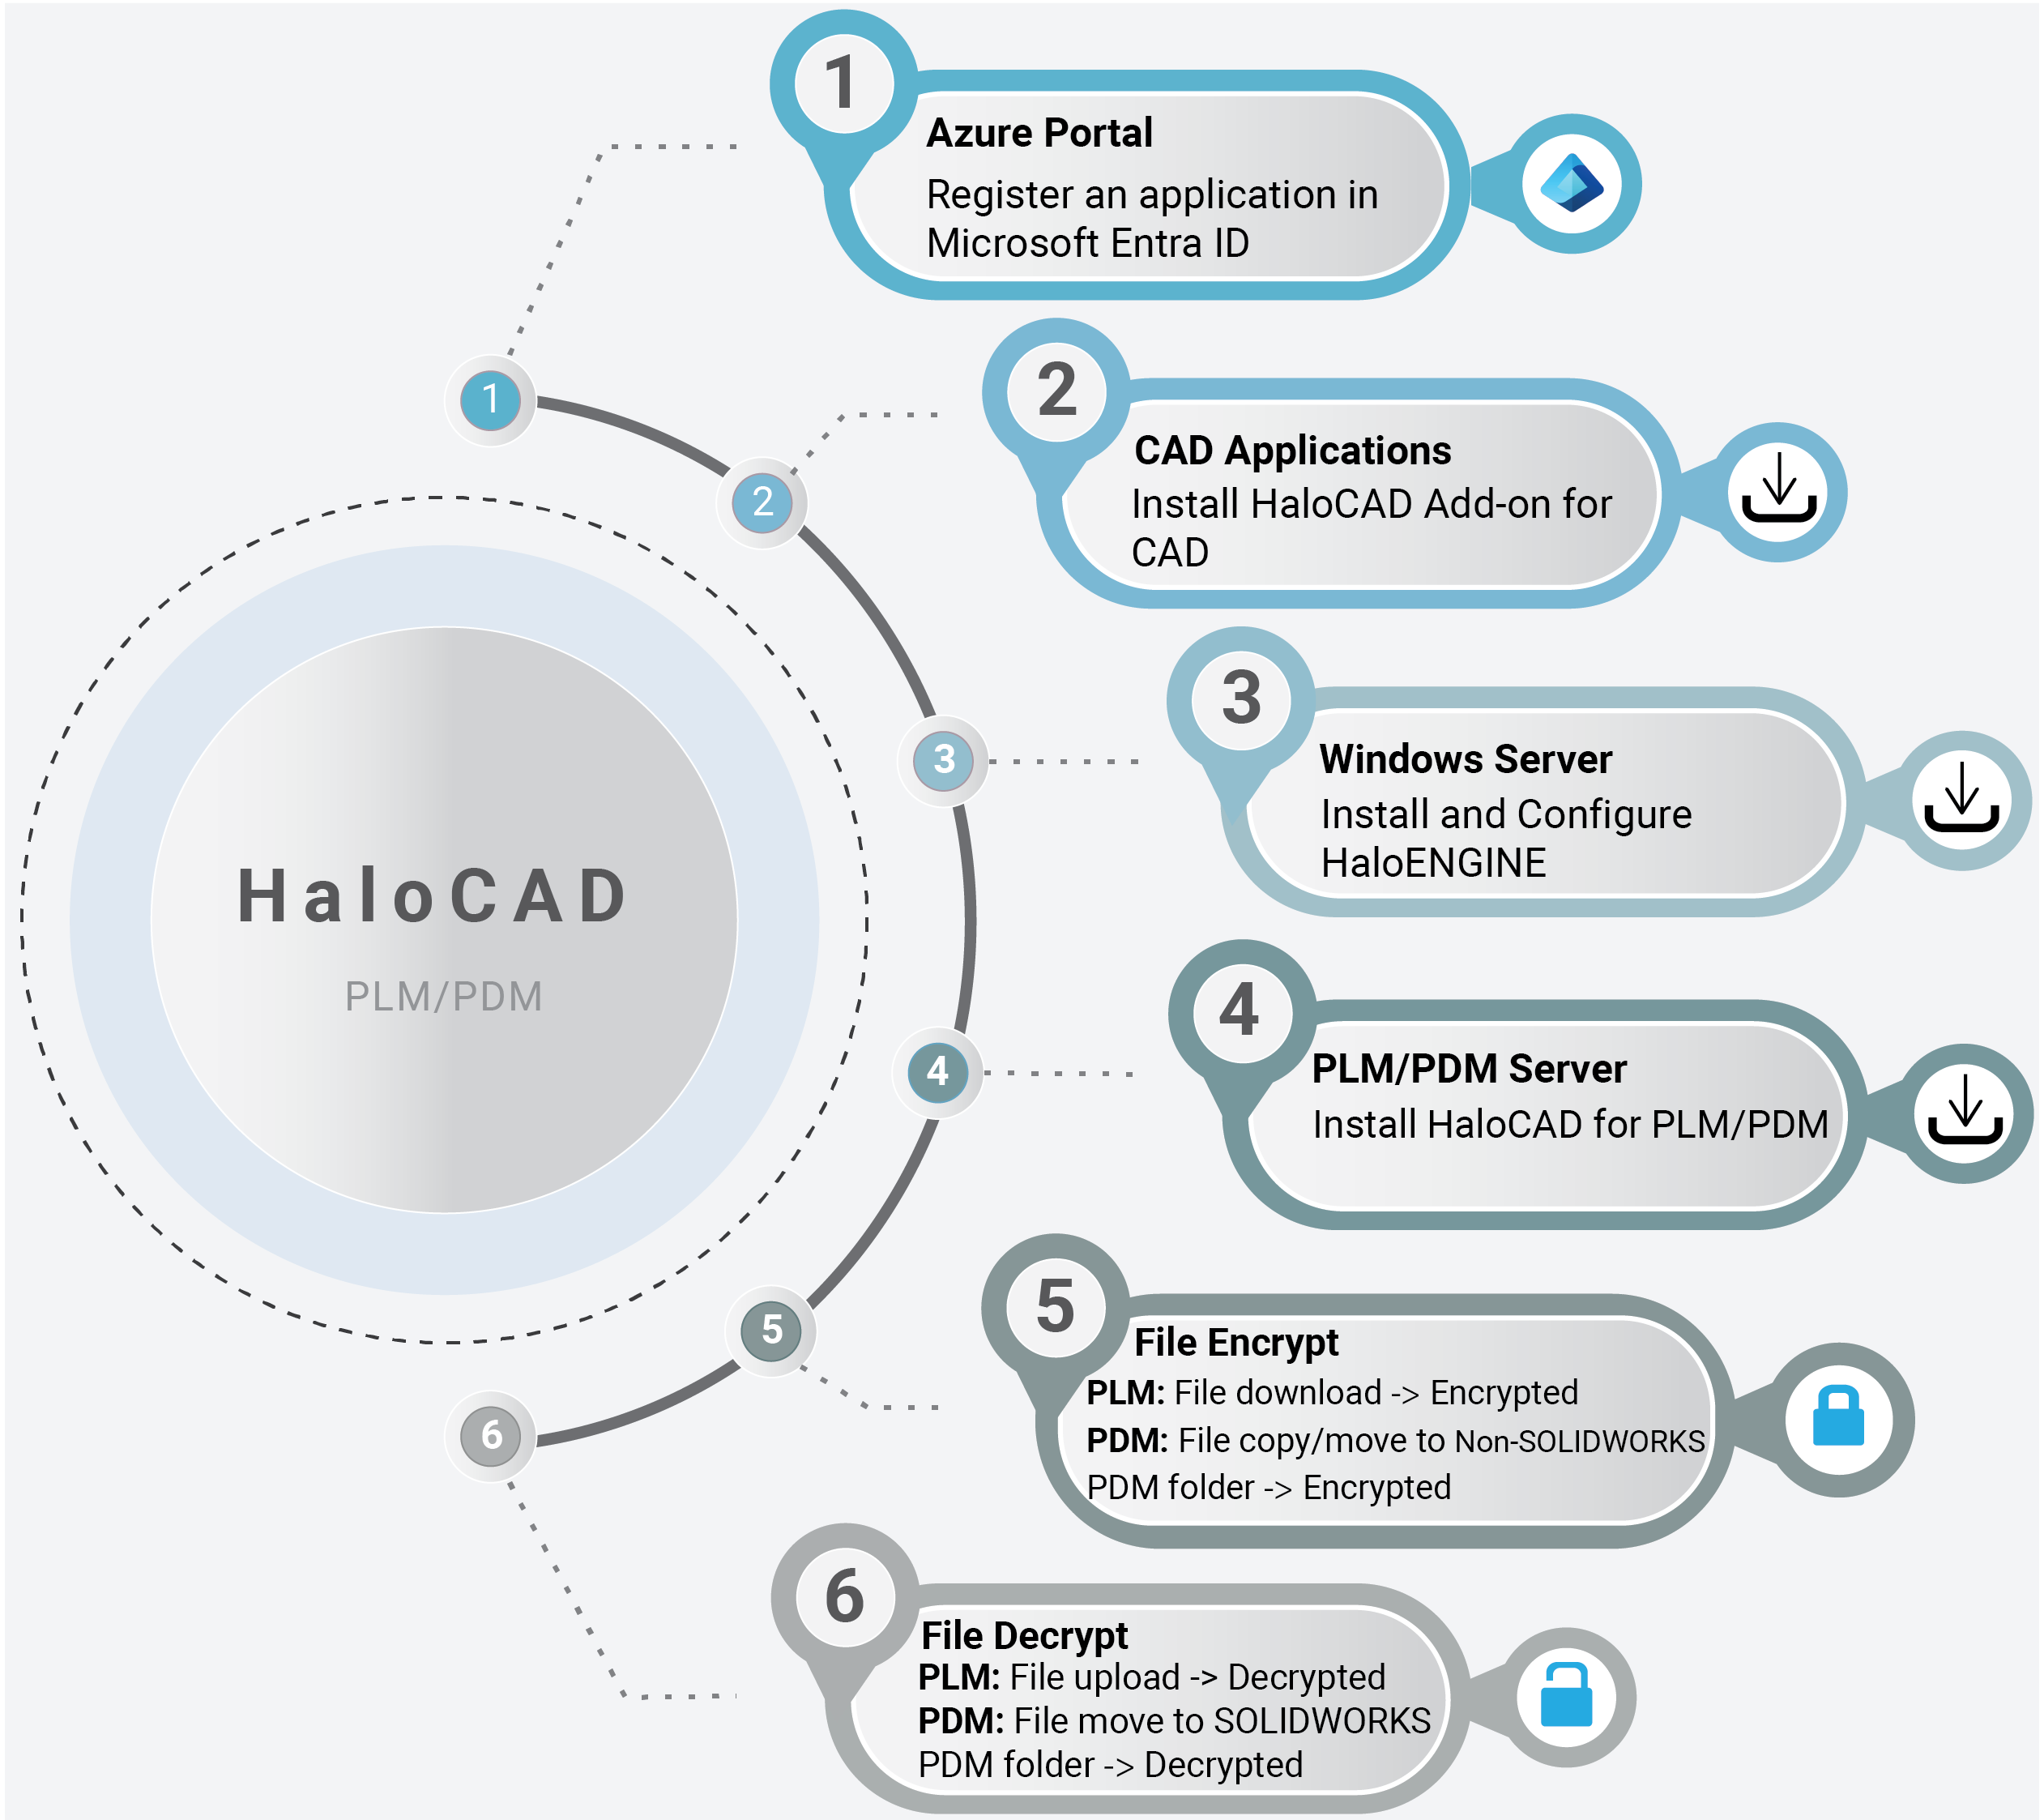
Quick start installation steps for HaloCAD for PLM/PDM
Reference Manuals
The table below describes where to obtain information in the HaloCAD documentation set.
|
For information on |
Name of the Reference |
|---|---|
|
Step 1 – Registering an Application in Entra ID. |
Please refer to the current manual. |
|
Step 2 – How to install HaloCAD Add-on for CAD. |
Refer to the Installation Manual for the add-on you purchased. |
|
Step 3 – How to install HaloENGINE. |
|
|
Step 4 – How to install HaloCAD for PLM/PDM. |
Refer to the Installation Manual for the HaloCAD for PLM/PDM you purchased. |
|
Step 5 and Step 6 – Workflow illustrating protection and decryption |
Refer to the Operations Manual for the HaloCAD for PLM/PDM you purchased. |
HaloCAD for PLM/PDM reference documentation
About the Term “HaloENGINE Tomcat Service”
The HaloENGINE Tomcat Service is a common component used in both the HaloENGINE and HaloCAD products. Since it was initially developed for HaloENGINE and later adopted across HaloCAD, all Tomcat instances in Secude appear under the name “HaloENGINE Tomcat Service.”
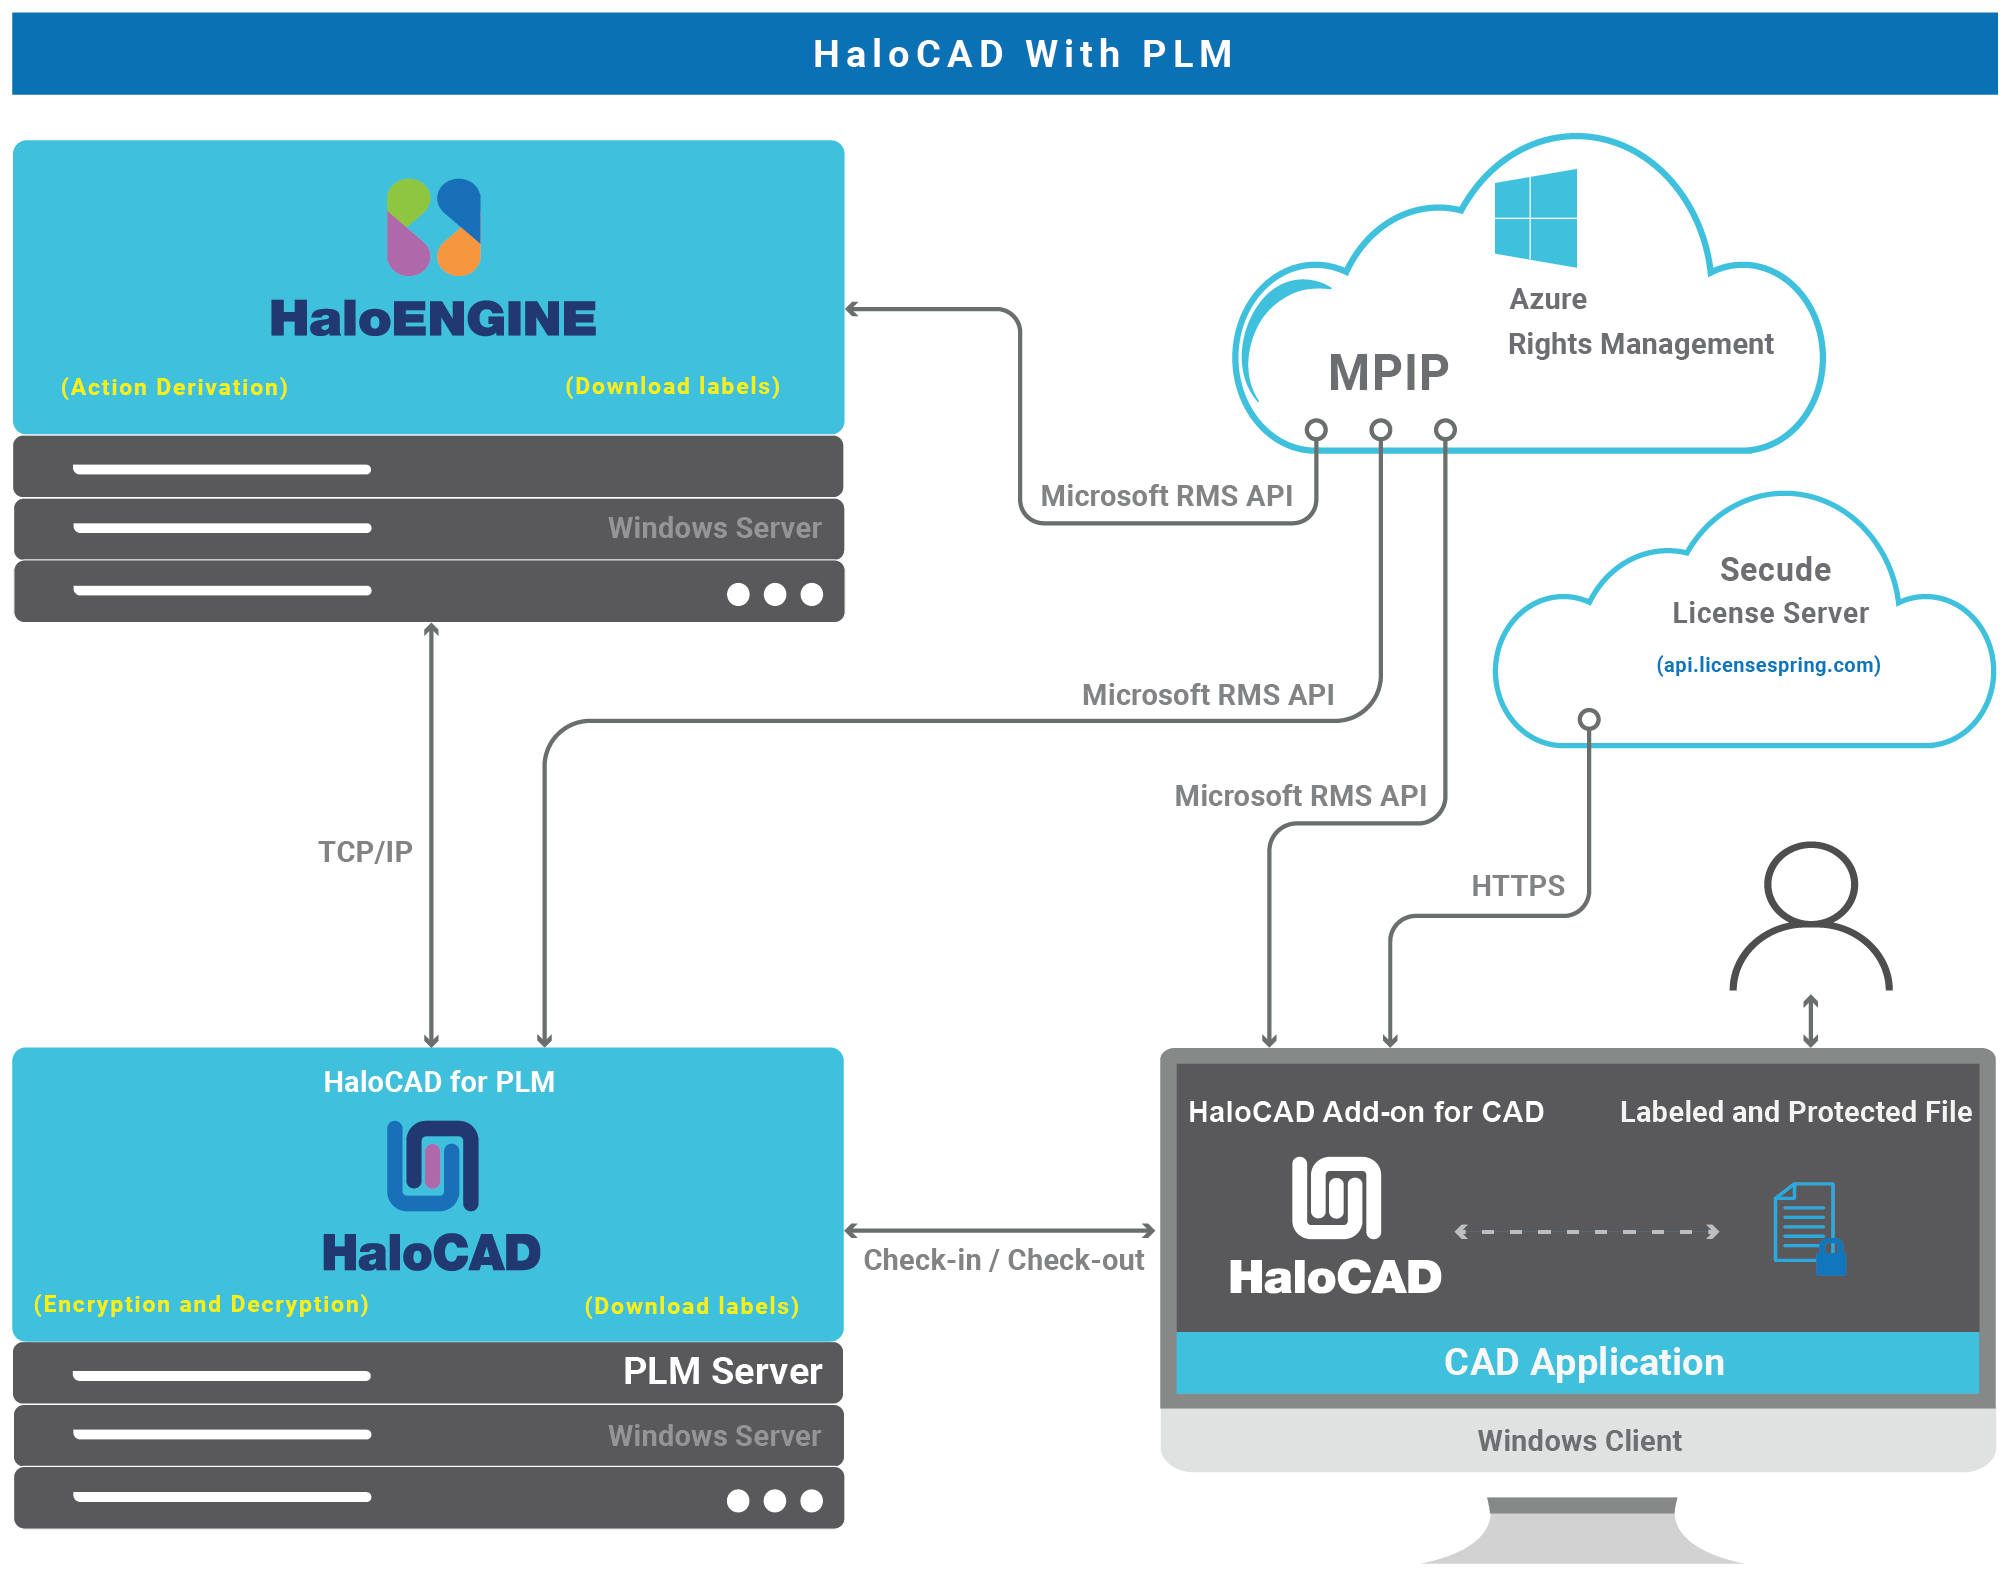
HaloCAD Architecture
The architecture is designed to provide secure and efficient management of CAD and PLM data through three core components: HaloCAD Add-on for CAD, HaloCAD for PLM, and the HaloENGINE.
HaloCAD Add-on for CAD
A standalone solution that contains the HaloCAD PROTECT feature. It enables access to protected files, enforces associated privileges, and allows controlled modification of MPIP labels via direct interaction with the user.
HaloCAD Add-on for CAD leverages the Microsoft Purview Information Protection solution to provide persistent document security. During the process of creating a new CAD file, the user downloads MPIP labels using valid credentials, selects a suitable label, and applies it to the file. In the standalone add-on, no automation is available, as setting labels is done manually. Protected files can only be opened and modified by authorized users, and thus, protection remains even when multiple users access the file. The user’s rights are governed by pre-established policies. The following figure shows the HaloCAD Add-on for CAD as a standalone add-on.
Note: When HaloCAD (standalone add-on) is integrated with HaloCAD for PLM, files are automatically protected based on predefined rules before the end user can access them. Please refer to the paragraph below.
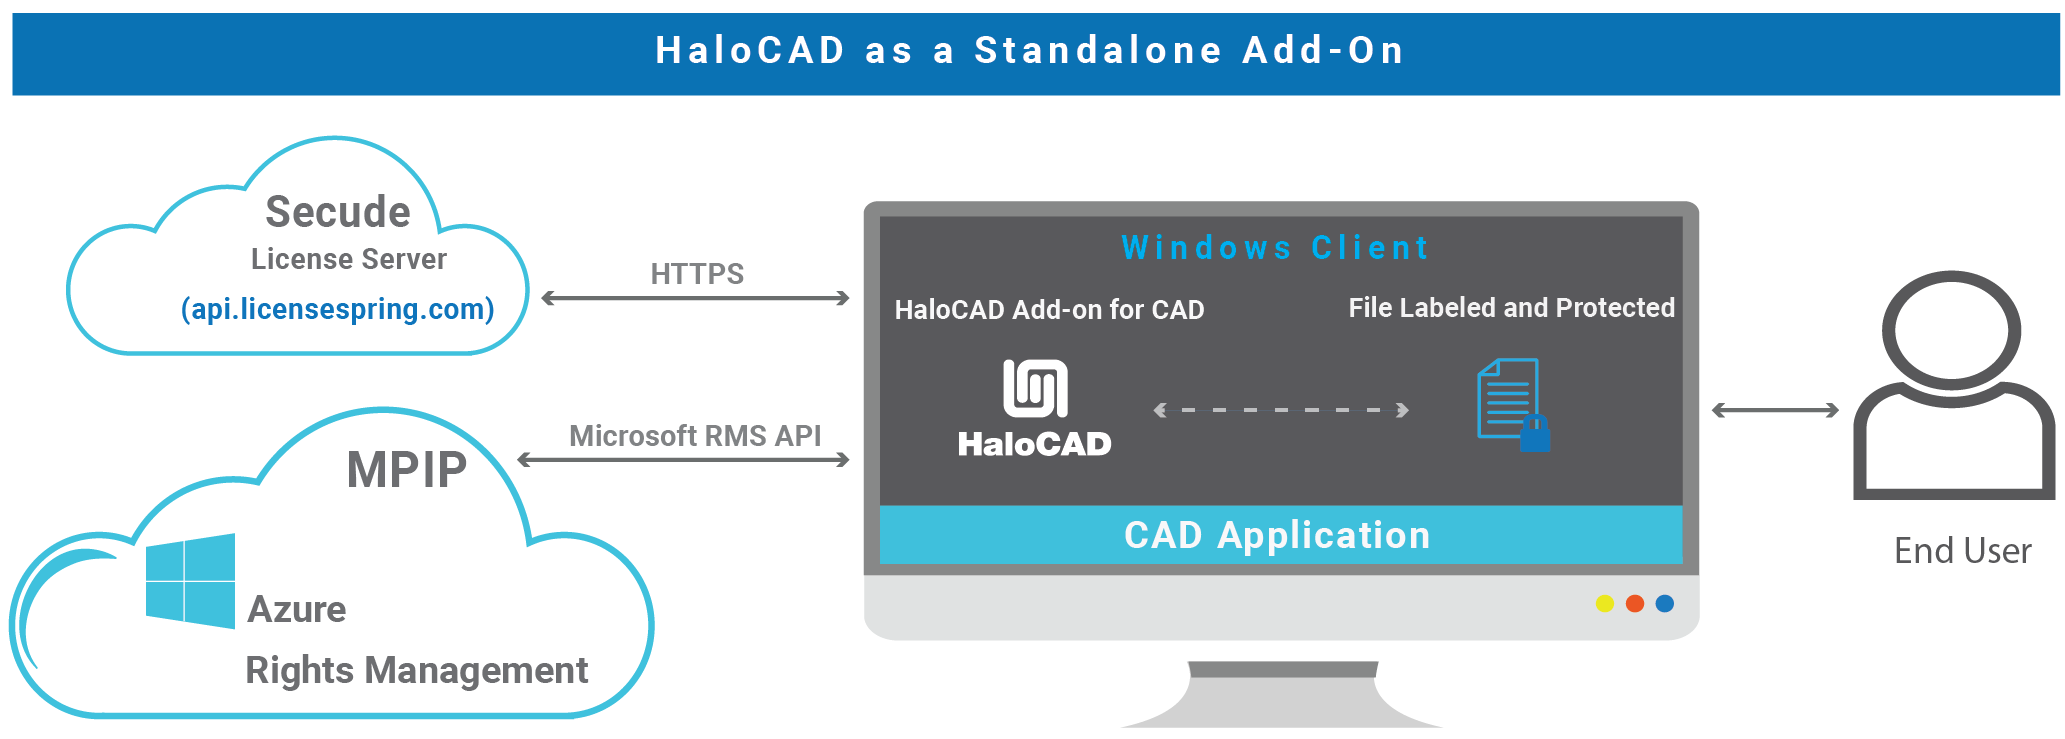
HaloCAD as a standalone add-on
HaloCAD for PLM
HaloCAD for PLM (HaloCAD for Teamcenter, HaloCAD for Windchill, and HaloCAD for Autodesk Vault)
This solution integrates seamlessly with the PLM application, including the features of HaloCAD PROTECT and HaloCAD MONITOR, while utilizing Microsoft Purview Information Protection (MPIP), formerly Microsoft Information Protection (MIP), to provide Enterprise Digital Rights Management (EDRM) capabilities.
HaloCAD for PLM operates continuously in the background, monitoring file uploads and downloads. It connects to Azure Rights Management (Azure RMS) to download sensitivity labels and handle file encryption and decryption.
During a file upload, it checks whether the file is already encrypted and, if so, automatically decrypts it before allowing it to be checked into the PLM Vault. Similarly, whenever a file is downloaded, HaloCAD for PLM automatically enforces protection according to defined action rules, ensuring that all file operations adhere to security rules and keep data safe. It operates independently during the file check-in or upload process. However, during file check-out or download, it depends on the rules defined in the Classification Engine.
HaloCAD for PLM
Separate Installation Requirement
Ensure that HaloENGINE and HaloCAD for PLM are installed and configured separately on Windows servers.
HaloENGINE—The core of the architecture is HaloENGINE, a Java-based classification engine responsible for implementing business logic. It integrates with Azure Rights Management (Azure RMS) to download sensitivity labels and make them available for configuration. HaloENGINE uses metadata to classify and organize data while enforcing classification schemas and action rules. All file downloads must comply with the rules defined in this engine, making it the central component of the architecture.
During file download, HaloENGINE receives relevant metadata from HaloCAD for PLM, determines the appropriate action based on the configured rules, and forwards the label and action information to HaloCAD for PLM for file processing (encryption).
HaloCAD for PDM (HaloCAD for SOLIDWORKS PDM)
This solution integrates HaloCAD PROTECT and MONITOR capabilities with the respective PDM application. It connects to Azure Rights Management (Azure RMS) to download sensitivity labels and handle file encryption and decryption.
SOLIDWORKS PDM folders are actively monitored to ensure file security and compliance. When files are cut or copied from a SOLIDWORKS PDM folder to a non-SOLIDWORKS PDM folder, they are automatically intercepted and protected before reaching the destination. Conversely, when previously encrypted SOLIDWORKS application files or PDF files are copied or moved into a SOLIDWORKS PDM folder, they are seamlessly decrypted and saved for use within the environment.
HaloENGINE—A Java-based classification engine that implements business logic. As described in HaloCAD for PLM, it provides similar functionality when integrated with PDM.
It integrates with Azure Rights Management (Azure RMS) to download sensitivity labels and make them available for configuration. HaloENGINE uses metadata to classify and organize data while enforcing classification schemas and action rules. All file copy/move must comply with the rules defined in this engine, making it the central component of the architecture.
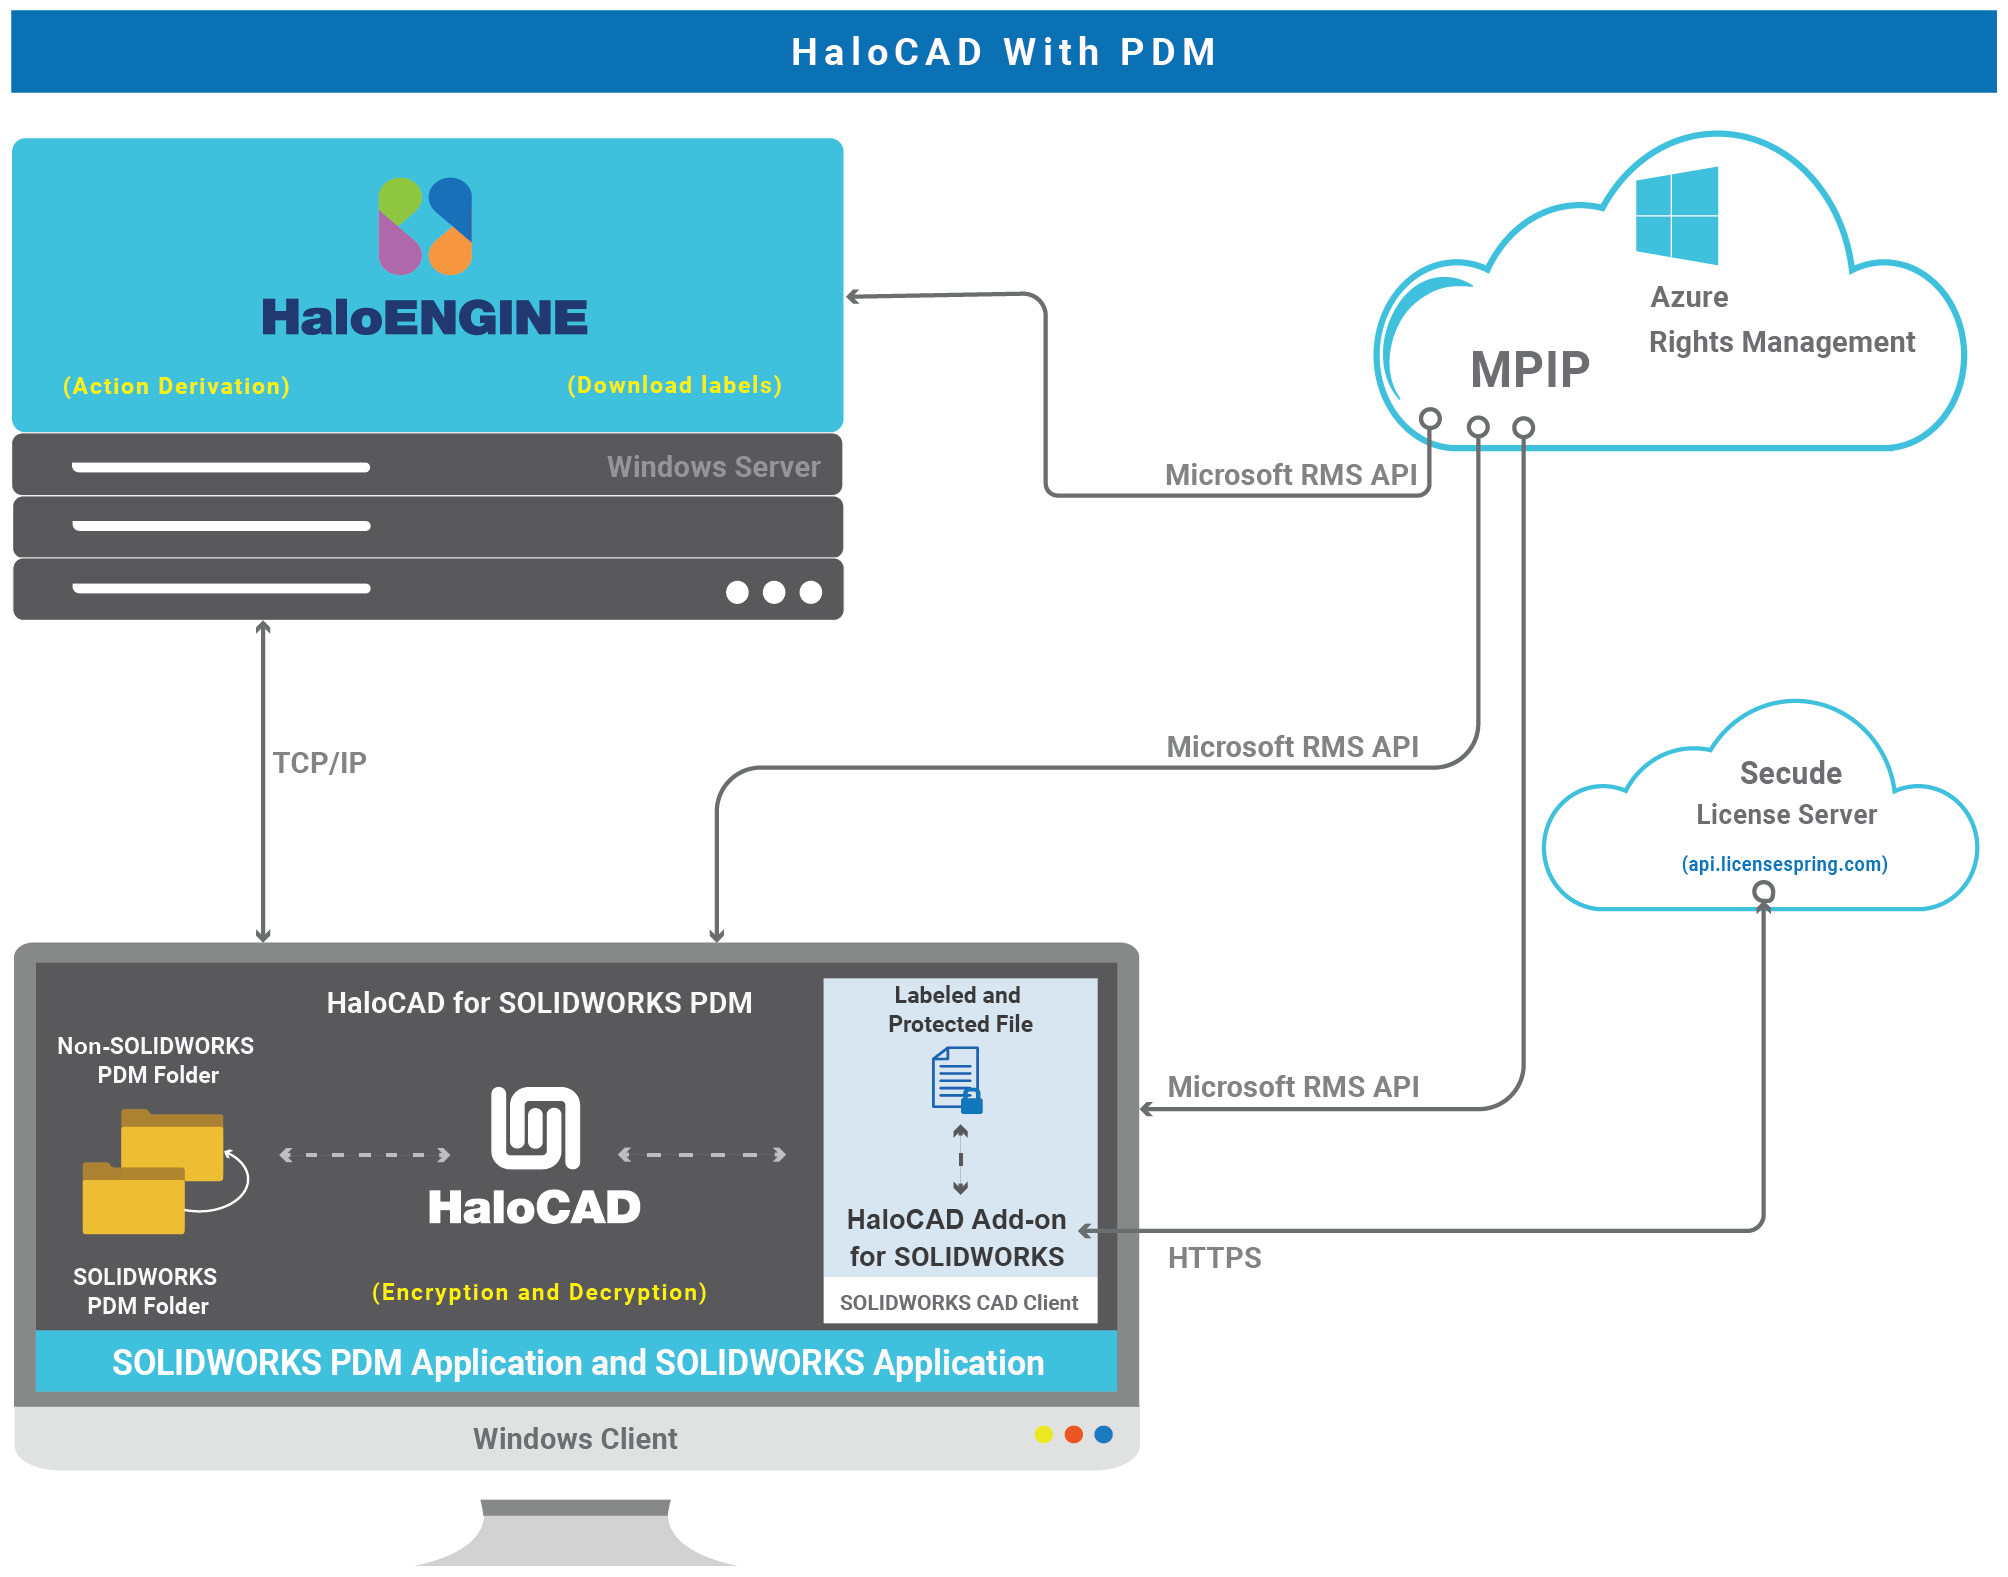
HaloCAD for PDM
For comprehensive details, please refer to the respective manuals as per your PLM environment:
-
If your environment is integrated with Windchill PLM, refer to the HaloCAD for Windchill Installation Manual.
-
If your environment is integrated with Teamcenter PLM, refer to the HaloCAD for Teamcenter Installation Manual.
-
If your environment is integrated with Autodesk Vault PLM, refer to the HaloCAD for Autodesk Vault Installation Manual.
-
If your environment is integrated with SOLIDWORKS PDM, refer to the HaloCAD for SOLIDWORKS PDM Installation Manual.
HaloCAD Reader Add-on for CAD
Secude offers a standalone reader add-on for the CAD application that allows you to view MPIP-protected files containing sensitive data. It enforces ‘read-only’ privileges to all users and thus even authorized users cannot sneak sensitive information out by copying it or taking a screenshot. Additionally, it does not support the setting or modification of labels. The following figure shows the HaloCAD Reader Add-on for CAD. Note: When a HaloCAD MPIP-protected file is shared with partners/suppliers, they don't need to install the HaloCAD Add-on for CAD on their machines; instead just this simple reader add-on is sufficient.

HaloCAD Reader Add-on for CAD
Microsoft Purview Information Protection
HaloCAD solution effortlessly integrates Microsoft Purview Information Protection to protect your sensitive documents. Microsoft Purview Information Protection is an industry document security solution that enables businesses to ensure that only authorized users can open the protected content while also regulating what they can do with it, such as print, edit, or save. Even if sensitive data is leaked accidentally or maliciously, unauthorized parties cannot view it in clear text, thus leaving it useless.
Microsoft documentation
This manual assumes that you already have a complete setup of Microsoft Purview Information Protection and you are familiar with using the Microsoft Purview portal and related concepts. If you are new, you can refer to Microsoft's online documentation for setup and configuration.
Prerequisites
The prerequisites and dependencies for installing and configuring the HaloCAD add-ons are summarized in this section.
Register an Application in Microsoft Entra ID - Public client/native
|
Applicable to |
HaloCAD Add-on for CAD, HaloCAD Reader Add-on for CAD, and HaloCAD for SOLIDWORKS PDM |
This section will guide you through registering an application, obtaining the Client ID and Directory ID, and assigning permissions to the application.
Microsoft documentation
Registering an application in Microsoft Entra ID establishes a trust connection between your application and the identity provider, the Microsoft identity platform.
The information in the Microsoft documentation overrides any information published in this section. For a comprehensive description, refer to Microsoft documentation.
Create an Application
Follow the instructions below to register an application:
-
Log in to the Microsoft Entra admin center using an account that has administrator privileges.
-
If you have access to multiple tenants, click the Settings icon in the top menu and select the tenant for which you want to register the application from the Directories + subscriptions menu.
-
You will be directed to the homepage.
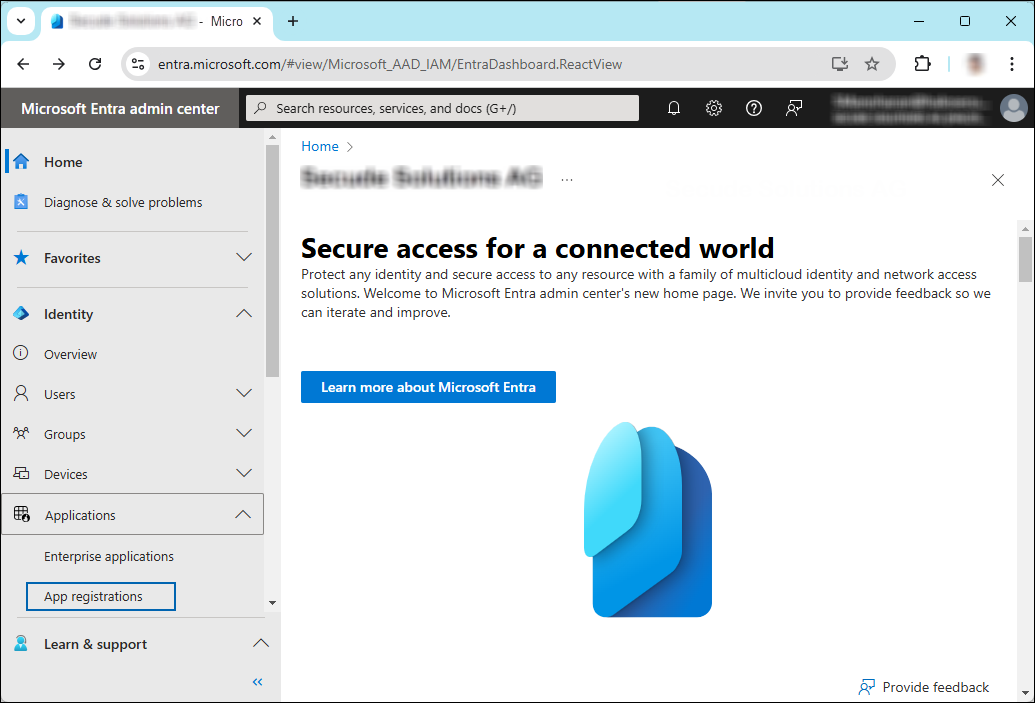
Selecting Microsoft Entra ID
-
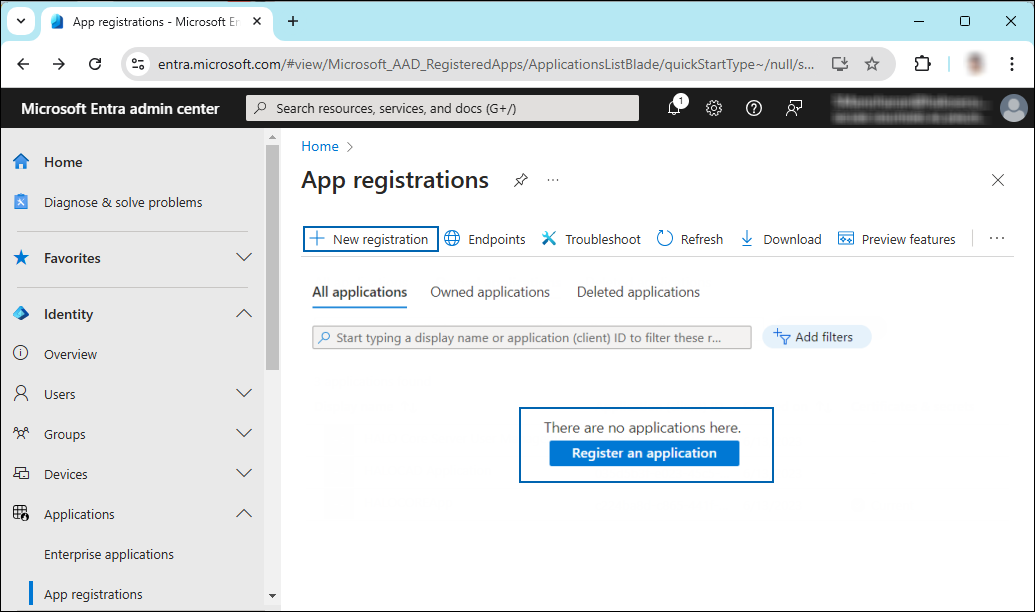
Click Identity > Applications > App registrations on the left of the navigation pane.
-
On the App registrations page, click the New registration page or Register an Application button (this button appears only if no applications have already been created).
New application registration
-
On the Register an application page, enter the registration details for your application.
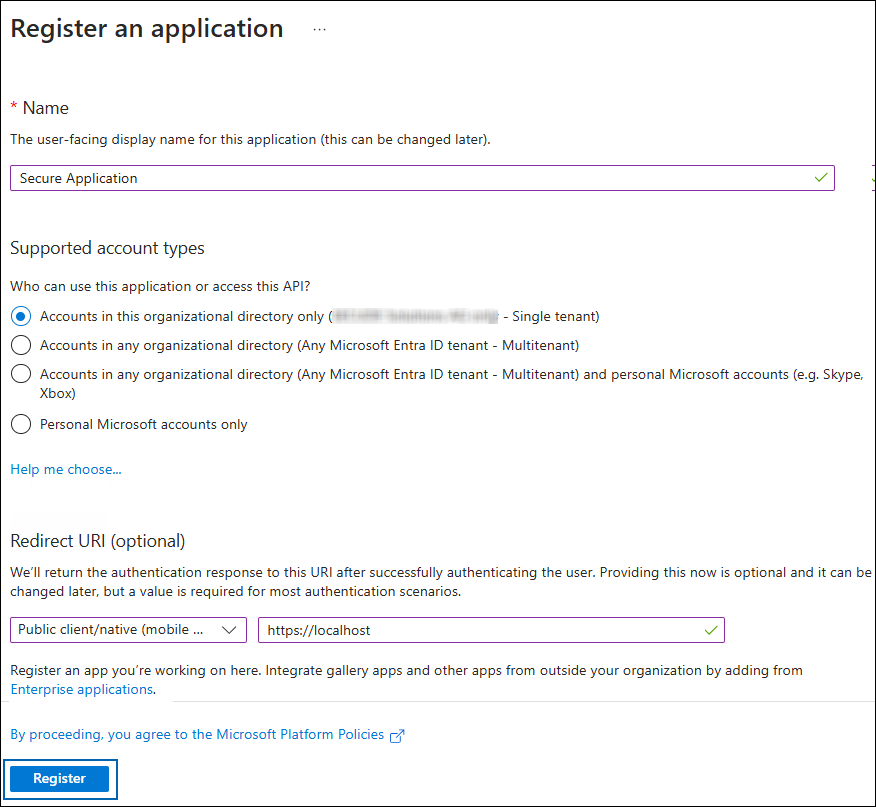
Application details
-
In the Name field, enter an appropriate application name.
-
Under Supported account types, select which account you would like your application to support. For detailed information on these types, please see Microsoft documentation.
-
To target only accounts that are internal to your organization, select Accounts in this organizational directory only.
-
To target only business or educational customers, select Accounts in any organizational directory.
-
To target the widest set of Microsoft identities and to enable multitenancy, select Accounts in any organizational directory and personal Microsoft accounts.
-
To target the widest set of Microsoft identities, select Personal Microsoft account only.
-
Under Redirect URI: Select Public client/native (mobile & desktop), and then type a valid redirect URI for your application. For example,
https://localhost. -
When finished, click Register.
-
-
The home page of the new application is created and displayed.
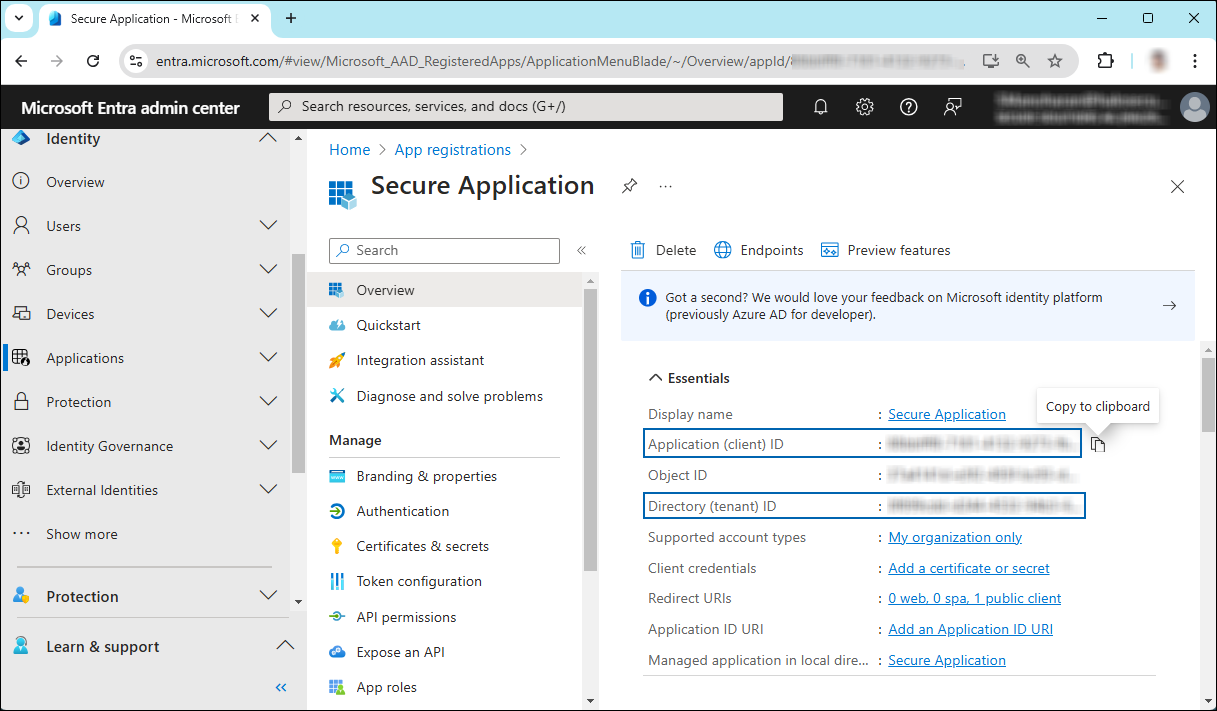
Application ID and Tenant ID
-
Once registration is complete, the following values are shown on the portal. To copy and save the ID value in a text editor, hover your cursor over it and click the Copy to clipboard icon.
-
Application ID – It is also referred to as Client ID.
-
Directory ID – It is also referred to as Tenant ID.
-
Save the authentication parameters
In a text editor (such as Notepad), copy the values of Application (client) ID, Directory (tenant) ID, and Redirect URI, and save them for initializing the HaloCAD application. The Directory (tenant) ID is needed only for single-tenant applications.
Add Required Permissions
To protect content using the MIP SDK, you need to provide the following API permission(s) for the created application ID.
-
In the sidebar of the new application page, select API permissions. The API permissions page for the new application registration will appear.
-
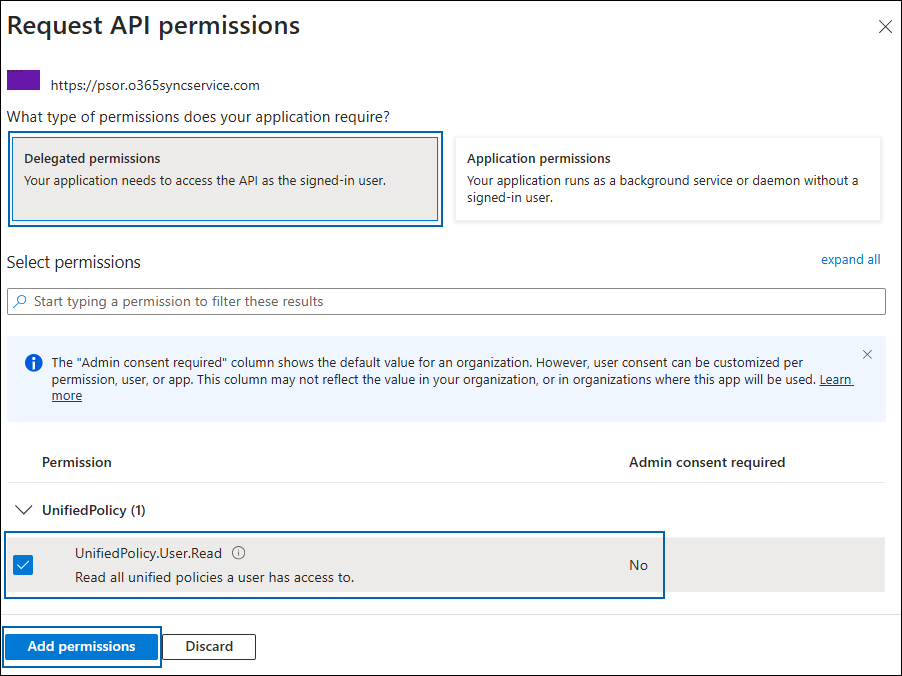
Click Add a permission button. The Request API permissions page will appear.
-
Under the Select an API setting, select APIs my organization uses. A list appears, containing the applications in your directory that expose APIs.
-
Type in the search box or scroll to find the required API that is mentioned in the table below, “Required Permissions”.
-
For example, type Microsoft Information Protection Sync Service. You can see the API listed as shown in the figure below:

Searching for permissions
-
Now, click on the displayed API. You can see two permissions on the page − Delegated permissions and Application permissions.
-
Click the Delegated permissions button and then, under the Permission section, select the check box against "Read all unified policies a user has access to".
Adding permission
-
Click Add permissions. (Repeat the steps outlined above to add the other required permissions listed in the table below.)
-
You will return to the API permissions page, where the permissions have been saved and added to the table. Please note that administrator consent is not necessary for Delegated permissions.
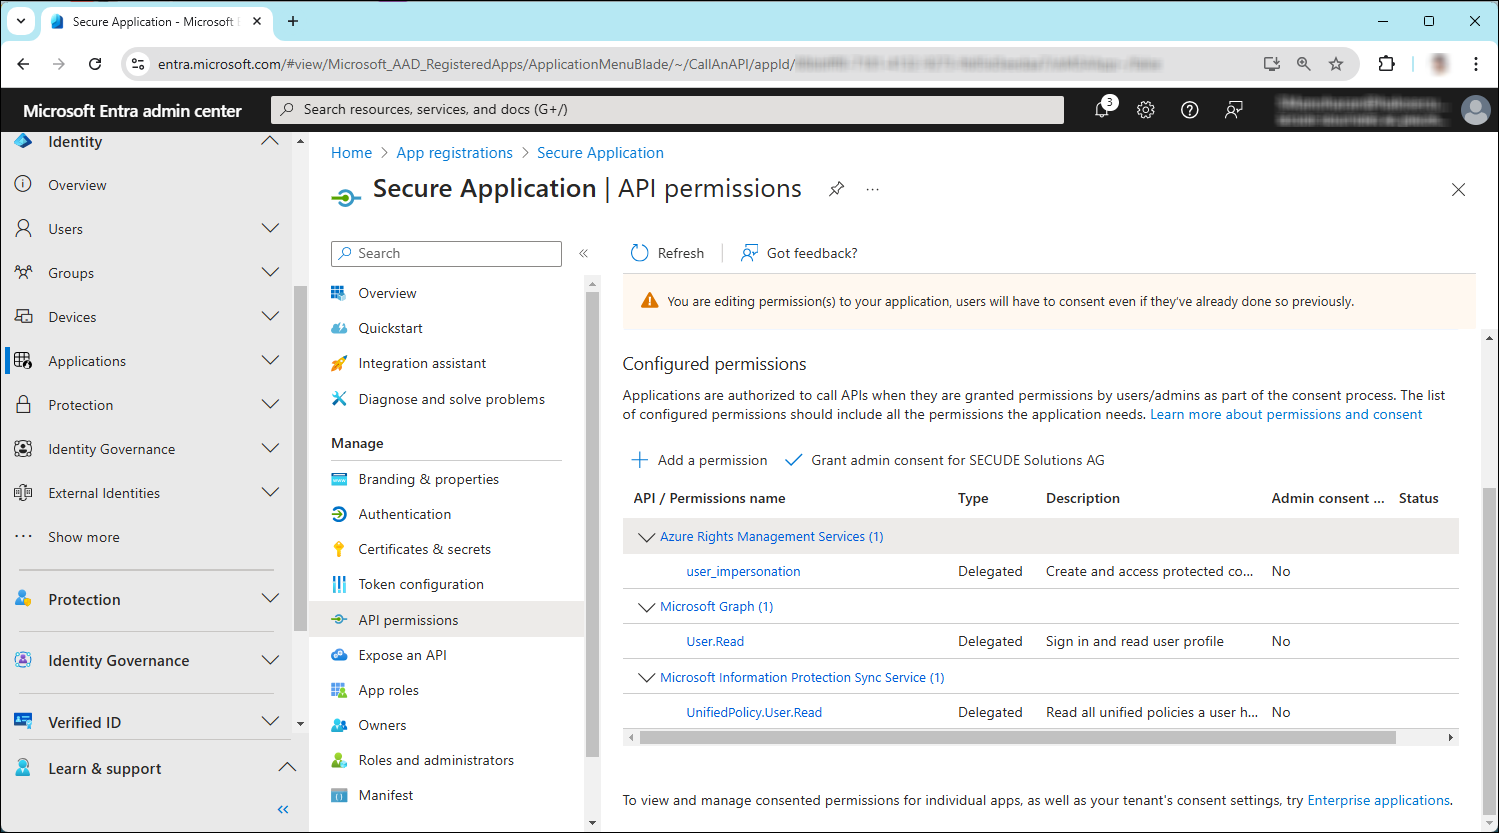
API Required permissions
-
The following table lists the required permissions.
|
API / Permission name |
Display Name |
Type |
Description |
|---|---|---|---|
|
Azure Rights Management Services (Microsoft Rights Management Services) |
|
Delegated |
Create and access protected content for users |
|
Microsoft Graph |
|
Delegated |
Sign in and read user profile (will be added by default) |
|
Microsoft Information Protection Sync Service |
|
Delegated |
Read all unified policies a user has access to. |
Required permissions
Registering an Application in Microsoft Entra ID - Web
|
Applicable to |
HaloCAD for Teamcenter, HaloCAD for Windchill, and HaloCAD for Autodesk Vault |
Creating an application in Microsoft Entra ID is similar to the steps in the previous section. However, for HaloCAD for PLM, some variations apply.
-
Under Redirect URI, select Web.
-
Add the permissions listed in the following table.
-
Click Grant admin consent for your <company>.
-
When the confirmation dialog appears, select Yes to approve.
-
After the consent is granted, the Status column changes to Granted.
|
API / Permission Name |
Display Name |
Type |
Description |
|---|---|---|---|
|
Microsoft Graph |
|
Delegated |
Sign in and read the user profile. This API permission is added by default, but it is not used by the HaloENGINE Tomcat Service. |
|
Azure Rights Management Services (Microsoft Rights Management Services) |
|
Application |
Create protected content on behalf of a user |
|
|
Application |
Create protected content |
|
|
Microsoft Information Protection Sync Service |
|
Application |
Read all unified policies of the tenant |
Required permissions #1
Additional Permission (Only for Decryption)
The permissions mentioned above are adequate for applying the MPIP label to a file with the owner as SPN (Service Principal Name) ID or any user email ID. Additionally, the HaloENGINE Tomcat Service requires the following superuser privilege for the decryption function when the owner is not as SPN.
|
API / Permission Name |
Display Name |
Type |
Description |
|---|---|---|---|
|
Azure Rights Management Services (Microsoft Rights Management Services) |
|
Application |
Read all protected content for this tenant in the Azure portal |
Required permissions #2
Upload the Certificate in the Azure Portal
The HaloENGINE Tomcat Service relies on certificate-based authentication to access MPIP services. Therefore, you must enter your certificate information in the registered application before proceeding with the configuration.
Prerequisites:
-
Certificate:
-
Ensure that you have a valid certificate containing the following key properties:
-KeyExportPolicy Exportableand-KeySpec Signature. -
The certificate can also be self-signed. Note: As a best practice and for security reasons, use a self-signed certificate only in a test environment. It is not recommended for production environments.
-
-
Local Computer certificate store: The certificate required for MPIP authentication must be installed in the Local Computer certificate store, along with the Root CA and Intermediate CA certificates.
-
If the certificate is CA-signed, install all related certificates in their respective stores (Root, Intermediate, and Personal).
-
If the certificate is self-signed, install it in both the Trusted Root Certification Authorities and Personal stores of the Local Computer.
-
To upload the public key of the certificate, follow the steps below:
-
In the sidebar of the new application page, select Certificate & secrets.
-
Under the Certificate section, click Upload certificate. The Upload certificate dialog appears as shown in the figure below:
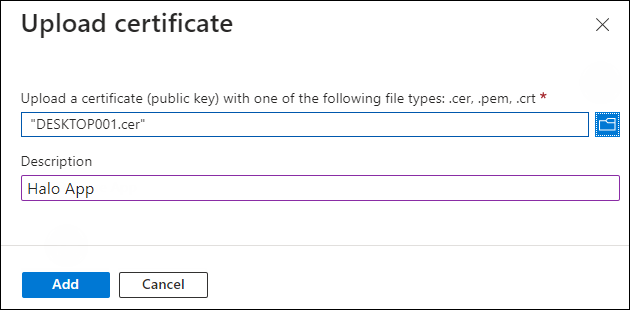
Upload certificate #1
-
Click on the folder icon to select the certificate and click Open. For illustration purposes, the file
DESKTOP001.ceris used. -
Now, click Add. The certificate will get uploaded, and its thumbprint will be displayed on the page as shown in the figure below:
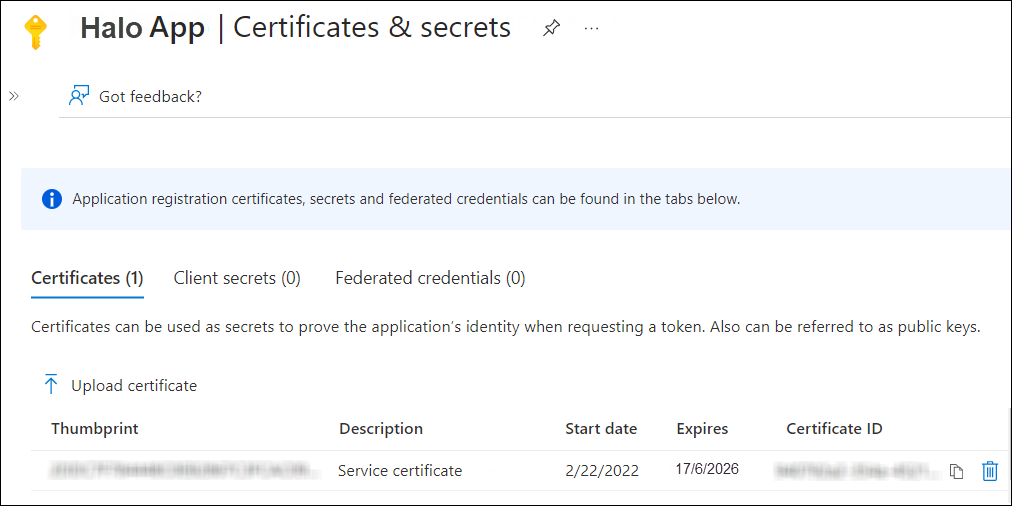
Upload certificate #2
The following table lists the Azure application types that need to be registered when using HaloCAD and HaloCAD for PLM.
|
Component/Combination |
Azure Application Type |
Configuration Guideline |
|---|---|---|
|
HaloCAD Add-on for CAD and HaloCAD Reader Add-on for CAD |
Public client/native (mobile & desktop) |
Use the same Azure tenant details for both add-ons. The Reader Add-on cannot open protected files if the tenant details do not match. |
|
HaloCAD for PDM |
Public client/native (mobile & desktop) |
Ensure both HaloCAD for SOLIDWORKS PDM and HaloENGINE use the same Directory (Tenant) ID. Mismatched IDs cause configuration errors. |
|
HaloCAD for PLM and HaloENGINE |
Web |
Ensure both are installed with the same Azure tenant details to avoid configuration errors. |
HaloCAD and Azure Application Type
Create and Configure the Sensitivity Labels
|
Applicable to |
HaloCAD Add-on for CAD, HaloCAD Reader Add-on for CAD, and HaloCAD for PLM/PDM (Teamcenter, Windchill, Vault, and PDM) |
As an administrator, you can create, configure, and publish sensitivity labels for various levels of content sensitivity based on your organization's classification taxonomy. Use names or terms that are familiar to your users. Consider starting with label names like Personal, Public, General, Confidential, and Highly Confidential if you don't already have a taxonomy in place. For more details, please refer to Microsoft online documentation.
Office 365 Subscription Details
|
Applicable to |
HaloCAD Add-on for CAD, HaloCAD Reader Add-on for CAD, and HaloCAD for PLM/PDM (Teamcenter, Windchill, Vault, and PDM) |
-
Fully configured Microsoft Purview Information Protection.
-
An Azure subscription is required to use Azure RMS and the MPIP functionality.
-
A working Microsoft Entra ID service must be available.
-
Transport Layer Security (TLS) 1.2 or higher must be enabled to ensure the use of cryptographically secure protocols at all client workstations. Please refer to the section “Enable Support for TLS 1.2 at the Client Workstation for Microsoft Entra ID”.
-
To avail the revoke access feature, the user should be assigned to the Microsoft Purview Information Protection Premium P1/P2 license. (Not required for reader add-on)
-
Audit logging: Your Azure subscription must include Log Analytics on the same tenant as Microsoft Entra ID.
Recommended URLs, Addresses, and Ports for MPIP
|
Applicable to |
HaloCAD Add-on for CAD, HaloCAD Reader Add-on for CAD, and HaloCAD for PLM/PDM (Teamcenter, Windchill, Vault, and PDM) |
MIP SDK doesn't support the use of authenticated proxies. So, make sure you set the Microsoft 365 endpoints to bypass the proxy. View a list of endpoints at “Microsoft Online Documentation”. However, Microsoft recommends the following:
|
Addresses |
Ports |
|---|---|
|
|
TCP 443 |
|
|
TCP 443, 80 |
|
For event logging
|
TCP 443 |
|
National Cloud |
Microsoft Entra ID authentication endpoint |
|
Microsoft Entra ID for the US Government |
|
|
Microsoft Entra ID (global service) For details on Microsoft Entra ID endpoints, please refer to “Microsoft Online Documentation”. |
|
Recommended endpoints
Secude License Manager for HaloCAD
|
Applicable to |
HaloCAD Add-on for CAD and HaloCAD Reader Add-on for CAD |
To communicate with Secude License Manager for HaloCAD, the following URL and port must be whitelisted in the customer's proxy:
|
Address |
Port |
|---|---|
|
License API - api.licensespring.com |
TCP 443 |
Recommended license manager endpoint
Enable Support for TLS 1.2 at the Client Workstation for Microsoft Entra ID
|
Applicable to |
HaloCAD Add-on for CAD, HaloCAD Reader Add-on for CAD, and HaloCAD for PLM/PDM (Teamcenter, Windchill, Vault, and PDM) |
To improve the security posture of the tenant and to remain in compliance with industry standards, Microsoft Entra ID stopped supporting the following Transport Layer Security (TLS) protocols and ciphers:
-
TLS 1.1
-
TLS 1.0
-
3DES cipher suite (TLS_RSA_WITH_3DES_EDE_CBC_SHA)
In order for the HaloCAD for CAD add-on to be able to authenticate to Microsoft Entra ID, TLS 1.2 must be activated on the respective client workstation. Please see this Microsoft article to enable TLS 1.2.
Microsoft documentation
The information in the Microsoft documentation overrides any information published in this section.
Secude is not liable for changes to the content of this section because it was extracted from the Microsoft article at the time when the HaloCAD manual was prepared. Do check the most recent updates in this regard from the Microsoft documentation.
In summary, the following steps must be performed:
-
Update the Windows Operating System
-
Update .NET Framework
-
Set the following registry settings:
|
S.No |
Windows Registry |
Values |
|---|---|---|
|
1 |
|
|
|
2 |
|
|
Registry entries
License Activation
|
Applicable to |
HaloCAD Add-on for CAD and HaloCAD Reader Add-on for CAD |
A license for a product is necessary for access to features and support, legal compliance, security, and reliability. The primary Secude licensing method uses a Key-based license that regulates and allows access to the application's features. Therefore, to enable features, we suggest obtaining the license key from Secude support before installing HaloCAD.
Key-based License
Upon purchase or registration with Secude, a special "license key" is provided to the user to control the use of the application. The license key, which is an alphanumeric code, must be provided by the administrator when the application is installed or activated. By entering this key, the entire functionality of HaloCAD is unlocked, and the user's authorization to use it is validated.
This document does not cover all the specifics of purchasing a license. Please contact Secude’s representative for additional details.
The following methods are available to activate the license in HaloCAD.
-
Tool-based automatic initialization and license activation: This includes generating an encrypted configuration file with the license key and Azure application details. Using this file, the installer will complete the installation, application initialization, and license activation automatically. Refer to the section “Secure Installation” for more information.
-
UI-based manual license activation: This provides a straightforward installation method without automatic license activation. The administrator must manually activate the license by entering the license key into the HaloCAD license screen after launching the CAD application. Refer to the section “UI-based Manual License Activation” for more information.
-
License activation in silent mode: Uses an encrypted configuration file to initialize the application and activate the license automatically. For more details about silent mode, refer to the Silent Mode section of the HaloCAD Installation Manual that comes with your purchased application.
-
License activation via System Center Configuration Manager (SCCM): For deploying and activating the HaloCAD add-on throughout an organization, an encrypted configuration file (containing the license key information and Azure application details) is used together with the installer. For additional information on SCCM, please refer to the HaloCAD Installation Manual.
The following is a high-level diagram that illustrates license activation.
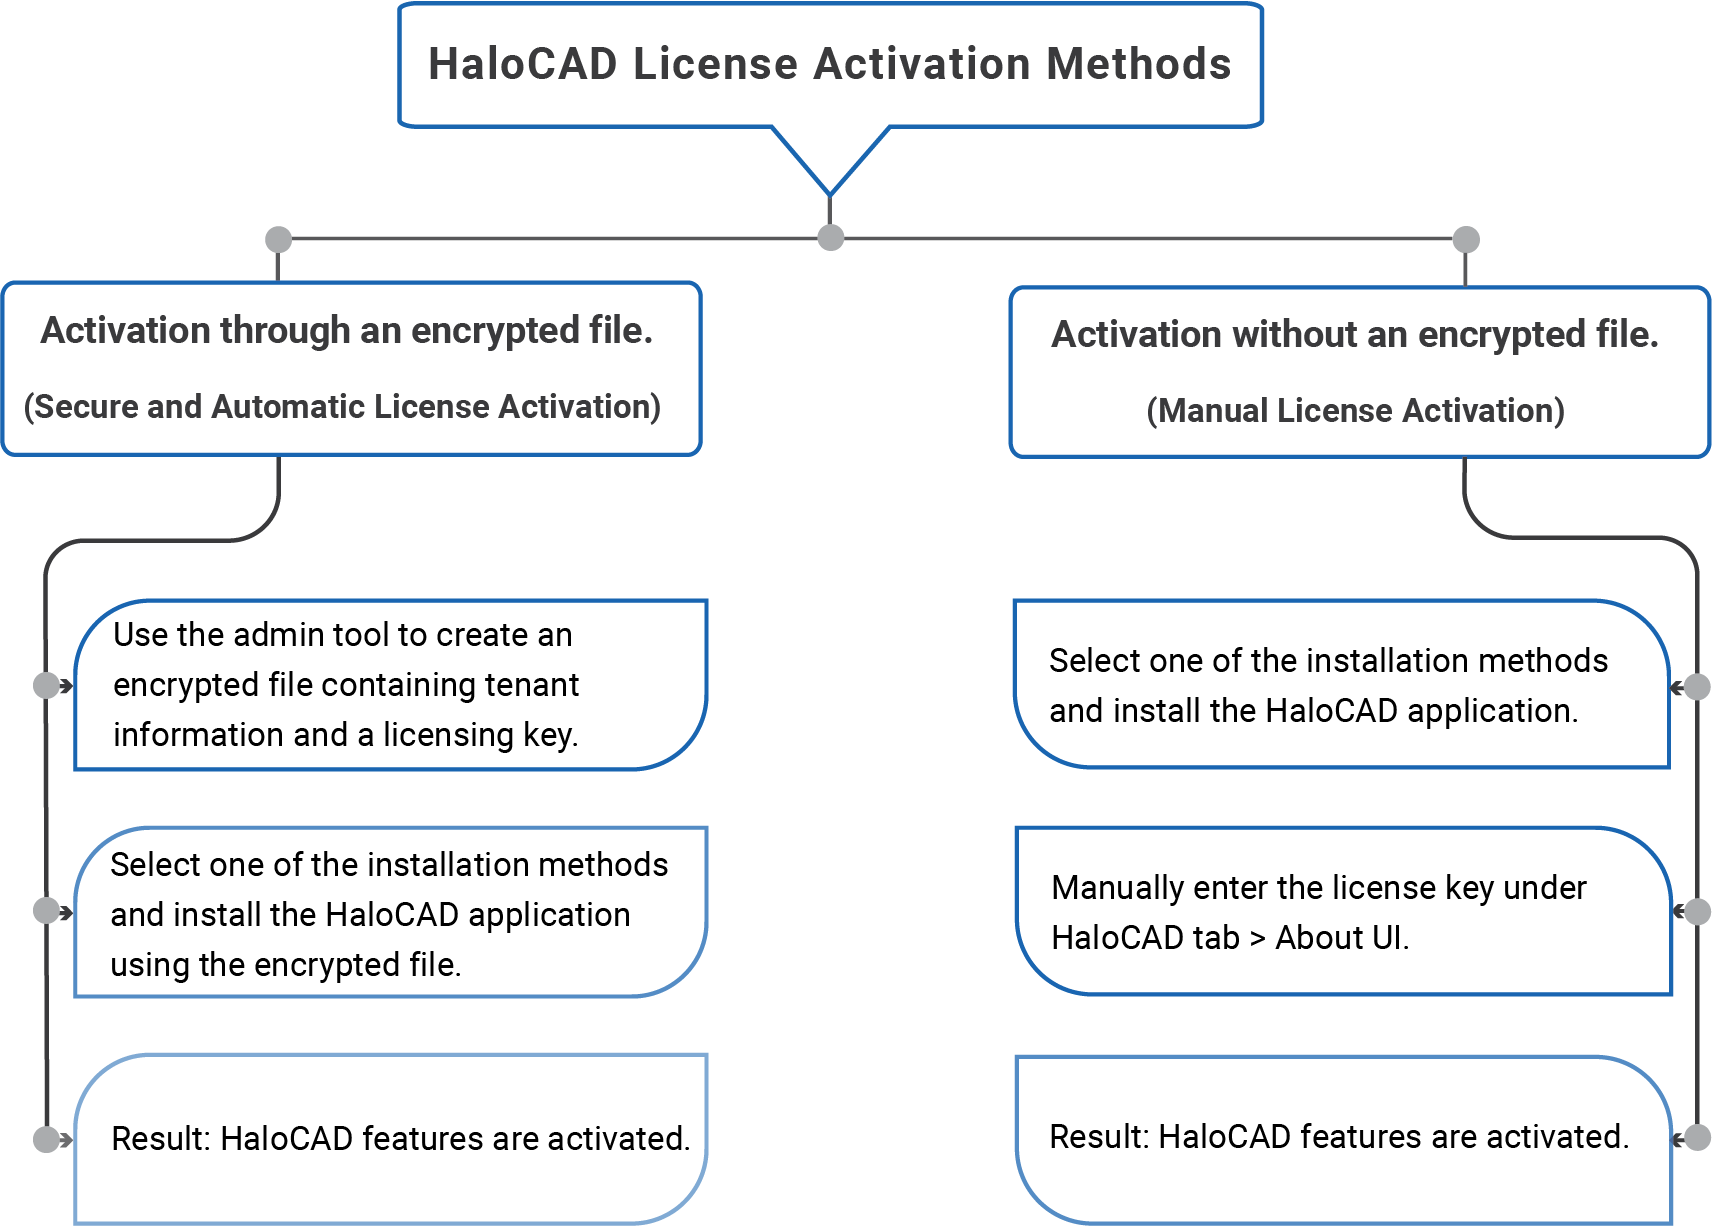
License activation
Secure Installation (Recommended)
|
Applicable to |
HaloCAD Add-on for CAD, HaloCAD Reader Add-on for CAD, and HaloCAD for SOLIDWORKS PDM |
As a best practice, any application secrets should not be shared with end-users, third parties, or any trusted vendors. However, to avail of HaloCAD features (standard add-on and reader add-on) there is a need to share such sensitive information for a successful installation.
To overcome this challenge, Secude offers an admin utility tool that can write and encrypt data, including Azure application specifics (Application ID, Tenant ID, and Redirect URI), Cloud type details, and a license key in an encrypted configuration file. It uses the RSA algorithm for cryptography, allowing only the HaloCAD installer to access the configuration file with the private key during the initialization process, effectively masking the Initialization screen from the user.
An administrator can create an encrypted JSON file using this admin tool and share it with internal/external parties without disclosing the original tenant details.
HaloCAD Admin Utility Tool
The HaloCAD product package comprises an additional component—hc.admintool.exe.
Prerequisites: Before executing the admin tool, make sure you have the necessary information.
-
Azure application details for initialization
-
Cloud type details
-
A license key
How to Encrypt the Configuration File
-
From the product package, move the admintool folder to your preferred location. For example,
C:\Users\superdocs\Desktop\admintool. -
Open the Command Prompt with elevated rights (Run as Administrator).
-
Navigate to the directory of the admintool folder and type
hc.admintool.exeand press Enter.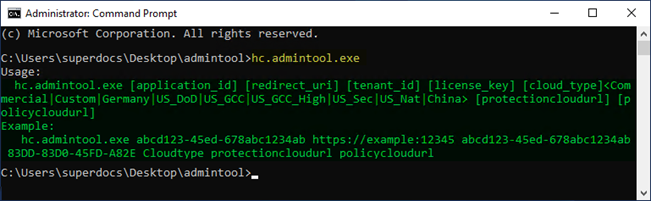
Admin tool with help command
-
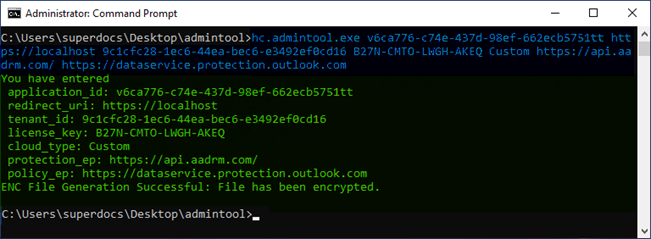
Enter the required details. For example,
Cloud type: Commercial -hc.admintool.exe v6ca776-c74e-437d-98ef-662ecb5751tt https://localhost 9c1cfc28-1ec6-44ea-bec6-e3492ef0cd16 B27N-CMTO-LWGH-AKEQ Commercial
Cloud type: US_DoD -hc.admintool.exe v6ca776-c74e-437d-98ef-662ecb5751tt https://localhost 9c1cfc28-1ec6-44ea-bec6-e3492ef0cd16 B27N-CMTO-LWGH-AKEQ US_DoD
Cloud type: Custom -hc.admintool.exe v6ca776-c74e-437d-98ef-662ecb5751tt https://localhost 9c1cfc28-1ec6-44ea-bec6-e3492ef0cd16 B27N-CMTO-LWGH-AKEQ Custom https://api.aadrm.com https://dataservice.protection.outlook.com -
The output window will now appear as follows:
Admin tool displaying the output
-
The following admin tool, along with its
helpcommand, is specific to the HaloCAD add-on for Creo.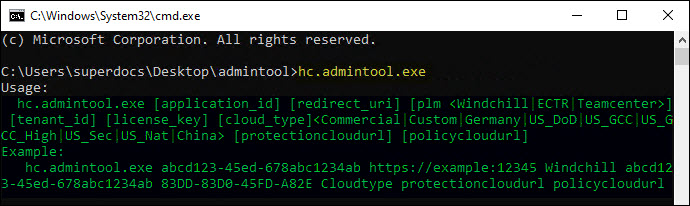
Admin tool with help command for Creo add-on
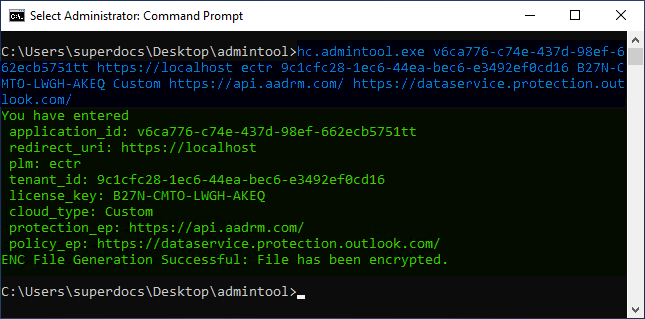
Admin tool displaying the output with ECTR integration (only for Creo add-on)
-
The following admin tool, along with its
helpcommand, is specific to the HaloCAD for SOLIDWORKS PDM..png?cb=4116417c248497ca6acca79a6bc44dc4)
Admin tool displaying the output for SOLIDWORKS PDM
-
Results:
-
The
hc.conf.jsonfile will be replaced by an encrypted file namedhc.conf.enc. -
You can now share the configuration file with external users. With this file, users can install the HaloCAD add-on on their workstations seamlessly, without requiring any additional configuration details.
-
Configuration files created with earlier releases are not supported. Always use the admin tool included in the installation package to generate a new configuration file.
-
What to do next
-
Place the encrypted file
hc.conf.encin the same directory as the HaloCAD installer you have purchased. -
To start the interactive installation, double-click the installer and follow the steps provided in the Installation Manual for your purchased add-on.
UI-based Manual License Activation
|
Applicable to |
HaloCAD Add-on for CAD and HaloCAD Reader Add-on for CAD |
This section describes how to activate a license using the HaloCAD user interface.
Prerequisite: Ensure that the HaloCAD installation is complete by following the instructions provided in the Installation Manual.
To complete the license activation, carry out the following steps:
Note: If you encounter any issues while activating the license, please refer to the “Troubleshooting” chapter in the Operations Manual.
-
Open the CAD application for which the add-on was purchased.
-
HaloCAD programmatically sends a license validation request to Secude's License Manager, and the following warning message appears:
HaloCAD license warning message
-
Click OK.
-
Go to the HaloCAD tab and click About to see the status of your license. You will see None on the screen, indicating that the license has not yet been enabled.
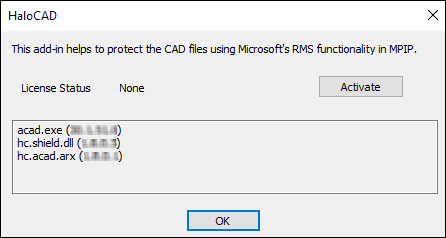
License Status: None
-
Click Activate.
-
The HaloCAD License Activation screen will appear.
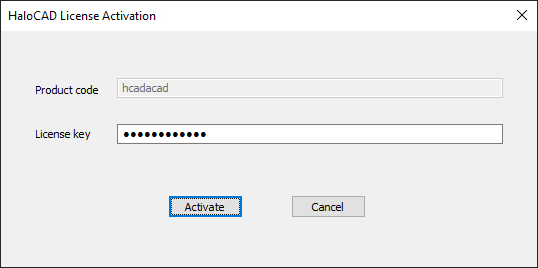
HaloCAD activation screen
-
Enter the license key for the standard add-on for protection. Note: Ensure you enter the license key provided specifically for the reader add-on when using it. Interchanging license keys results in activation failure.
-
Click Activate.
Results:
-
You will receive the following confirmation message:
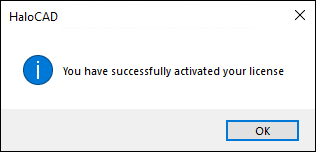
Activation success message
-
Click OK.
-
As a result, you will see Active on the screen, indicating that the license has been activated.
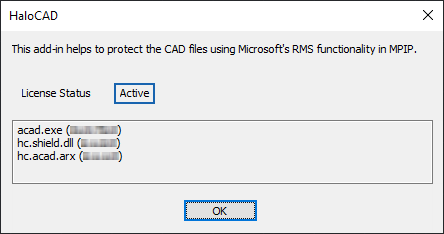
License Status: Active
-
-
Related tasks:
-
If you click the pencil icon (Click to change label) to label the file, the Rights Management Service prompts you to sign in. Click OK, and then enter your credentials.
-
After successfully authenticating, the labels can be retrieved from the Azure RMS, and the HaloCAD Ribbon is activated. For more details, please refer to the Operations Manual.
-
License Expiry
|
Applicable to |
HaloCAD Add-on for CAD and HaloCAD Reader Add-on for CAD |
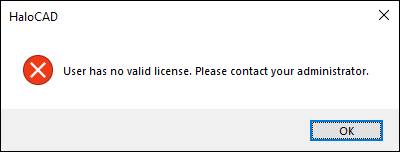
The license will expire on the specified date, and launching the CAD application will result in the following HaloCAD warning message: "The license is invalid." After clicking OK, you will receive another warning message stating, “User has no valid license. Please contact your administrator.” Therefore, you must acquire a new license to renew it.
Prerequisite: Before reactivating it, ensure that you have a new license key from Secude.
Option 1 - Using the admin tool (automatic activation)
-
Run the admin tool with the new license key, as explained in the section “How to Encrypt the Configuration File”.
-
Navigate to the configuration directory containing the old
hc.conf.encfile and replace it with the one created in the previous step. -
Restart the application.
Results:
-
The HaloCAD license key is now automatically activated.
-
You can start protecting CAD files.
-
Option 2 - Using the About UI (manual activation)
-
Open the CAD application.
-
Go to the HaloCAD tab and click About.
-
Click Activate.
-
Enter the new key that Secude has provided.
Results:
-
The HaloCAD license key is now manually activated.
-
You can start protecting CAD files.
-
Appendix
Third-Party Libraries
Third-party software/code is included or bundled with Secude's products according to its appropriate license. Secude conducts testing to make sure the third-party products are compatible with and perform as intended with Secude applications.
|
Applicable to |
HaloCAD Add-on for CAD and HaloCAD Reader Add-on for CAD |
The third-party libraries and dependencies used by the HaloCAD Add-on for CAD are shown in the table below.
|
Library |
Version |
Source Code |
License Link |
|---|---|---|---|
|
Mhook |
2.5.1 |
||
|
Protobuf Library |
3.15.6 |
https://github.com/protocolbuffers/protobuf/blob/master/LICENSE |
|
|
OpenSSL |
3.2 |
||
|
Rapidxml |
1.13 |
https://sourceforge.net/projects/rapidxml/files/latest/download |
|
|
JSON Parser |
3.11.3 |
||
|
MSAL |
4.72.1.0 |
https://github.com/AzureAD/microsoft-authentication-library-for-dotnet |
https://github.com/AzureAD/microsoft-authentication-library-for-dotnet/blob/master/LICENSE |
|
ConfuserEx |
1.0.0.0 |
||
|
WTL |
9.0.4140 |
||
|
MIP SDK |
1.17.158 |
https://learn.microsoft.com/en-us/information-protection/develop/version-release-history |
https://docs.microsoft.com/en-us/information-protection/develop/ |
|
Licensespring |
7.40.0 |
- |
- |
Third-party libraries
The third-party libraries and dependencies used by HaloCAD for PLM and PDM are listed in its Installation Manual.