
A profile is a repository for all details relating to classification settings.
Follow the procedure below to configure the Profile:
-
On the left navigation bar, click Customer Configuration, and then select the customer ID (halo_customer) from the list.
-
On the Profile Configuration tab, click Configure. The following page appears, as shown in the figure below:
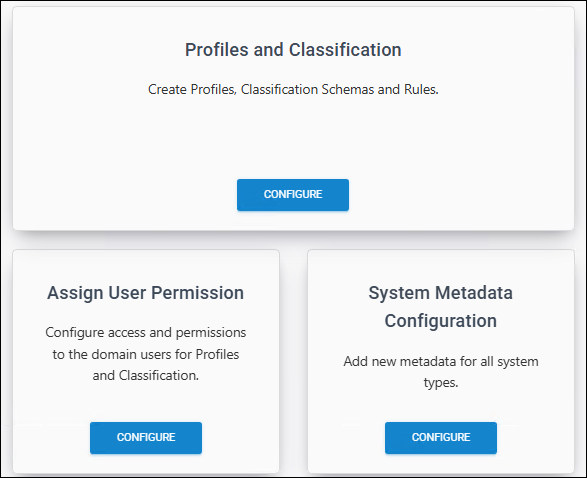
Profile Configuration page #1
-
On the Profiles and Classification tab, click Configure.
-
Upon opening, the Classification Profiles page appears empty, with no profiles added.
-
Click the plus icon, and then enter the following details:
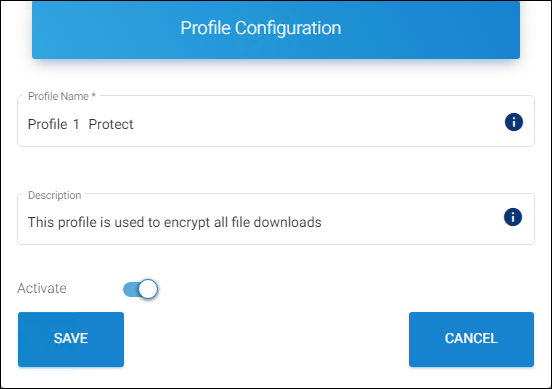
Profile Configuration page #2
-
Profile Name − Enter a name for the new profile. Note: A profile name cannot contain any of the following characters
"< >: " / \ |? * ` ~"and can contain “- _" -
Description − Enter a description for the new profile (optional).
-
Activate − The current profile is automatically enabled by default. However, you can deactivate it by clicking the Activate slider button.
-
Click Save.
-
Repeat the above steps to create multiple profiles.
Results:
-
A confirmation message appears after the profile is saved successfully.
-
The new profile is added to the Classification Profiles list.
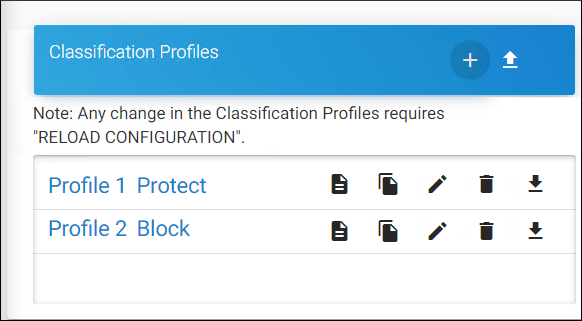
Profile list
-
Related tasks
-
You can manage Classification Profiles using the Copy, Edit, Delete, Download, and Import icons.
-
To view the details of a profile, click the Profile Details icon.
What to do next:
-
Click Reload Configuration to apply the changes.
-
Select a classification profile from the displayed list. The Classification Configuration page appears, as shown in the figure below:
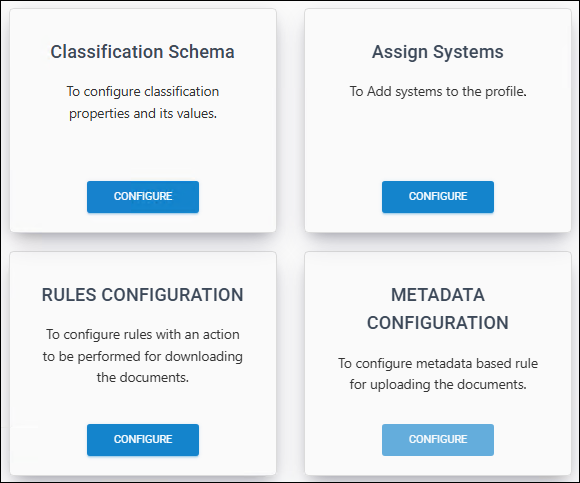
Classification Configuration
-
Refer to the following sections to create a classification schema, rules (download and upload), configure metadata (only for Teamcenter System type), and assign systems for each profile.
Create Classification Schema
The classification schema contains properties and their values.
-
On the Classification Schema tab, click Configure. Upon opening, the Classification Schema page appears empty, with no schemas added.
-
Click the plus icon and enter the following details:
-
Property Name − Enter a name for the new property (maximum 20 characters and case sensitive). For example, sensitivity.
-
Property Value − Enter a value for the property (maximum 20 characters and case sensitive) and click the plus icon on the right. The value is added to the list. For example, Secret, Confidential, and Internal.
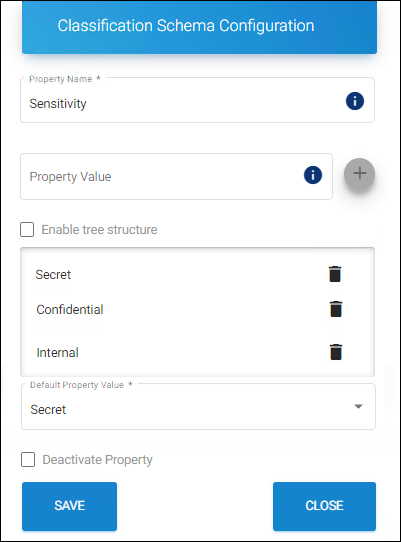
Classification Schema Configuration
-
-
The first entry (e.g., Secret) will be taken as the default value, but you can modify it using the Default dropdown menu. The words
default,group,multiple,if,tree,hierarchy, andreturnare reserved keywords that are used for internal processes. Therefore, it should not be used as a Property Name or Property Value. Using the keyword will result in a compile-time error. -
Add as many values as you wish to add.
-
Click Save.
Results:
-
A confirmation message appears after the Classification Schema is saved successfully.
-
The property name and its values are added as a node.
-
Similarly, you can add schemas by clicking the plus icon.
-
-
Enable tree structure: To have a tree structure view of information, where each item can have multiple children, select the Property Value (e.g., Asia) and enter a value in the property value field (e.g., India), and then select the Enable tree structure check box and add the child node using the plus icon. In this illustration, the Property Value “Asia” contains three child nodes - India, Saudi Arabia, and Singapore.
-
Click Close to exit the page.
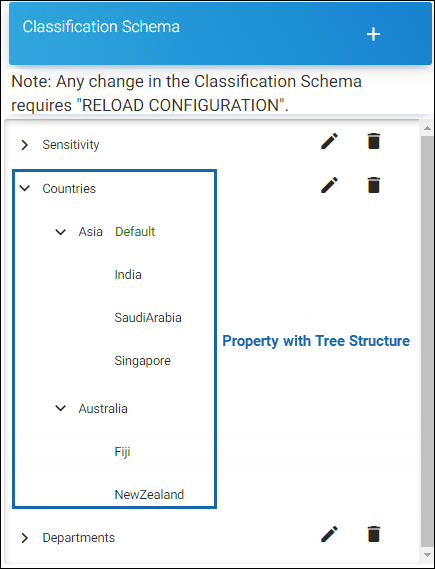
Classification Schema list
-
Click Reload Configuration to apply the changes.
Related tasks
-
By default, the current property is activated. You can deactivate it by selecting the Deactivate Property check box.
-
You can manage classification profiles using the Edit and Delete icons.
Create Download Classification Rules
Download rules define classification rules based on metadata types and Pre-Expression, while Action rules determine whether a file is blocked, protected, or excluded during download.
Custom Pre-Expression
This page allows you to create custom pre-expressions depending on the system types for which you have been licensed. This is available for all systems such as Windchill, Teamcenter, Keytech, Autodesk_Vault, SOLIDWORKS_PDM, and HaloENGINE_API.
-
Navigate to the Profile Configuration tab and click Configure > go to the Profiles and Classification tab and click Configure > select a classification profile > on the Rules Configuration tab, click Configure. The following page appears, as shown in the figure below:
Download rules configuration page
-
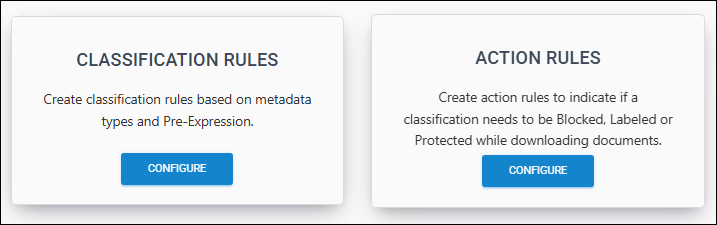
On the Classification Rules tab, click Configure, and the following page appears, as shown in the figure below:
Classification rules page
-
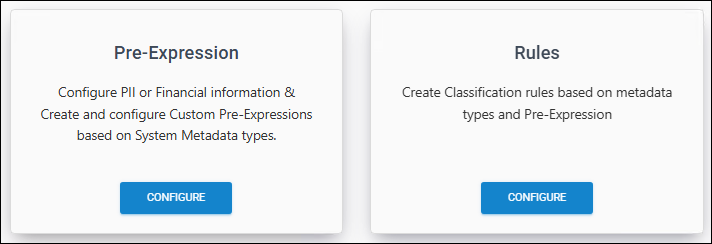
On the Pre-Expression tab, click Configure, and the Pre-Expression Configuration page appears, as shown in the figure below:
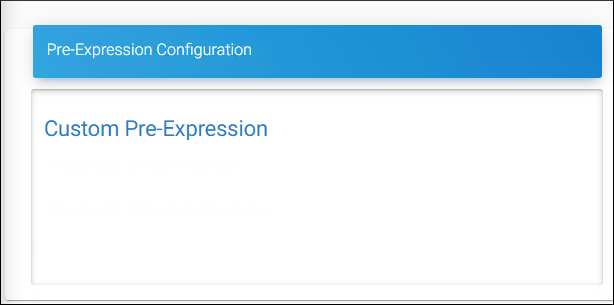
Pre-Expression Configuration
-
On the Pre-Expression Configuration page, click Custom Pre-Expression. Upon opening, the Custom Pre-Expression page appears empty, with no pre-expressions added.
-
Click the plus icon and enter the following details:
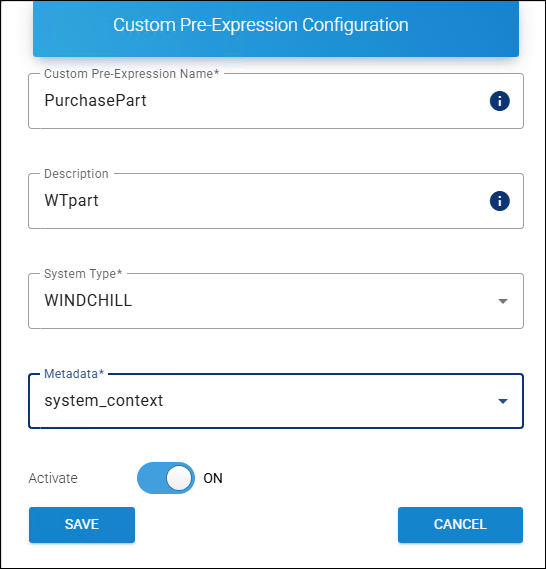
Custom Pre-Expression #1
-
Custom Pre-Expression Name − Enter a name for the new custom pre-expression entry. Note: only 'alphabet', 'numbers', '_', and '-' characters are supported.
-
Description − Enter a description of the new custom pre-expression (optional).
-
System Type − Based on your license, your system type will be displayed by default.
-
Metadata − Select a metadata from the list.
-
Activate − The current Custom Pre-Expression is automatically enabled by default. However, you can deactivate it by clicking the Activate slider button.
-
Click Save.
Results:
-
A confirmation message appears after the Custom Pre-Expression is added.
-
The new custom pre-expression is added to the list.
-
Click Reload Configuration to apply the changes.
-
Reference Manuals: For more information about metadata description, please refer to the relevant HaloCAD PLM/PDM Installation Manual.
-
Autodesk Vault – HaloCAD for Autodesk Vault Installation Manual
-
Teamcenter – HaloCAD for Teamcenter Installation Manual
-
Windchill – HaloCAD for Windchill Installation Manual
-
SOLIDWORKS PDM – HaloCAD for SOLIDWORKS PDM Installation Manual
-
Keytech – HaloCAD for Keytech Installation Manual
-
HaloENGINE API – Since there is no built-in metadata for the REST SDK, custom metadata can be used to generate new metadata for the HaloENGINE API system type. Please refer to the section “Custom Metadata”.
To add custom metadata configuration
-
Now, select a custom pre-expression from the list, and the Custom Metadata Configuration page appears, as shown in the figure below. For illustration, a new custom pre-expression "DOMAIN” is added to the list.
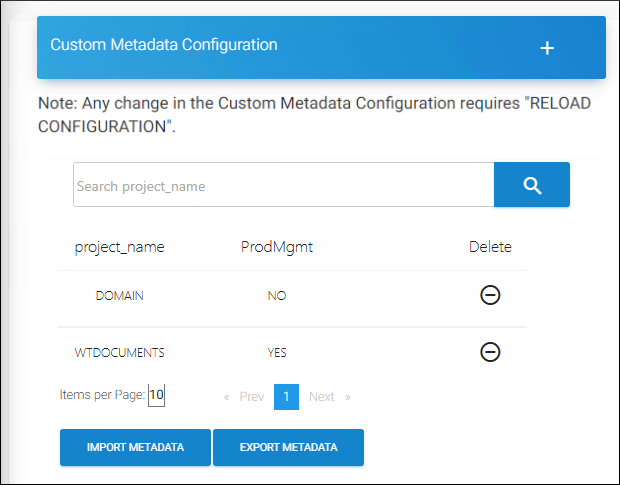
Custom Pre-Expression #2
-
Click the plus icon. The Add Custom Metadata Values dialog appears.
-
Enter a value and select any one of the following options:
-
YES = it contains specified metadata information
-
NO = it does not contain the specified metadata information
-
Click Save.
Results:
-
A confirmation message appears after the Custom Metadata is saved.
-
The new metadata value is added to the list.
-
Click Reload Configuration to apply the changes.
-
Related tasks
-
To find a metadata value, enter the name in the Search Metadata text box. The search results will be shown.
-
If you want to remove custom metadata from the list, click the Delete icon against the metadata.
-
To Import Custom Metadata: If you wish to add your own metadata, click Import Metadata. The Import Custom Metadata dialog will appear. Click on the button and select the metadata file (
.csv, .xls,.xlsx) from the Open Windows dialog. -
To Export Custom Metadata: If you wish to export the existing metadata, click Export Metadata. An Excel file will be downloaded. The new custom pre-expression is displayed and available for user selection in the Classification Rule UI as metadata, as shown in the example below:
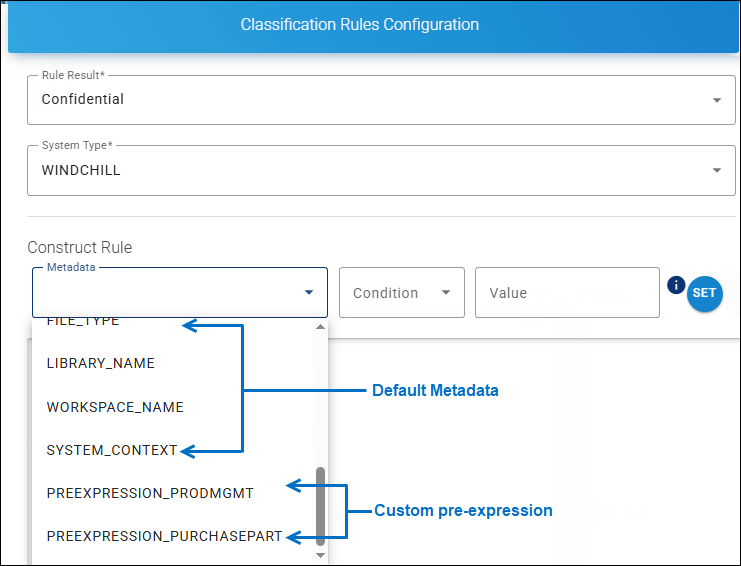
Example for Custom Pre-Expression #3
-
You can manage Custom Pre-Expressions using the Edit or Delete icons.
Custom Metadata
For data classification and secure file downloads, the HaloENGINE Admin Portal uses the default metadata. However, depending on organizational requirements, the portal allows administrators to add custom metadata.
Note: Metadata can be configured for PLM clients who do not want schema or rule-based decryption. For more information, refer to the section "Metadata Configuration”.
Follow the procedure below to create custom metadata for System types:
-
On the left navigation bar, click Customer Configuration, and then select the customer ID (halo_customer) from the list.
-
Navigate to the Profile Configuration tab and click Configure > go to the System Metadata Configuration tab and click Configure.
-
Click the System Type to which you want to add the custom metadata. In this example, the WINDCHILL System Type is selected.
-
Click the plus icon. The Add Custom Metadata dialog appears.
-
Enter a name and click Save.
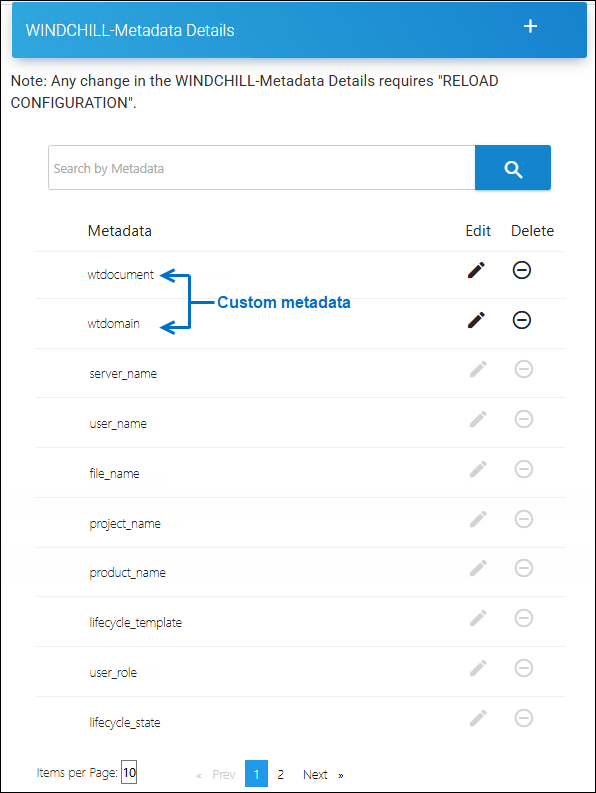
Metadata details page
Results:
-
A confirmation message appears after the Custom Metadata is saved.
-
The new metadata name is added to the list.
-
Click Reload Configuration to apply the changes.
-
Related tasks
-
If you want to edit/remove newly added custom metadata from the list, click the Edit/Delete icon against the metadata.
-
To search metadata by name, use the text box labeled Search by Metadata. Your search results will be displayed.
-
The new custom metadata is displayed and available for user selection in the Classification Rule UI, as shown in the example below:
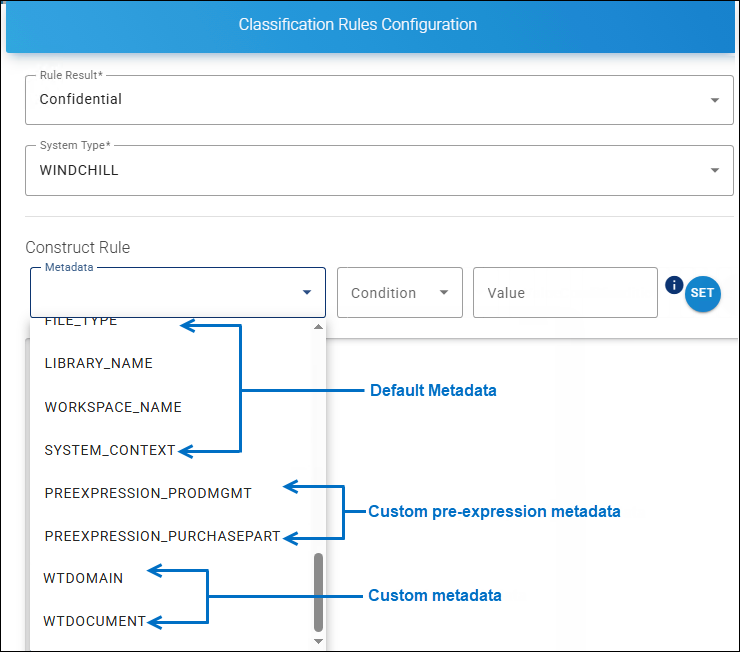
Example for Custom Metadata
Create Download Rules
Prerequisite: Make sure that classification properties and their values are configured.
Classification Rules define one or more classifications based on metadata types and pre-expressions.
-
Navigate to the Profile Configuration tab and click Configure > go to the Profiles and Classification tab and click Configure > select a classification profile > on the Rules Configuration tab, click Configure > on the Classification Rules tab, click Configure > finally, click the Rules tab and then Configure.
-
Upon opening, the Download Classification Rules page appears empty, with no rules added.
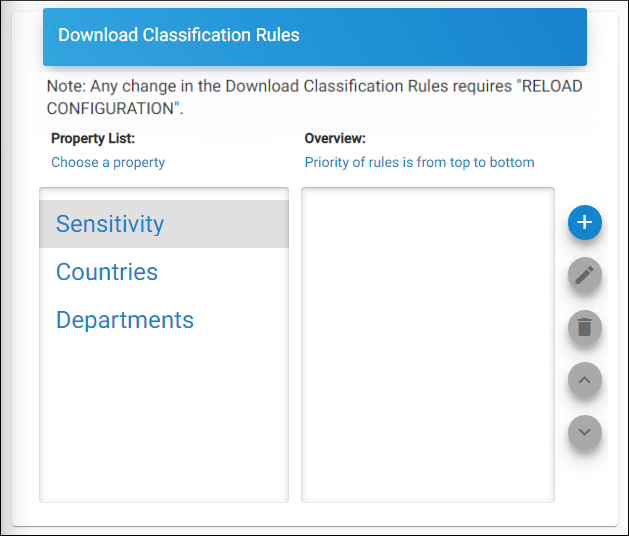
Download classification rules page
-
Select a property from the Choose a Property table and then click the plus icon.
-
The Classification Rules Configuration page appears, as shown in the figure below:
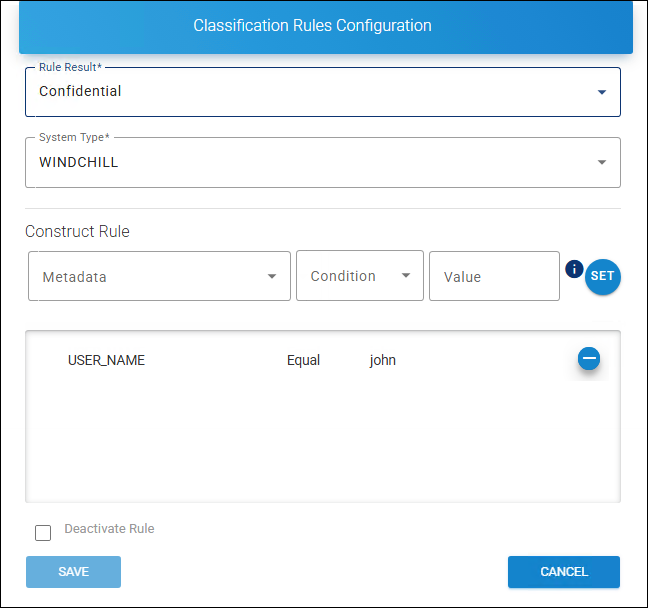
Classification rules configuration
-
Enter the values for the following:
-
Rule Result − Select a value from the list.
-
System Type − Based on your license, your system type will be displayed by default.
-
Metadata − Select a value from the list.
-
Condition − Select a condition (Equal/Not Equal) from the list.
-
Value − Enter a value for the selected metadata (case-sensitive).
-
-
Click Set to apply the rules.
-
The selected metadata and its condition are added to the list.
-
Click Save.
Results:
-
A confirmation message appears after adding or updating the rule.
-
The rule is added to the list under the Overview table as shown in the figure below:
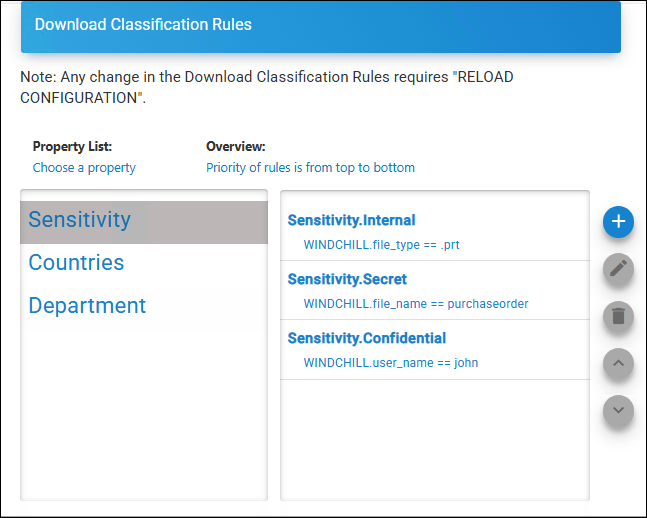
Classification rules page after configuration
-
Click Reload Configuration to apply the changes.
Related tasks
-
By default, the current rule is activated. However, you can disable it by selecting the Deactivate Rule checkbox.
-
To adjust a rule’s priority, select the rule and click the corresponding Up Arrow or Down Arrow icon.
-
To undo the priority changes, click the Restore Priority Changes icon.
-
To save the updated priority order, click the Save Priority Changes icon.
Reference Manuals:
For more information about metadata description, please refer to the relevant HaloCAD PLM/PDM Installation Manual.
-
Autodesk Vault – HaloCAD for Autodesk Vault Installation Manual
-
Teamcenter – HaloCAD for Teamcenter Installation Manual
-
Windchill – HaloCAD for Windchill Installation Manual
-
SOLIDWORKS PDM – HaloCAD for SOLIDWORKS PDM Installation Manual
-
Keytech – HaloCAD for Keytech Installation Manual
-
HaloENGINE API – Since there is no built-in metadata for the REST SDK, custom metadata can be used to generate new metadata for the HaloENGINE API system type. Please refer to the section “Custom Metadata”.
Add Action Rules
Action rules define the conditions under which a file download is blocked, protected, or excluded.
Follow the procedure below to add Action Rules:
-
Navigate to the Profile Configuration tab and click Configure > go to the Profiles and Classification tab and click Configure > select a classification profile > on the Rules Configuration tab, click Configure > under Action Rules, click Configure. The following page appears as shown below:
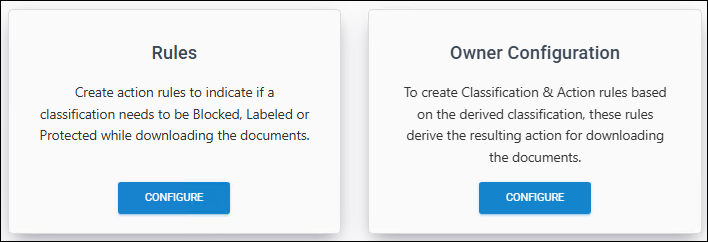
Action Rules
-
On the Rules tab, click Configure. When opened, the Action Rules for Download page appears empty, with no action rules added.
-
Click the plus icon. The Add Action Rule page appears.
-
Under Choose Resulting Actions, select any one of the actions. Please note that you can select only one action at a time: Block, Label, or Exclude.
-
To block a file download, select the Block check box and proceed to point 6.
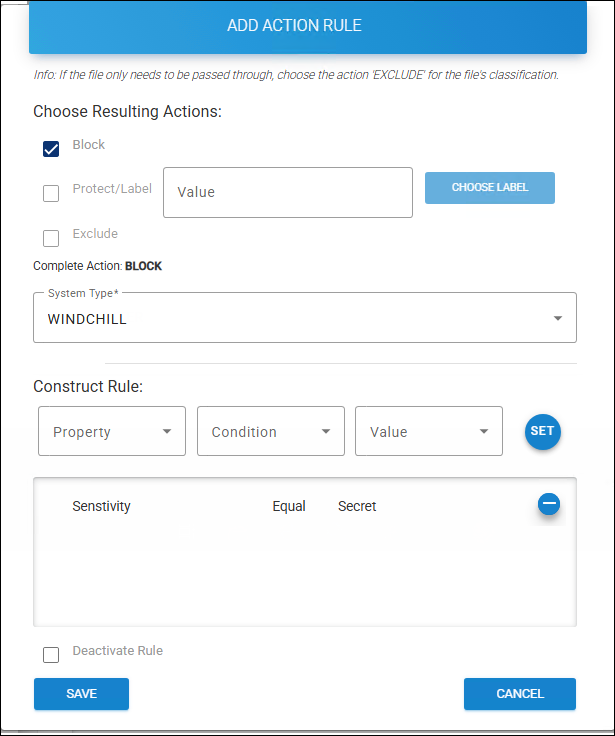
Action rule for block
-
To protect a file download, select the Protect/Label check box. Click Choose Label to select a label from the list. Proceed to point 6.
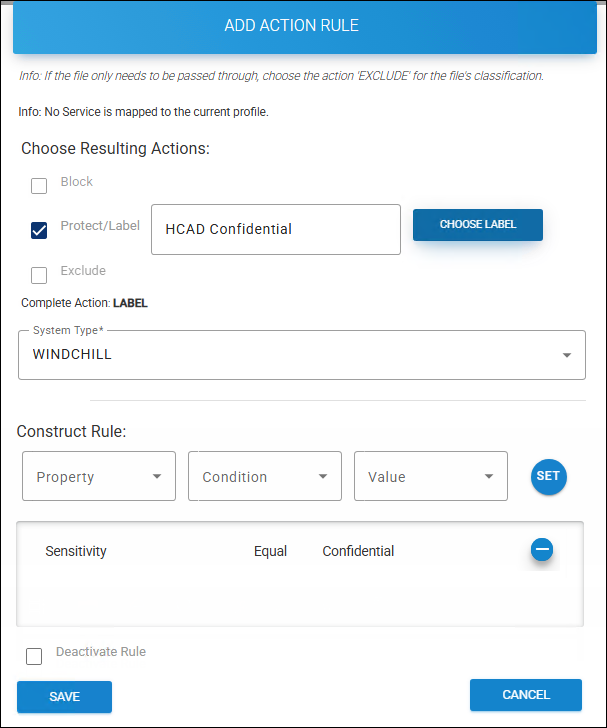
Action rule for protection
-
Exclude − Allows suppressing actions such as monitor, block, label, or protect during a file download by selecting the Exclude action based on the configured metadata or Pre-expression. If selected, other options will be disabled. Proceed to point 6.
-
-
System Type− Based on your license, your system type will be displayed by default.
-
Enter the values for the following under Construct Rules:
-
Property − Select a value from the list.
-
Condition − Select a condition (Equal/Not Equal) from the list.
-
Value − Select a value from the list.
-
Deactivate Rule − If you want to deactivate a rule, select Deactivate Rule check box.
-
-
Click Set to configure the rule. The selected property and its condition are added to the list.
-
Click Save.
Results:
-
A confirmation message appears after adding or updating the action rule.
-
The rule is added to the list.
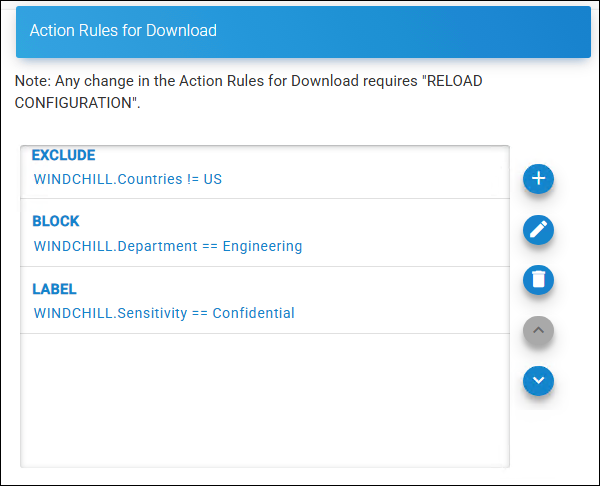
List of action rules
-
Click Reload Configuration to apply the changes.
-
Related tasks
-
You can manage the Action Rule using the Edit and Delete icons.
-
To increase or decrease the priority of a rule, select the rule and click the corresponding Up Arrow or Down Arrow icon.
-
To reverse any priority changes, click the Restore Priority Changes icon.
-
To save your priority changes, click the Save Priority Changes icon.
Action Rule priorities
When multiple classification rules exist, the HaloENGINE prioritizes them from top to bottom. For example, consider Rule 1, Rule 2, Rule 3, and Rule 4 in the Classification Engine.
-
The Classification Engine evaluates the topmost rule, Rule 1, first. If all classification expressions are correct, the first action rule is applied.
-
If not, it moves on to Rule 2 and performs further verification.
-
This process continues until a correct classification expression is found or no rules apply.
Owner Configuration (Optional)
This feature defines how a user can be determined as the owner of exported documents.
Supported client systems: Teamcenter, Windchill, Autodesk_Vault, and Keytech systems.
Owner configuration does not apply to the SOLIDWORKS PDM client, as protection is managed by HaloCAD for SOLIDWORKS PDM.
Follow the steps below to configure owner rights:
-
On the Owner Configuration tab, click Configure.
-
The Document Rights Configuration page appears as shown in the figure below:
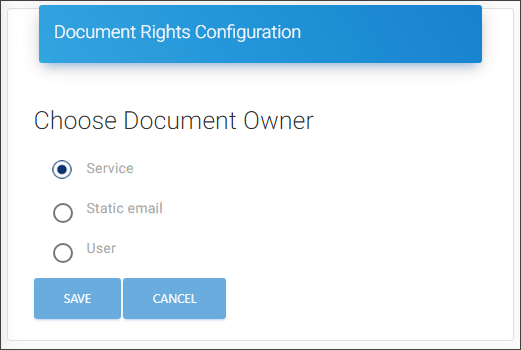
Owner rights
-
Select one of the following three options:
-
Service (default) − The Application ID used to initialize the HaloENGINE Tomcat Service becomes the owner of the document.
-
Static email − The email address entered in the text box is considered the owner of the document.
-
User − The mail address is derived from the client system, such as Windchill, Teamcenter, Keytech, Autodesk_Vault, or HaloENGINE_API.
-
-
Click Save to save the rule.
Results: A confirmation message appears after updating the assigned rights.
Metadata Configuration
SetMetadata/Unprotect Action (only for Teamcenter): It allows you to set existing metadata back onto the file while checking-in, based on the MPIP label. This aids in the consistency of file classification. As an example, for Teamcenter IP_Classification values can be returned. Note: It is not currently supported by other PLMs.
Prerequisite: Ensure that the Classification Schema is available.
Follow the steps below to configure metadata:
-
Navigate to the Profile Configuration tab and click Configure > go to the Profiles and Classification tab and click Configure > select a classification profile > go to the Metadata Configuration tab and click Configure.
-
Upon opening, the Add Metadata Rule page appears empty, with no metadata rules added.
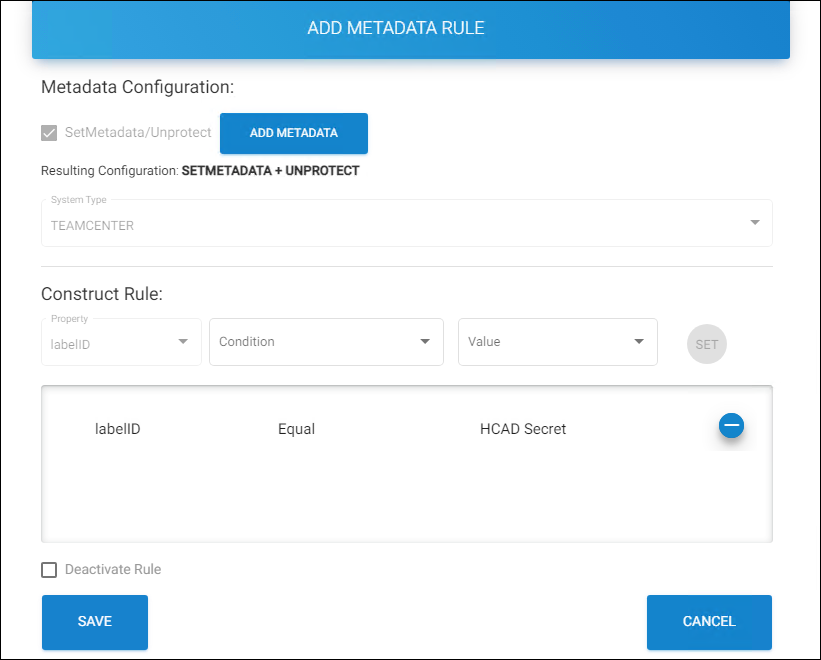
Add metadata rule
-
By default, the SetMetadata/Unprotect option is selected.
-
Click ADD METADATA.
-
The Add Metadata page appears, as shown in the figure below:
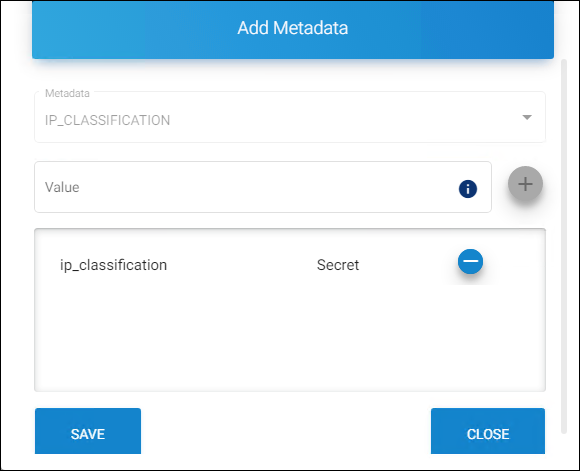
Add metadata page
-
Metadata − IP_CLASSIFICATION will be displayed by default. Currently supported only for ip_classification metadata.
-
Value − Enter the metadata that is used during encryption (minimum of 3 characters, maximum of 30 characters, and case sensitive).
-
Click on the plus icon to apply the rules. The selected metadata and its condition will be added to the list.
-
Click Save.
-
-
System Type − Teamcenter will be displayed by default. Currently supported only for the Teamcenter system type.
-
Enter the values for the following under Construct Rules:
-
Property − labelID will be displayed by default. Currently supported only for labelID.
-
Condition −Select a condition (Equal/Not Equal) from the list.
-
Value − Select a label from the list.
-
Click Set to set up the rules. The selected property and its condition will be added to the list.
-
Deactivate Rule − By default, the current rule will be activated. However, the admin portal allows you to turn off the Rule by selecting the Deactivate Rule check box.
-
-
Click Save.
Results:
-
A confirmation message appears after adding or updating the rule.
-
Click Reload Configuration to apply the changes.
-
The table below outlines the key attributes that are allowed on each system type.
|
Profile Configuration |
|||||||
|---|---|---|---|---|---|---|---|
|
System Types |
Download Rules (default) |
PII and Fin. Info. |
Cust. Pre-Exp. |
Owner Config. |
Metadata Config. |
Sys. Metadata Config. |
Auth./Comm. Endpoint |
|
Teamcenter |
Yes |
N/A |
Opt. |
Opt. |
Opt. |
Opt. |
Mutual |
|
Autodesk_Vault |
Yes |
N/A |
Opt. |
Opt. |
N/A |
Opt. |
Mutual |
|
Windchill |
Yes |
N/A |
Opt. |
Opt. |
N/A |
Opt. |
Mutual |
|
Keytech |
Yes |
N/A |
Opt. |
Opt. |
N/A |
Opt. |
Mutual |
|
SOLIDWORKS PDM |
Yes |
N/A |
Opt. |
N/A |
N/A |
Opt. |
Supports mutual and server-side |
|
HaloENGINE_API |
Yes |
N/A |
Opt. |
Opt. |
N/A |
Opt. |
Supports mutual and server-side |
Key attributes of each system type
Abbreviations used in the above table
-
Yes - applicable by default
-
N/A - Not Applicable
-
Opt. - Optional
-
Fin. Info. - Finance Information
-
Cust. Pre-Exp. - Custom Pre-Expression
-
Owner Config. - Owner Configuration
-
Metadata Config. - Metadata Configuration (Profile Configuration > Profile Classification > Classification Configuration > METADATA CONFIGURATION)
-
Sys. Metadata Config. - System Metadata Configuration (Profile Configuration > System Metadata Configuration)
-
Auth. - Authentication
-
Comm. - Communication
Assign User Permission
HaloENGINE uses three roles—ROLE_SUPER_ADMIN, ROLE_CUSTOMER_ADMIN, and ROLE_CUSTOMER_USER—for authentication and authorization. These roles are set up and managed through the Azure portal. For more details, please refer to the section “User Management Settings”. The Assign User Permission page allows you to add users who have been assigned to the role ROLE_CUSTOMER_USER.
The following configurations are possible for the ROLE_CUSTOMER_USER. Using these read-and-write permissions, a user can manage multiple profiles.
For example,
-
User 1 - assigned with full rights as an admin user. So he could access the entire portal without any limitations.
-
User 2 - assigned with read-only access. This user can view the configuration of a particular profile, but is restricted to changing the settings.
-
User 3 - assigned with write access. This user is allowed to change the configuration of a particular profile.
User accounts
-
Administrator with Super User role—Granted, the highest level of access to the entire HaloENGINE component.
-
Domain Users with Customer_Admin roles—Have fewer administrative privileges than Super User.
-
Domain Users with Customer_User roles must be configured with access. Access to this user is granted by either Customer_Admin or Super User.
Follow the procedure below to configure user access:
-
Navigate to the Profile Configuration tab and click Configure > go to the Assign User Permission tab and click Configure.
-
Upon opening, the User-Profile Permission page appears empty, with no profiles added.
-
Click the plus icon and enter the following details:
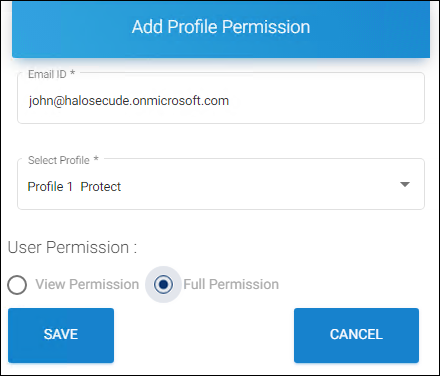
Adding a user page
-
Email ID - Enter the email ID, which is mapped to the role ROLE_CUSTOMER_ADMIN/ROLE_CUSTOMER_USER in the Azure portal. For more details, please refer to the section "User Management Settings".
-
Select Profile - Select a profile from the list.
-
User Permission - Select either View Permission or Full Permission for the user.
-
Click Save.
Results:
-
A confirmation message appears after adding the user permission.
-
The email ID is added to the list, as shown in the figure below:
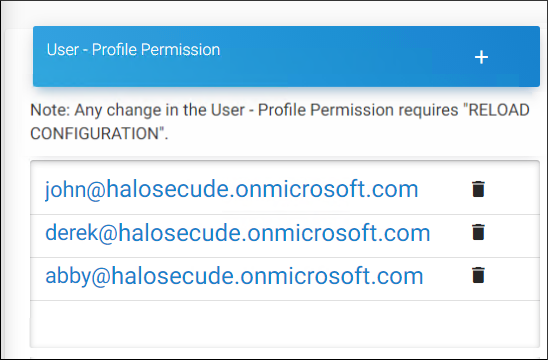
User profile permission #1
-
Click Reload Configuration to apply the changes.
-
Related tasks
To know the details of a user.
-
Click on the user’s email ID. The Profile Permission Details page appears as shown in the figure below:
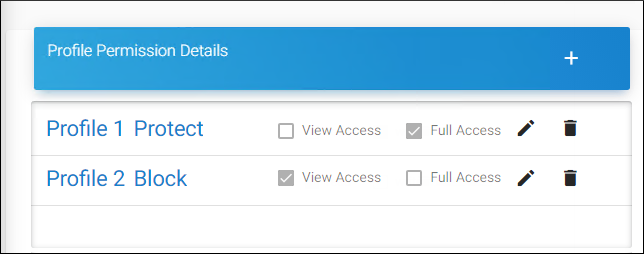
User profile permission #2
-
You can manage the permission using the Edit and Delete icons.