
The initial configuration settings on the System Configuration page can be updated at any time. This page also handles certificate and password management. You can set a password policy if necessary for your business environment, but it is not mandatory.
HaloENGINE Configuration
Basic Configuration
Follow the below steps to update the basic HaloENGINE configuration:
-
Login admin portal.
-
On the left navigation bar, click System Configuration, and then on the HaloENGINE Configuration tab, click Configure.
-
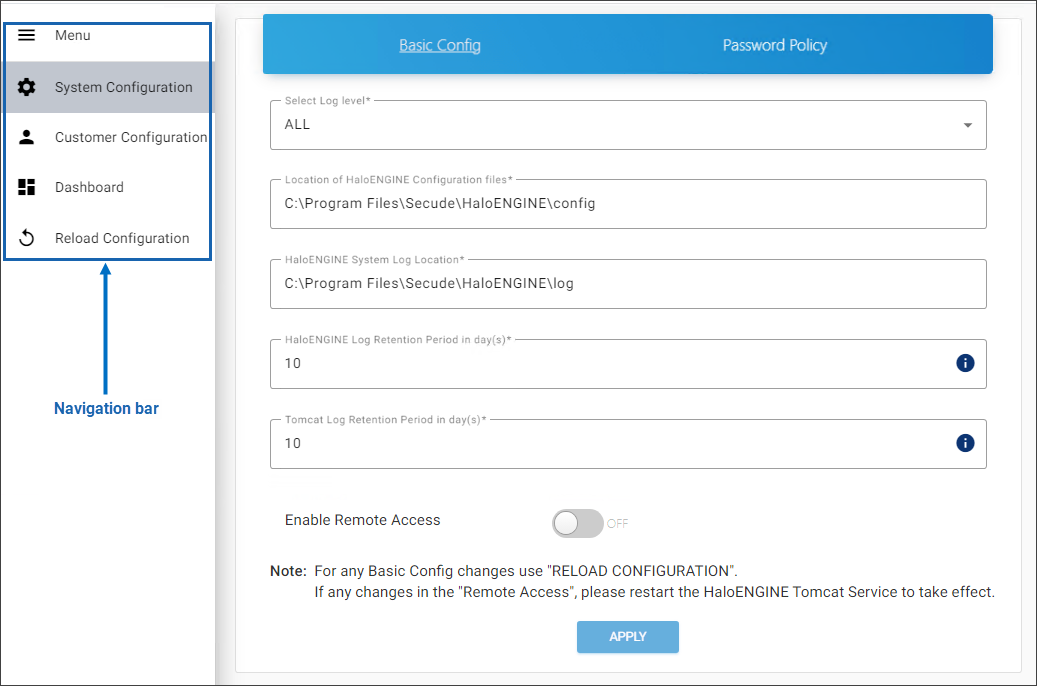
Update the following:
-
Log level
-
Path for HaloENGINE configuration files
-
Path for HaloENGINE system log
-
Retention period of HaloENGINE log
-
Retention period of Tomcat log
-
Enable/disable remote access
-
-
To make basic configuration changes take effect, click Apply and then click Reload Configuration in the left navigation bar.
HaloENGINE Configuration
Results:
-
The page will be directed to the login page once the reload is done.
-
If any changes are made to Remote Settings please restart the HaloENGINE Tomcat service.
-
Password Policy
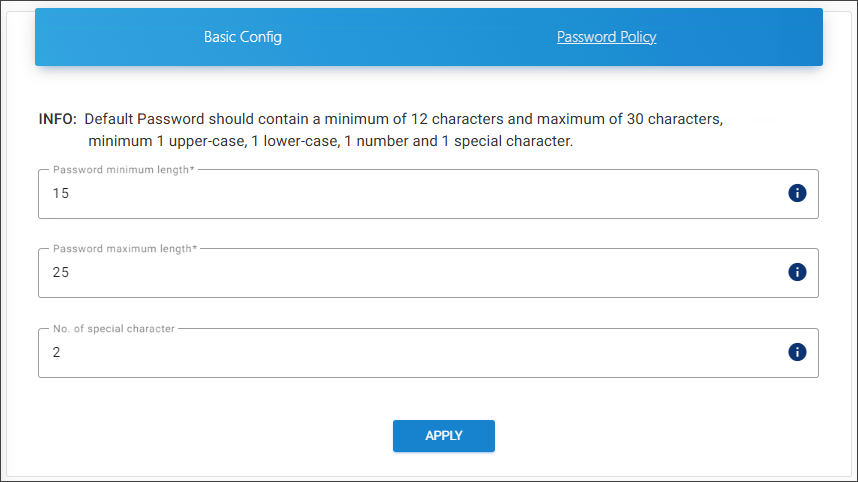
HaloENGINE's password policy requires a minimum of 12 characters and a maximum of 30 characters to increase security. However, the length of a company's password policy is determined by security requirements, regulatory obligations, and industry best practices. Therefore, you can configure or update your length seamlessly on this page.
-
Select the Password Policy tab and enter the following details as shown in the figure below:
Password policy configuration
-
Password minimum length − Enter the minimum number of characters required for your password. The default setting allows more than 12 characters.
-
Password maximum length − Enter the maximum number of characters required for your password. The default setting allows up to 30 characters.
-
No. of special character − Enter the number of special characters that should be included in your password. The default setting requires at least one special character. Note: If you set a Password Policy that includes more than one special character, you must input the password continuously. For example, if you set the No. of special character to 2, input them one after the other (for example, Pass234567!$). Entering special characters apart (for example, Pass!234567$) in the new password field will not be accepted.
-
Click Apply.
Results:
-
You will receive a confirmation message after successfully updating the password policy followed by a warning message as “Please change your Password.”
-
On the warning message screen, click Change Password. The Change Admin Password screen will appear.
-
Enter your current password, create a new password, and confirm it in the text boxes provided. For more details, please refer to the section “Change Password”.
-
The admin portal will restart automatically and you must enter the new password to access it.
-
Please note that it is not allowed to use the current password as your new password.
-
Import/Export Configuration
Follow the below steps to update the import/export configuration:
-
On the left navigation bar, click System Configuration, and then on the Import/Export Configuration tab, click Configure.
-
To import:
-
Select the mode of installation - Single Customer or Multi Customer. You can notice an attachment button gets enabled for file selection.
-
Click on the button and select the
HaloENGINE-admin-config.zipfile from the Open Windows dialog. -
Results: You can see the name of the zip file displayed on the page.
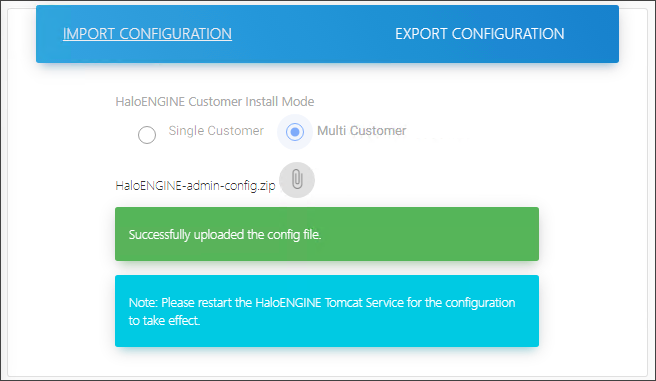
Import Configuration
-
-
What to do next: Restart the HaloENGINE Tomcat service for the configuration update to take effect.
-
To export:
-
Click Export Configuration and then click Export Config button.
-
Please wait while the file
HaloENGINE-admin-config.zipis downloaded.
-
CAD File Types Configuration
Use this page to add a new CAD file extension that will enable encryption and decryption for CAD-compatible file formats.
To add a new file extension, follow the steps below:
-
On the left navigation bar, click System Configuration, and then on the CAD File Types Configuration tab, click Configure.
-
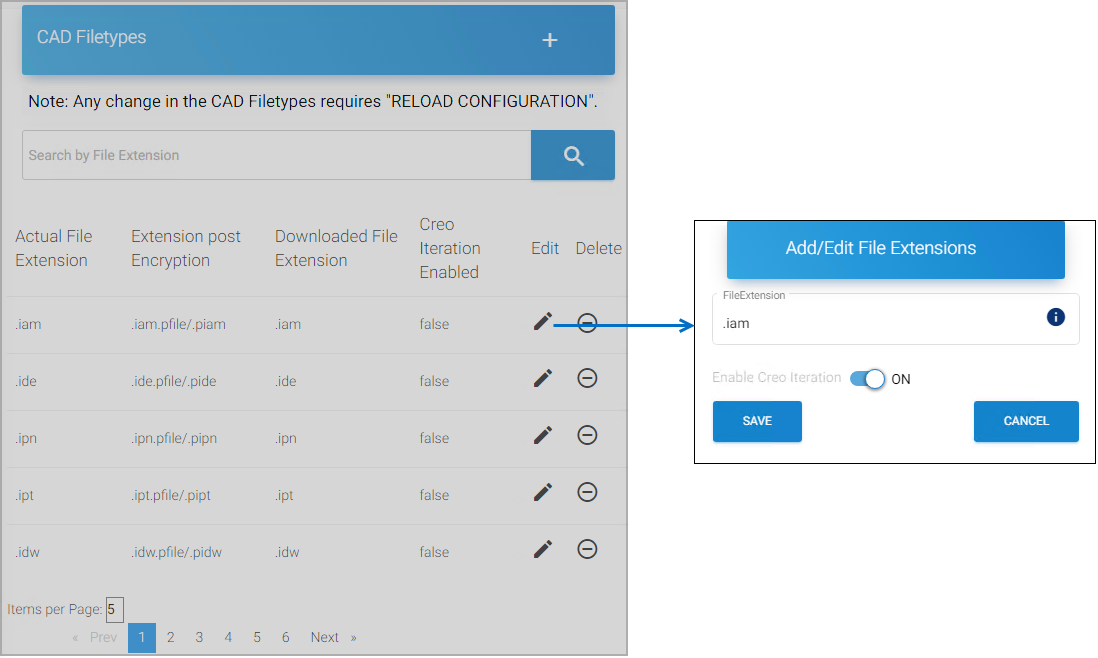
The CAD Filetypes page will appear as shown in the figure below:
CAD File Types Configuration
-
Option 1:
-
To change the Creo Iteration of a file type from the existing list.
-
Turn ON the slider button Enable Creo Iteration against the file type. In this example,
.iamis enabled with Creo Iteration.
-
-
Click Save.
Results: You can see a confirmation message after saving the file type. In the below example, the
.iamrow gets appended to the end of the list with Creo Iteration Enabled = true.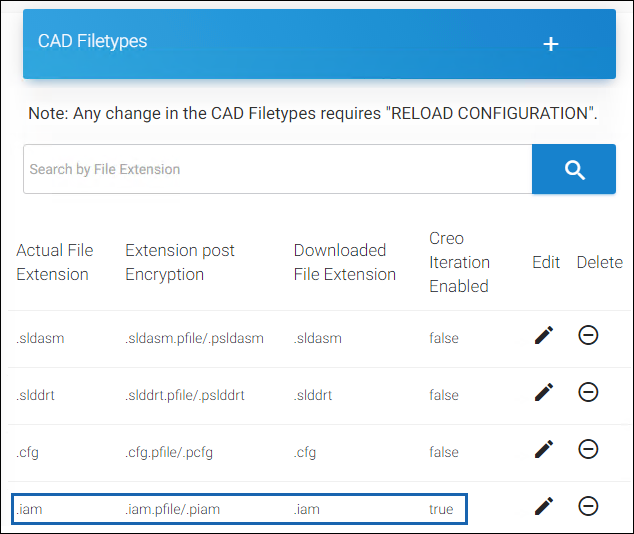
Creo Iteration Enabled
-
Option 2: To add a new file extension.
-
Click on the plus icon and enter the file extension along with Creo Iteration Enabled = true/false status.
-
Click Save.
Results: You can see a confirmation message after saving the file type and the new entry is appended to the list's end.
-
-
To find a file extension:
-
Click Search File Extension. The Search File Extension page will appear.
-
Enter the file extension in Search File Extension and click Search.
Results: The results of the search will be automatically listed. You can manage the file extension file using the Edit or Delete icon.
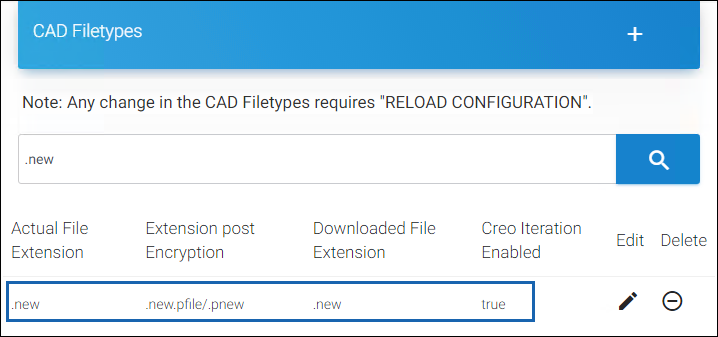
Search File Extension
-
Download Logs
The HaloENGINE logs and Tomcat logs can be downloaded via the admin portal using the following procedure:
-
On the left navigation bar, click System Configuration, and then on the Download HaloENGINE/Tomcat Logs tab, click Configure.
-
The Download HaloENGINE/Tomcat Logs page will appear as shown in the figure below:
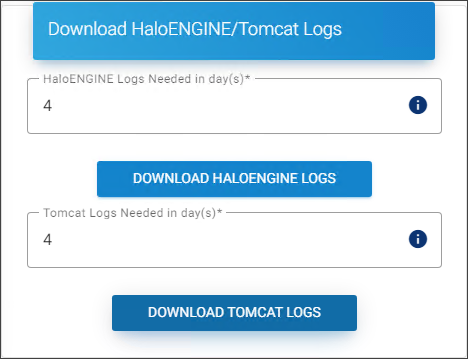
HaloENGINE and Tomcat logs
-
To download the HaloENGINE logs:
-
Enter the number of days and then click Download HaloENGINE Logs.
-
Results: A zip file (
HaloENGINE-Log) will be downloaded to the default download location.
-
-
To download the Tomcat logs:
-
Enter the number of days and then click Download Tomcat Logs.
-
Results: A zip file (
tomcat-Log) will be downloaded to the default download location.
-
-
Please note that you can only enter the value within the range that is defined on the HaloENGINE Configuration page for HaloENGINE log retention and Tomcat log retention.
HaloENGINE Admin Activities Log
Halochain scrutinizes the log file HaloENGINE_Admin_Activities.log for any modification and shows the results.
-
On the left navigation bar, click System Configuration, and then on the HaloENGINE Admin Activities Log tab, click Validate.
-
The HaloENGINE Admin Activities Log page will appear as shown in the figure below:
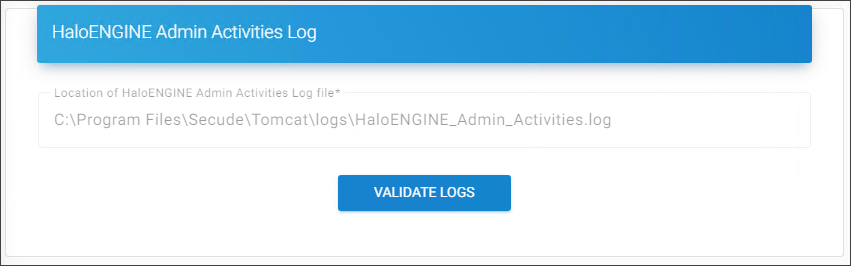
Admin Activities log
-
Click Validate Logs.
Results:
-
You will receive the message “The log file has been validated and no manipulated entries found.”, if no manipulation is identified,
-
If manipulation is detected, you will obtain the following output:
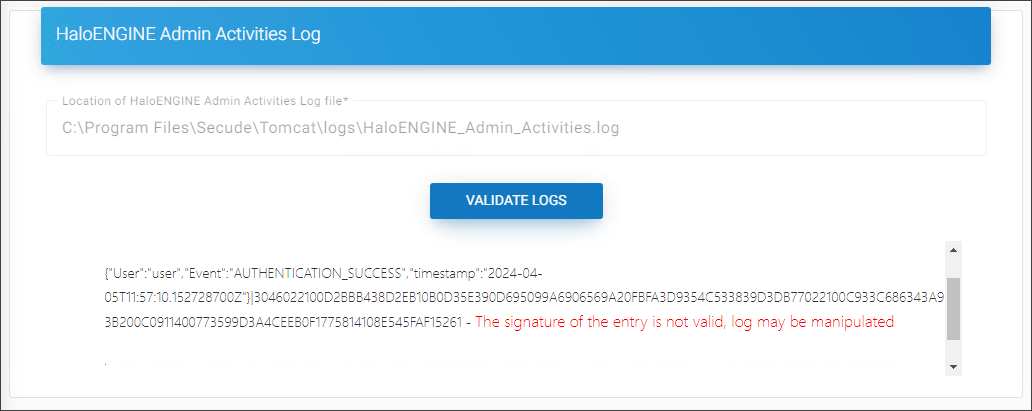
Halochain output
-
Log Out
Logging out means terminating the current user's access to the portal. When the Log Out button is pressed, the portal is notified that the current user intends to terminate the login session.
A logged-in user's login session expires after 20 minutes. The user will no longer be able to use the portal after this period has passed. The user will be automatically logged out and redirected back to the login screen.
Change Password
You can change your password for security concerns by following the steps below:
-
Click Change Password on the top right corner.
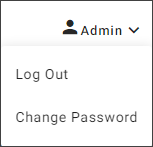
Change login password #1
-
The Change Admin Password dialog will appear as shown in the figure below:
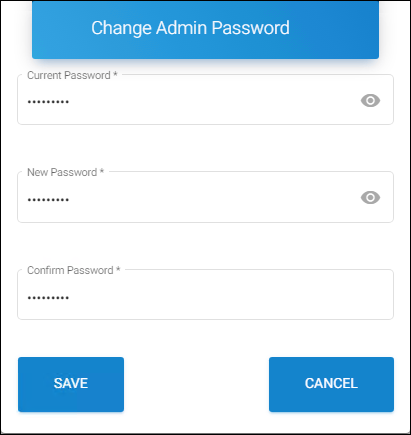
Change login password #2
-
Enter the current password.
-
Enter your new password and re-enter again.
-
Click Save.
Reset Administrator Password
Use the following procedure to reset, update, or change your administrator password.
-
Copy
haloengine-password-config-<version>.zipfile to the desktop and extract it. -
Open Command Prompt with administrator rights and change directory to
haloengine-password-config-<version>\bin. -
Type
haloengine-password-config.bat -hto display the help information.
For example:
haloengine-password-config.bat -confPath <Full path of HaloENGINE config directory> -newPwd <new password for the login>
haloengine-password-config.bat -confPath "C:\Program Files\Secude\HaloENGINE\config" -newPwd TestHalo!2345
When to reset and change the password?
HaloENGINE Admin portal provides the option of either changing or resetting your password. You can change the password when you know the current password. If you have forgotten the current password, you could reset (create a new) password using the tool.
Test the Configuration
-
Restart the HaloENGINE Tomcat service.
-
If you have configured the HaloENGINE properly, the following URLs must be resolved. URL resolves within the machine when you use
localhost. Where localhost is the fully qualified hostname or IP address of the HaloENGINE installed machine.-
Process URL:
http://localhost:8383/haloengine-server/process?wsdl -
Monitor URL:
http://localhost:8383/haloengine-server/monitor?wsdl -
Stateful Process URL:
http://localhost:8383/haloengine-server/stateful_process?wsdl
-
-
To access from other machines, use the IP address of the HaloENGINE.
-
http://10.41.14.69:8383/haloengine-server/process?wsdl -
http://10.41.14.69:8383/haloengine-server/monitor?wsdl -
http://10.41.14.69:8383/haloengine-server/stateful_process?wsdl
What to do next: Install the SAP add-on, and use the above URLs to create logical ports for processing the file and monitoring the downloads.
-
How to Update?
This section describes how to update HaloENGINE from previous versions to the latest version.
Update from HALO Core Server to HaloENGINE
This section is for users who are using previous versions of HALO Core Server (for example, <6.6) and want to update to HaloENGINE 6.8.
Update password
If your administrator password in the previous version is less than 12 characters, you must reset it according to the current password policy. To know how to reset the password, refer to the section “Reset Administrator Password”.
-
Step 1: Export admin file from HALO Core Server
-
Export the
halocore-admin-config.zipfile using the Export Configuration option. -
Uninstall HALO Core Server version 6.5 using the installer
SECUDE_HALO_CORE_SERVER_X64.EXE. -
When prompted "Do you want to keep the HALO Core Server configuration files?" during the removal process, select Yes. The Tomcat files and configuration will be saved as a result.
-
-
Step 2: Install the new version (HaloENGINE 6.8)
-
Install the HaloENGINE using
HaloENGINE_Setup.exe. -
At this moment, do not launch the portal to configure it. The reason for this is to use the previously stored files from Step 1.
-
Create a system variable
JAVA_HOMEand copy theHaloENGINE_HOMEvalue. For example, e.g:JAVA_HOME = D:\test\Secude\secude-jre
-
-
Step 3: Run the batch file
-
Open a command prompt and navigate to the folder where
HaloENGINEMigrationFor67.batis available in the product package. -
Execute the batch file as shown below:
HaloENGINEMigrationFor67.bat <path to the old zip file>\ <zip file name> <name of the new zip file> For example: HaloENGINEMigrationFor67.bat D:\Office\admin_zip_files\ halocore-admin-config.zip HaloENGINE-admin-config-new.zip -
The new configuration zip file will be generated at
D:\Office\admin_zip_files. Note: Make sure the folder name has no spaces. -
Now launch the portal and import the new zip file using the Import Configuration option.
-
-
Step 4: Replace XML files
To use the previous versions (<6.6) of the server certificate
HalocoreServer.cer, simply rename it toHaloENGINEServer.cer.Case 1: If you have chosen the default installation folder (
C:\Program Files\Secude), you can skip this step.Case 2: If you have chosen a location (
D:\sample\Secude) other than the default installation folder, follow the steps below.-
Replace the [
server.xml,tomcat-users.xml,certfolder] files that were saved in Step 1 in the installation folder. -
From the above location, edit the
server.xml.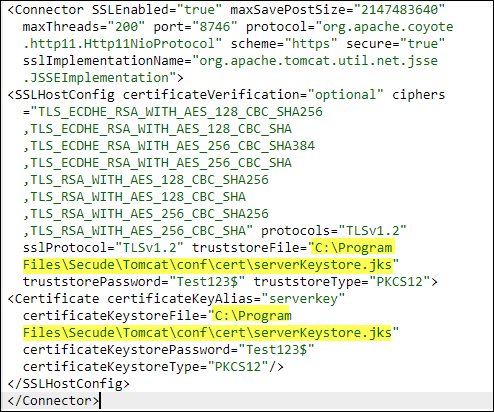
Server XML
-
Replace the current HaloENGINE installation location (
D:\sample\Secude) in two places where you seeserverKeystore.jksandcertificateKeystore.jks. -
For example,
D:\sample\Secude\Tomcat\conf\cert\serverKeystore.jksandC:\Program Files\Secude\Tomcat\conf\cert\serverKeystore.jks. -
Save it and start the Tomcat Service.
-
Launch the admin portal.
-
Update of HaloENGINE from Version 6.7.x.x to 6.8.x.x
-
Navigate to the directory in which the HaloENGINE installation package is located and double-click the
HaloENGINE_Setup.exe. The installation begins with the following dialog: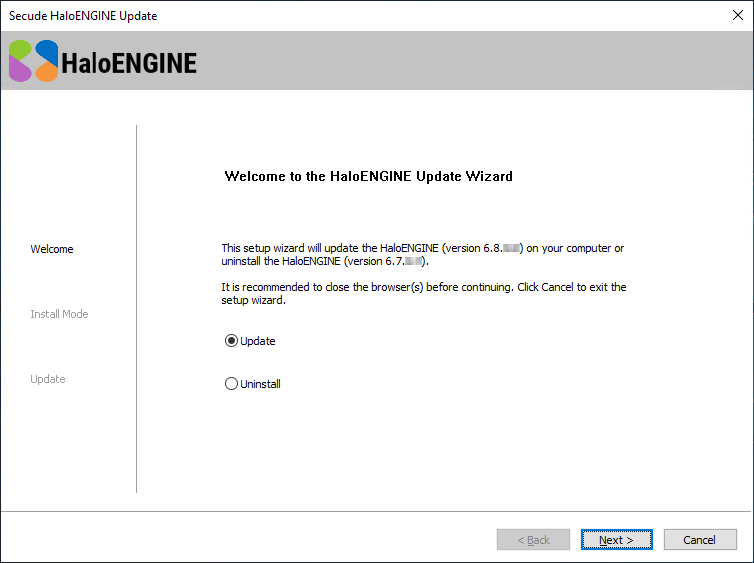
Update screen #1
-
Select either Update or Uninstall.
-
Uninstall: If you wish to uninstall the server component, select Uninstall and click Next.
-
To the question, "You are about to uninstall the HaloENGINE. Are you sure you want to uninstall the application?", answer Yes.
-
To the question, "Do you want to keep the HaloENGINE configuration files?", answer Yes to save and then continue the installation or answer No to continue uninstallation without saving.
-
On completing the uninstall process, the following screen will appear. Click Close to close the wizard.
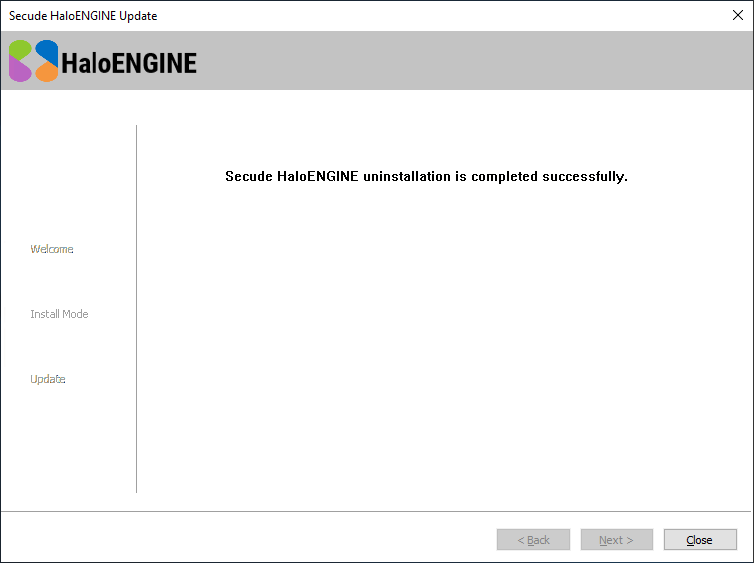
Uninstall dialog
-
-
Update: If you wish to update, select Update and click Next.
-
-
The Customer mode selection dialog will appear:
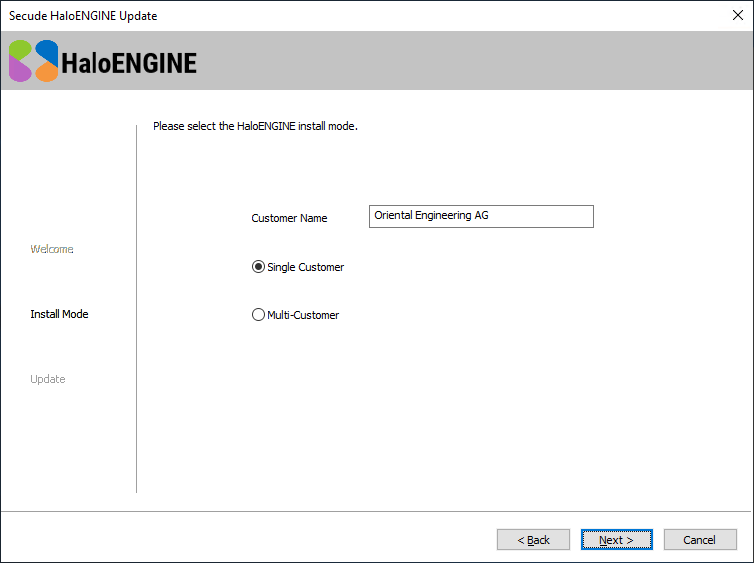
Update screen #2
-
Select a mode (Single Customer or Multi-Customer), and click Next.
-
The update begins, and progress is shown in the dialog. Please be patient, as this will take some time.
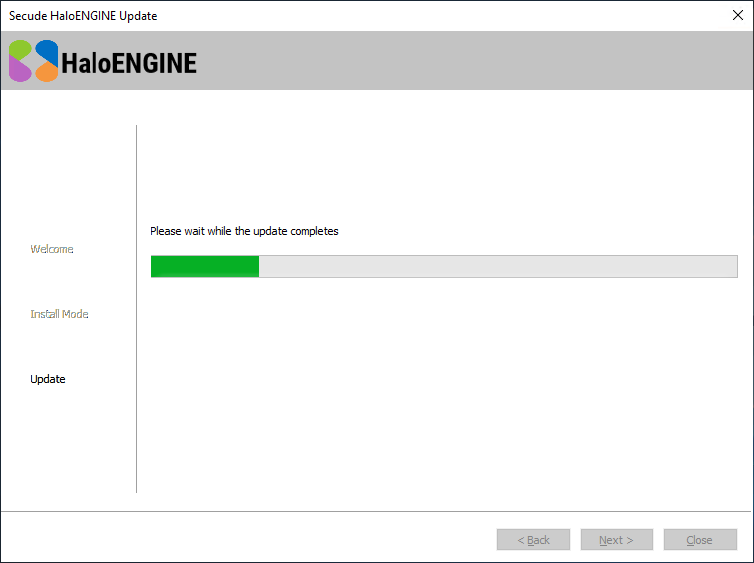
Update screen #3
-
Once the update is completed, the HaloENGINE configuration dialog will appear.

Update screen #4
-
When you select Configure HaloENGINE, a link will appear on the configuration screen.
-
Run the batch file as described in the "Step 3: Run the Batch File" section above.
-
Click on the link to access the HaloENGINE admin portal.
-
Note: To use the previous versions (<6.6) of the server certificate
HalocoreServer.cer, simply rename it toHaloENGINEServer.cer.
HaloENGINE Service Monitor
HaloENGINE Service Monitor displays HaloENGINE Service and Azure Connection information and verifies that the protection is properly applied.
Prerequisites:
-
HaloENGINE Service must be installed.
-
HaloENGINE must be installed.
Follow the steps to display the HaloENGINE Service Monitor page:
-
Stop HaloENGINE Tomcat Service.
-
Navigate to the installer package and edit
HCSRVNodes.jsonfile. -
Enter the following details:
If MPIP mode, enter the author (e-mail address) and a
label ID.
[ {
"author":"john@halosecude.onmicrosoft.com",
"template_ID":"",
"label_ID":"{cec0887a-07de-4dde-a67f-23edcf22395e}"
} ] -
Save the file.
-
Place the
HCSRVNodes.jsonin the HaloENGINE installed directory.-
The default location is
...Secude\ServiceMonitor\config -
User-defined location e.g.,
D:\Secude\ServiceMonitor\config
-
-
Start HaloENGINE Tomcat Service.
-
Access HaloENGINE Service Monitor with the following URL:
http://localhost:8383/haloengine-service-monitor/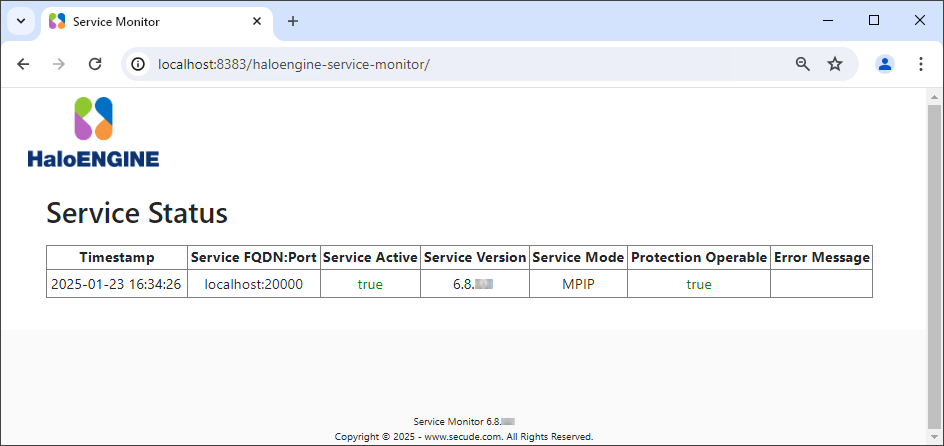
HaloENGINE Service status
Log Details
The following table lists the HaloENGINE log files.
|
Filename |
Location |
Description |
|---|---|---|
|
|
|
HaloENGINE’s activities are logged into this file, such as connection, file process, and so on. |
|
|
|
The tenant’s download activities are logged into this file. |
|
|
Same as above |
DSI logs are forwarded from SAP and are logged into this file. |
|
|
|
HaloENGINE Service health check status logged into this file. |
Log Details