
A profile is a repository for all details relating to classification settings.
Prerequisite: Make sure to register the HaloENGINE Services as mentioned in the section "Phase 4. Register HaloENGINE Services". Note: Blocking does not require HaloENGINE Service Registration.
Follow the below procedure to configure the Profile:
-
On the left navigation bar, click Customer Configuration and then select a customer ID from the list. On the Profile Configuration tab, click Configure. The following page will appear, as shown in the figure below:
Profile Configuration page #1
-
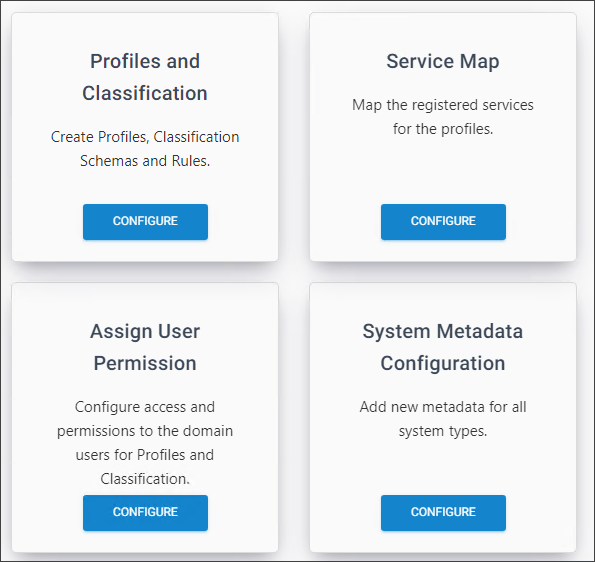
On the Profiles and Classification tab, click Configure.
-
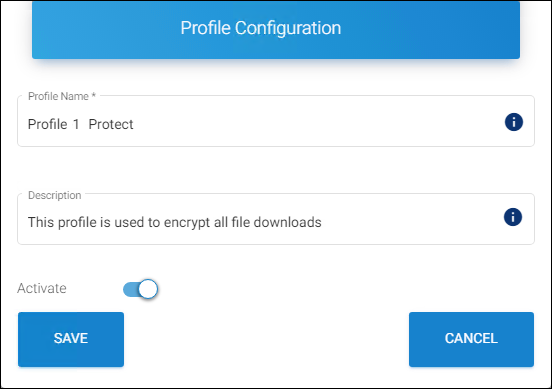
Click the plus icon on the Classification Profiles page and then enter the following details:
Profile Configuration page #2
-
Profile Name − Enter a name for the new profile. Note: A profile name cannot contain any of the following characters
"< >: " / \ |? * ` ~"and can contain “- _" -
Description − Enter a description for the new profile (optional).
-
Activate − The current profile is automatically enabled by default. However, you can deactivate it by clicking the Activate slider button.
-
Click Save.
-
Repeat the above steps to create multiple profiles.
Results:
-
You will receive a confirmation message after successfully saving the profile.
-
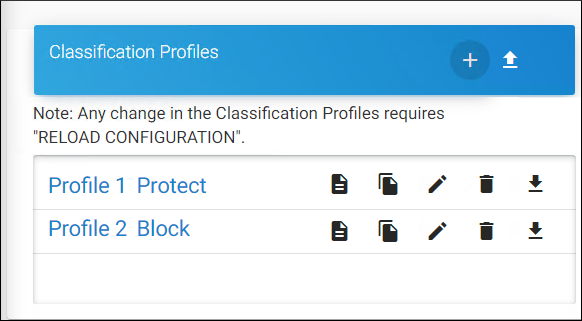
The new profile is added to the Classification Profiles list.
Profile list
-
Related tasks
-
You can manage the Classification Profiles by using the copy, edit, delete, download, and import icons.
-
If you want to view the profile details, click the Profile Details icon.
What to do next:
-
Select a classification profile from the displayed list. The Classification Configuration page will appear as shown in the figure below:
Classification Configuration
-
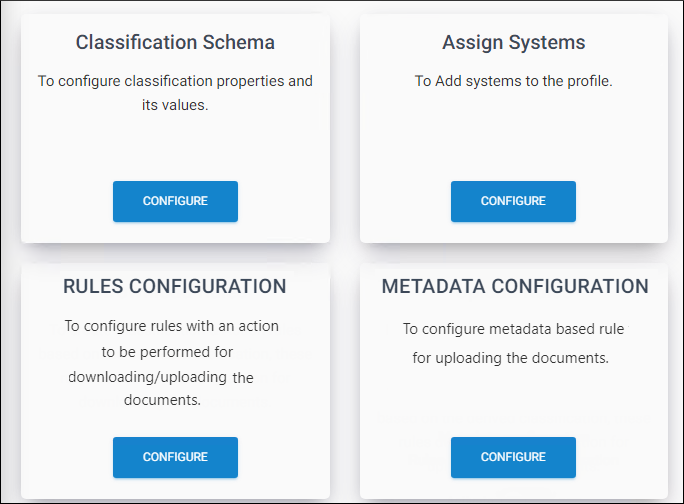
Refer to the following sections to create a classification schema, rules (download and upload), configure metadata, and assign systems for each profile.
Create Classification Schema
Classification Schema contains properties and their values.
-
On the Classification Schema tab, click Configure.
-
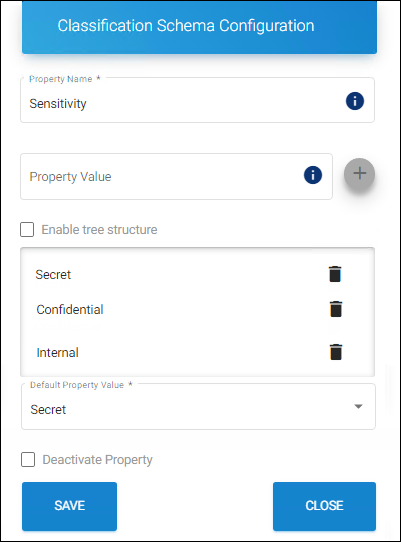
Click on the plus icon and enter the following details:
-
Property Name − Enter a name for the new property (maximum 20 characters and case sensitive). For example, sensitivity.
-
Property Value − Enter a value for the property (maximum 20 characters and case sensitive) and click the plus icon on the right. The value is added to the list. For example, Secret, Confidential, and Internal.
Classification Schema Configuration
-
-
The first entry (e.g., Secret) will be taken as the default value, but you can modify it using the Default dropdown menu. The words
default,group,multiple,if,tree,hierarchy, andreturnare reserved keywords that are used for internal processes. Therefore, it should not be used as a Property Name or Property Value. Using the keyword will result in a compile-time error. -
Add as many values as you wish to add.
-
Click Save.
Results:
-
You will receive a confirmation message after successfully saving the Classification Schema.
-
The property name and its values get added as a node.
-
Similarly, you can add many nodes by using the plus icon.
-
-
Enable tree structure: To have a tree structure view of information, where each item can have several multiple children, select the Property Value (e.g., Asia) and enter a value in the property value field (e.g., India), and then select Enable tree structure check box and add the child node using the plus icon. In this illustration, the Property Value “Asia” contains three child nodes - India, Saudi Arabia, and Singapore.
-
Click Close to close the page.
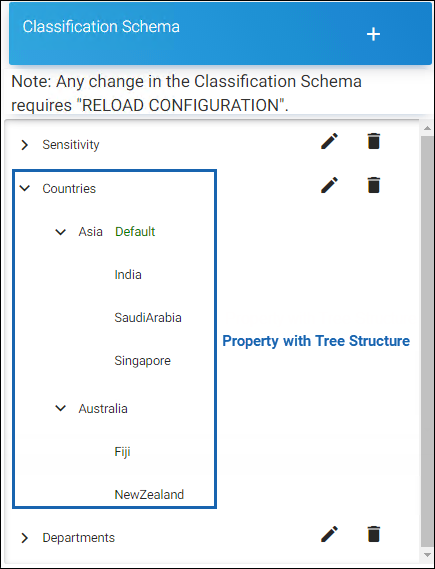
Classification Schema list
Related tasks
-
By default, the current Property will be activated. You can deactivate it by using the Deactivate Property check box.
-
You can manage the classification profiles by using the edit and delete icons.
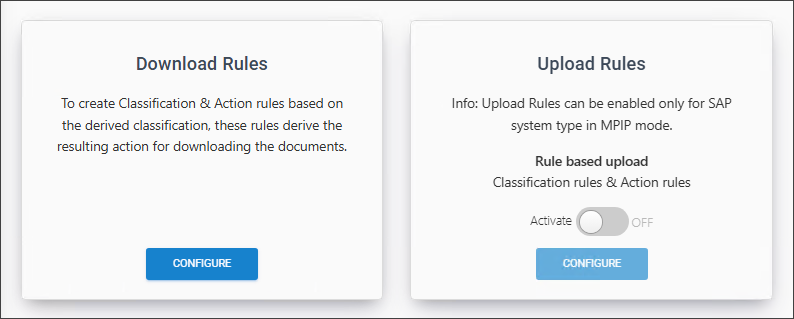
Create Download Classification Rules
Download rules define classification rules based on metadata types and Pre-Expression and action rules decide whether to block/protect/notify/exclude when a file is downloaded.
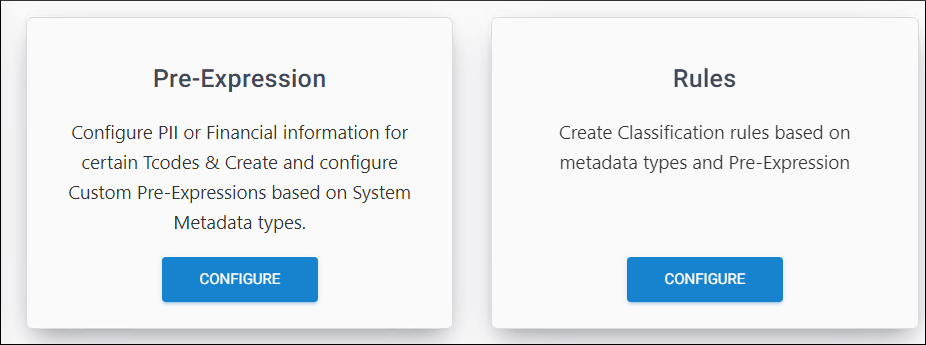
Personally Identifiable Information (Pre-Expression)
HaloENGINE provides a predefined list of pre-expression for Personally Identifiable Information (PII) contained in tcodes. Personally identifiable information is only applicable to the SAP system type.
-
On the Rules Configuration tab, click Configure and the following page will appear as shown in the figure below:
Rules Configuration
-
On the Download Rules tab, click Configure and then on the Classification Rules tab, click Configure and the following page will appear as shown in the figure below:
Classification rules
-
On the Pre-Expression tab, click Configure and the following Pre-Expression Configuration page will appear as shown in the figure below:
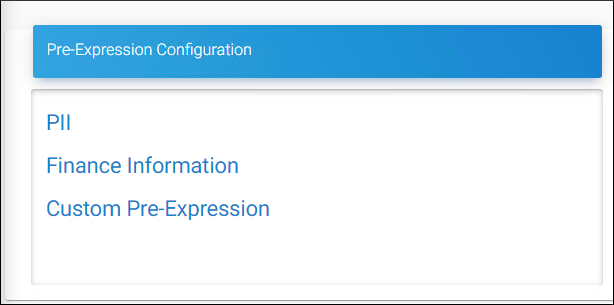
Pre-Expression Configuration
-
Click PII from the list. The PII Configuration page will appear as shown in the figure below:
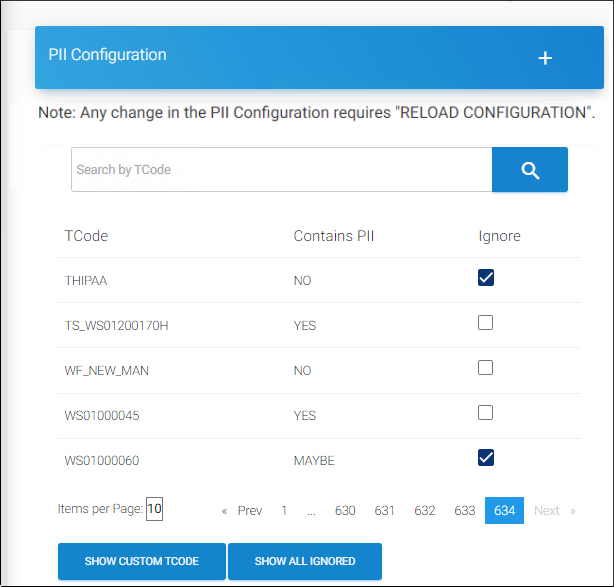
PII configuration
-
The value of the tcodes are indicated by the following options:
-
YES = it contains PII
-
NO = it does not contain PII
-
MAYBE = It might contain PII
-
-
If you want to ignore a tcode, select Ignore check box against it.
-
These values of the tcode have no relationship with the Ignore check box.
-
To find a tcode, enter the name in the Search by TCode text box.
Results: The search results will be shown automatically.
To add custom tcode(s)
-
Click on the plus icon. The Add Custom PII dialog will appear.
-
Enter your custom tcode and choose one of the following values from the list (YES/NO/MAYBE).
-
Click Save.
Results: You will receive a confirmation message on adding the tcode.
Related tasks
-
To view the list of custom tcode(s) added, click Show Custom Tcode.
-
If you wish to remove the tcode(s) from the list, click the Delete icon.
-
To view only ignored tcode(s), click Show All Ignored.
-
To view all (including ignored), click Show All.
Finance Information (Pre-Expression)
HaloENGINE Server provides a predefined list of pre-expression for Finance Information contained in tcodes. Finance Information is only applicable to the SAP system type.
-
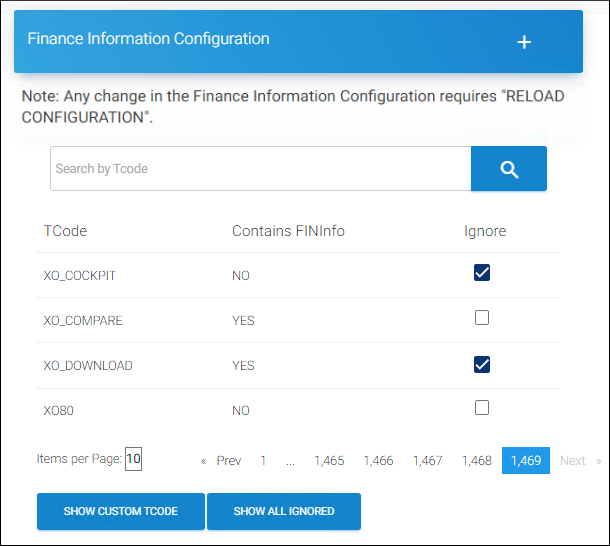
On the Pre-Expression Configuration page, click Finance Information.
-
The Finance Information Configuration page will appear as shown in the figure below:
Finance configuration
-
The value of the tcodes are indicated by the following options:
-
YES = it contains finance information
-
NO = it does not contain financial information
-
MAYBE = It might contain financial information
-
-
If you want to ignore a tcode, select Ignore check box against it.
-
These values of the tcode have no relationship with the Ignore check box.
-
To find a tcode, enter the name in the Search by TCode text box.
Results: The search results will be shown automatically.
To add custom tcode(s)
-
Click on the plus icon. The Add Custom Finance Info dialog will appear.
-
Enter your custom tcode and choose one of the following values from the list (YES/NO/MAYBE).
-
Click Save.
Results: You will receive a confirmation message on adding the tcode.
Related tasks
-
To view the list of custom tcode(s) added, click Show Custom Tcode.
-
If you wish to remove the tcode(s) from the list, click Delete icon.
-
To view only ignored tcode(s), click Show All Ignored.
-
To view all (including ignored), click Show All.
Custom Pre-Expression
This page allows you to create custom pre-expressions depending on the system types for which you have been licensed. This is available for all systems, including BO, SAP, Windchill, Teamcenter, Keytech, Autodesk_Vault, SOLIDWORKS_PDM, and HaloENGINE_API.
-
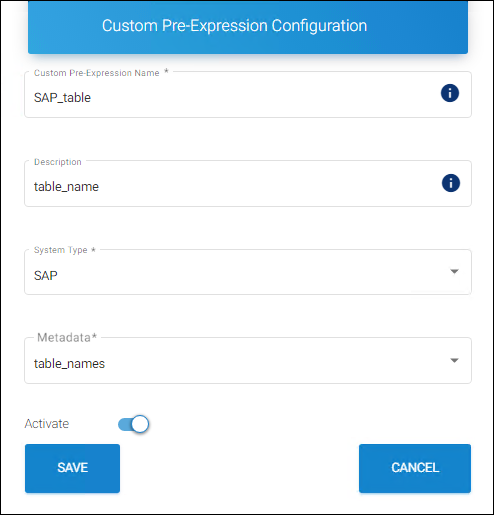
On the Pre-Expression Configuration page, click Custom Pre-Expression.
-
Click on the plus icon on the Custom Pre-Expression page and enter the following details:
Custom Pre-Expression #1
-
Custom Pre-Expression Name − Enter a name for the new custom pre-expression entry. Note: only 'alphabet', 'numbers', '_' and '-' characters are supported.
-
Description − Enter a description of the new custom pre-expression (optional).
-
System Type − HaloENGINE supports the following system types: BO, SAP, Windchill, Teamcenter, Keytech, Autodesk_Vault, SOLIDWORKS_PDM, and HaloENGINE_API. Based on your license, select your system type.
-
Metadata − Select a metadata from the list.
-
Activate − The current Custom Pre-Expression is automatically enabled by default. However, you can deactivate it by clicking the Activate slider button.
-
Click Save.
Results:
-
You will receive a confirmation message after adding the Custom Pre-Expression.
-
The new custom pre-expression is added to the list.
-
Reference Manuals: For more information about metadata description, please refer to the relevant HaloCAD PLM/PDM Installation Manual.
-
SAP – HaloCORE Installation Manual
-
Autodesk Vault – HaloCAD for Autodesk Vault Installation Manual
-
Teamcenter – HaloCAD for Teamcenter Installation Manual
-
Windchill – HaloCAD for Windchill Installation Manual
-
SOLIDWORKS PDM – HaloCAD for SOLIDWORKS PDM Installation Manual
-
Keytech – HaloCAD for Keytech Installation Manual
-
BO – HaloCORE BO Installation Manual
-
HaloENGINE API – There is no built-in metadata for REST SDK, so Custom metadata can be used to generate new metadata for the HaloENGINE API system type. Please refer to the section “Custom Metadata”.
To add custom metadata configuration
-
Now, select a custom pre-expression from the list and the Custom Metadata Configuration page will appear, as shown in the figure below:
-
For illustration, a new custom pre-expression "F-07" is added to the list.
Custom Pre-Expression #2
-
Click on the plus icon. The Add Custom Metadata Values dialog will appear.
-
Enter a value and select any one of the following options:
-
YES = it contains specified metadata information
-
NO = it does not contain the specified metadata information
-
Click Save.
Results:
-
You will receive a confirmation message on saving the Custom Metadata.
-
The new metadata value is added to the list.
-
Related tasks
-
To find a metadata value, enter the name in the Search Metadata text box. The search results will be shown.
-
If you want to remove custom metadata from the list, click the Delete icon against the metadata.
-
To Import Custom Metadata: If you wish to add your own metadata, click Import Metadata. The Import Custom Metadata dialog will appear. Click on the button and select the metadata file (
.csv, xls, .xlsx) from the Open Windows dialog. -
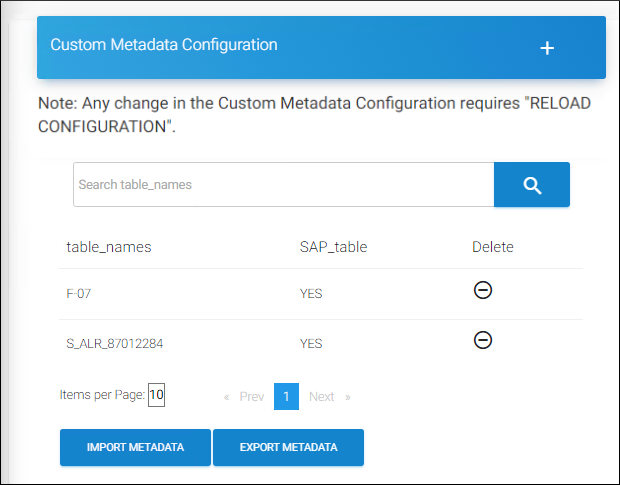
To Export Custom Metadata: If you wish to export the existing metadata, click Export Metadata. An Excel file will be downloaded. The new custom pre-expression is displayed and available for user selection in the Classification Rule UI as metadata as shown in the below example:
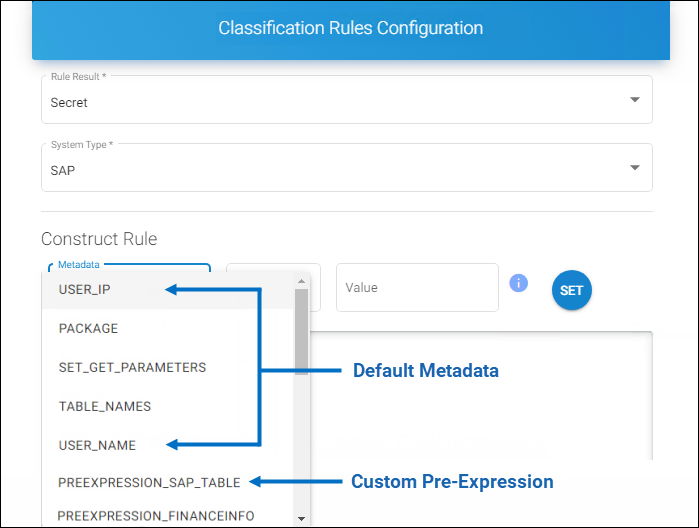
Example for Custom Pre-Expression #3
-
You can manage the Custom Pre-Expressions by using the edit or delete icons.
Custom Metadata
For data classification and secure file downloads, the HaloENGINE admin portal uses the default metadata. However, depending on the needs of each organization, the admin portal allows them to add their own metadata. Note: Metadata can be configured for PLM clients who do not want schema or rule-based decryption. For more information, refer to the section "Metadata Configuration”.
Follow the below procedure to create custom metadata for System types:
-
On the left navigation bar, click Customer Configuration and then select a customer ID from the list.
-
On the Profile Configuration tab, click Configure and then on the System Metadata Configuration tab, click Configure.
-
Click on the System Type (for example, SAP), and the SAP-Metadata Details page will appear as shown in the figure below:
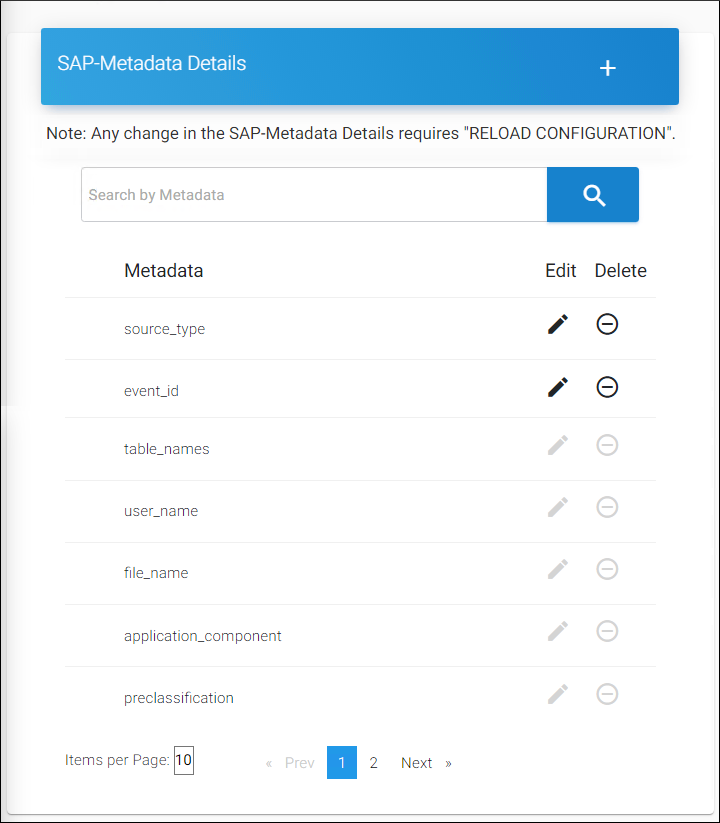
Metadata details page
-
Click on the plus icon. The Add Custom Metadata dialog will appear.
-
Enter a name and click Save.
Results:
-
You will receive a confirmation message on saving the Custom Metadata.
-
The new metadata name is added to the list.
-
Related tasks
-
If you want to edit/remove a newly added custom metadata from the list, click the Edit/Delete icon against the metadata.
-
To search metadata by name, use the text box labeled Search by Metadata. Your search results will be displayed.
-
The new custom metadata is displayed and available for user selection in the Classification Rule UI as shown in the below example:
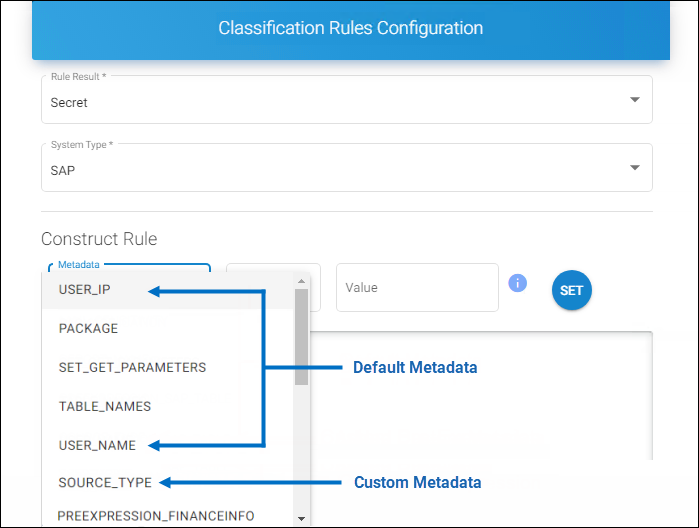
Example for Custom Metadata
Create Download Rules
Prerequisite: Make sure that classification properties and their values are configured.
Classification Rules define one or more classifications based on metadata types and pre-expressions.
-
On the Rules tab, click Configure.
-
The Download Classification Rules page will appear as shown in the figure below:
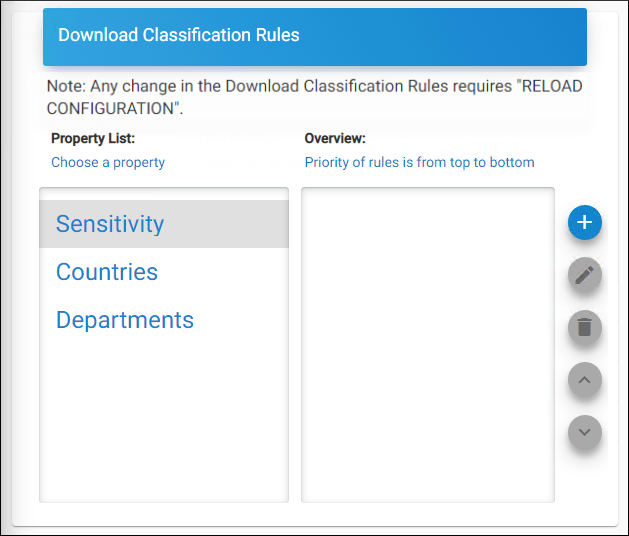
Download classification rules page
-
Select a property from the Choose a Property table and then click on the plus icon.
-
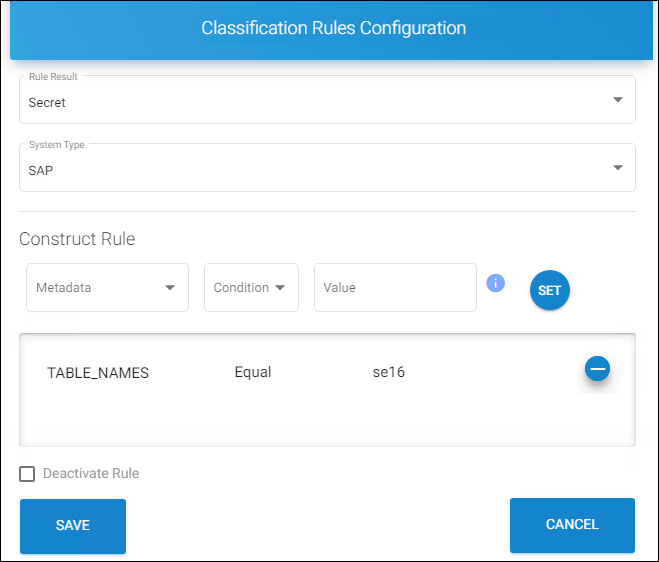
The Classification Rules Configuration page will appear as shown in the figure below:
Classification rules configuration
-
Enter the values for the following:
-
Rule Result − Select a value from the list.
-
System Type − HaloENGINE supports the following system types: BO, SAP, Windchill, Teamcenter, Keytech, Autodesk_Vault, SOLIDWORKS_PDM, and HaloENGINE_API. Based on your license, your system type will be displayed by default.
-
Metadata − Select a value from the list.
-
Condition − Select a condition (Equal/Not Equal) from the list.
-
Value − Enter a value for the selected metadata (case-sensitive).
-
-
Click Set to apply the rules.
-
The selected metadata and its condition will be added to the list.
-
Click Save.
Results:
-
You will receive a confirmation message after adding or updating the rule.
-
The rule is added to the list under the Overview table as shown in the figure below:
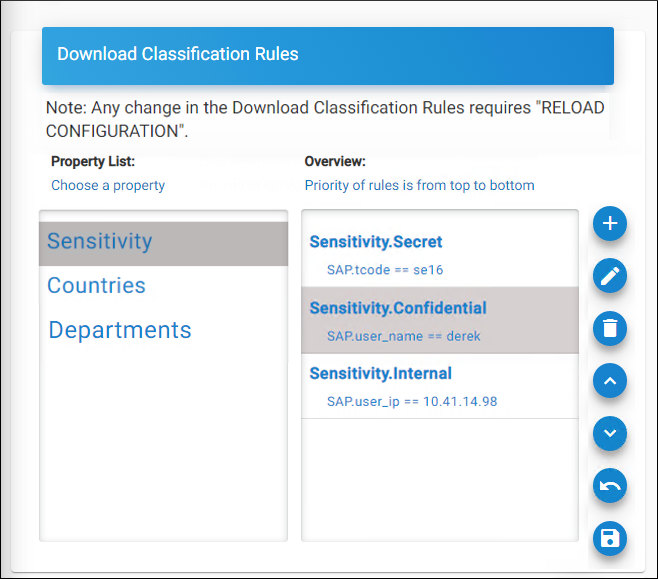
Classification rules page after configuration
Related tasks
-
By default, the current rule will be activated. However, you can turn off the rule by selecting the Deactivate Rule check box.
-
If you wish to increase/decrease the priority of a rule, you can do so by selecting the rule and then clicking on the respective up arrow/down arrow icon.
-
You can reverse the priority changes you have made by clicking the Restore the priority changes icon.
-
To save your priority changes, click Save the priority changes icon.
Reference Manuals:
For more information about metadata description, please refer to the relevant HaloCAD PLM/PDM Installation Manual.
-
SAP – HaloCORE Installation Manual
-
Autodesk Vault – HaloCAD for Autodesk Vault Installation Manual
-
Teamcenter – HaloCAD for Teamcenter Installation Manual
-
Windchill – HaloCAD for Windchill Installation Manual
-
SOLIDWORKS PDM – HaloCAD for SOLIDWORKS PDM Installation Manual
-
Keytech – HaloCAD for Keytech Installation Manual
-
BO – HaloCORE BO Installation Manual
-
HaloENGINE API – There is no built-in metadata for REST SDK, so Custom metadata can be used to generate new metadata for the HaloENGINE API system type. Please refer to the section “Custom Metadata”.
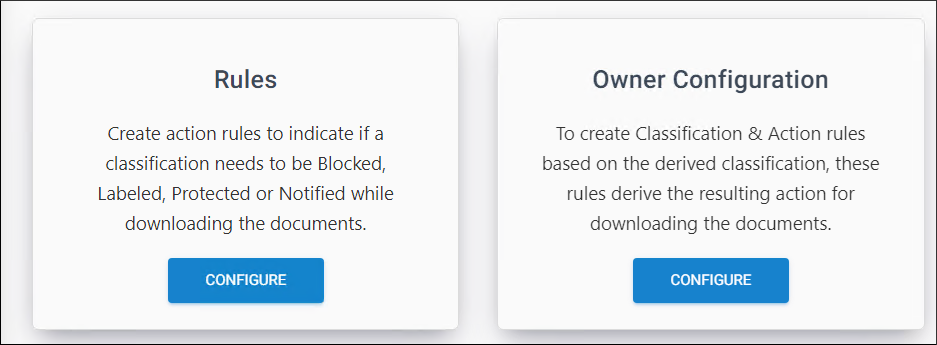
Add Action Rules
Action rules specify when a file download should be blocked, labeled, protected, or excluded.
Simulation Mode
-
In Simulation Mode, you can observe the runtime behavior of the label/protect/block/exclude process. The file will be downloaded without being labeled or blocked.
-
Additionally, the event is logged as an actual file download.
-
This feature is only applicable to SAP clients.
Prerequisite:
Based on the features you choose (as indicated in the table below), you must map the profile to a registered HaloENGINE Service as described in the section "Phase 4. Register HaloENGINE Services".
|
Action Rules |
HaloENGINE Service |
|---|---|
|
Protect/Label |
Is needed for protection |
|
Block |
Not required |
Action rules and HaloENGINE Service
Follow the below procedure to add Action Rules:
-
On the Action Rules tab, click Configure and the following page will appear, as shown in the figure below:
Action Rules
-
On the Rules tab, click Configure.
-
On the Action Rules for Download page, click on the plus icon.
-
The Add Action Rule page will appear.
-
Under Choose Resulting Actions select any one of the actions:
-
To block a file download, select the Block check box and proceed to point 6.
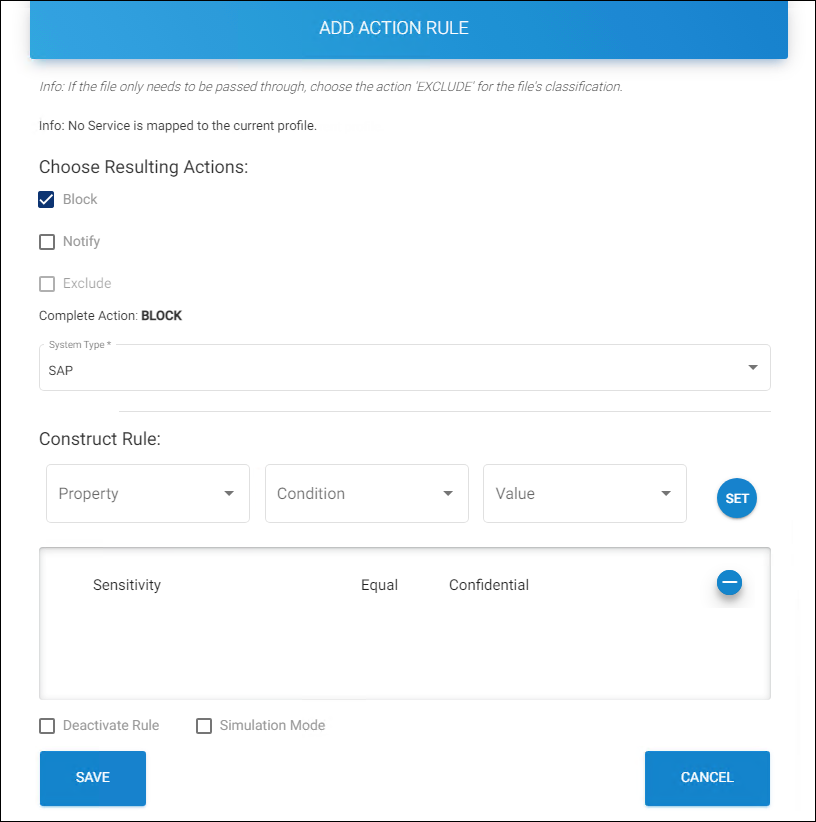
Action rule for block
-
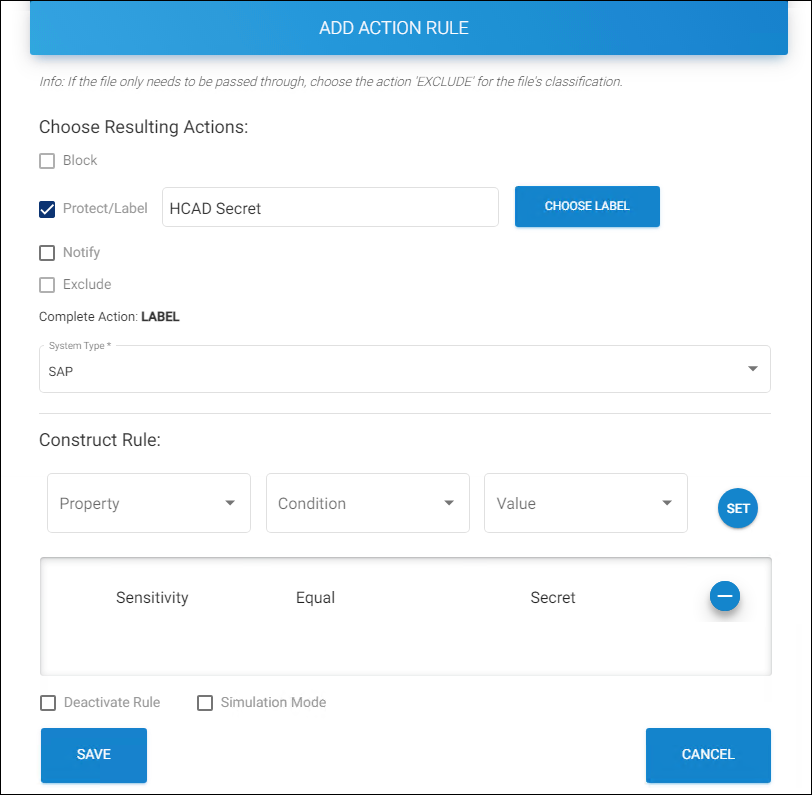
To protect a file download, select the Protect/Label check box. Click Choose Label to select a label from the list. Note: The labels are automatically retrieved from Azure RMS by the HaloENGINE Service. Proceed to point 6.
Action rule for protection
-
Exclude − Allows suppressing actions such as monitor, block, notify, label, or protect during a file download by selecting the “Exclude” action based on the configured metadata (e.g., user_name) or Pre-expression. If selected, other options will be disabled. Proceed to point 6.
-
Notify − Notifies of a file download. You can choose to notify from the four choices listed above.
Note: HaloCORE's Notify (alert) mechanism allows organizations to proactively detect security and compliance risks via real-time reporting. All download and data extraction activities in SAP are reviewed, and alerts are raised using the GRC mechanism. During a download, the HaloENGINE determines whether a notification must be sent or not based on the classification rules and actions. If action = Notify, the HaloENGINE requests the NetWeaver client (BAdI) to send a notification. A GRC alert is triggered "as implemented in the enhancement spot /SECUDEGC/ES_ALERT". Please note this mechanism is not yet implemented in HaloCORE for GRC. It will be implemented in a future release.
-
-
System Type
-
Supported system types for protection: BO, SAP, Windchill, Teamcenter, Keytech, Autodesk_Vault, SOLIDWORKS_PDM, and HaloENGINE_API. Based on your license, your system type will be displayed by default.
-
Supported system types for blocking: BO, SAP, Windchill, Teamcenter, Autodesk_Vault, and SOLIDWORKS_PDM, Based on your license, your system type will be displayed by default.
-
-
Enter the values for the following under Construct Rules:
-
Property − Select a value from the list.
-
Condition − Select a condition (Equal/Not Equal) from the list.
-
Value − Select a value from the list.
-
Deactivate Rule − If you want to deactivate a rule, select Deactivate Rule check box.
-
Simulation Mode − If you want to perform the exact actions without processing the file, select the Simulation Mode check box.
-
-
Click Set to set up the rule. The selected property and its condition will be added to the list.
-
Click Save.
Results:
-
You will receive a confirmation message after adding or updating the action rule.
-
The rule is added to the list.
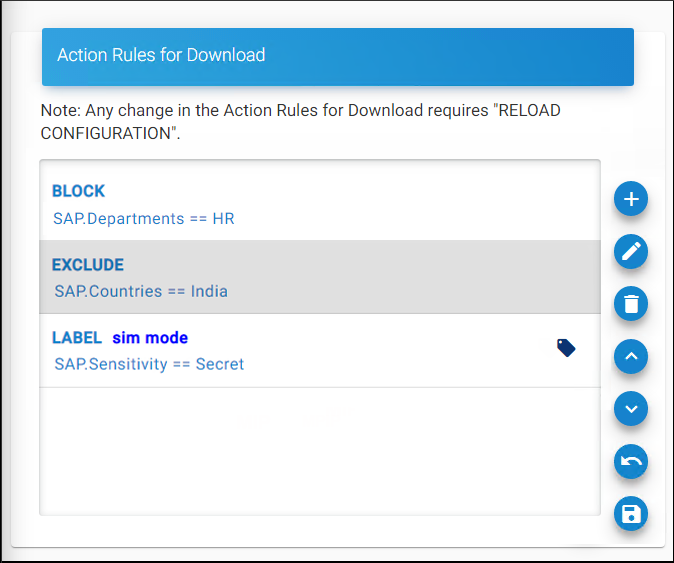
List of action rules
-
Related tasks
-
You can manage the Action Rule by using the edit/delete icons.
-
If you wish to increase/decrease the priority of a rule, you can do so by selecting the rule and then clicking on the respective up arrow/down arrow icon.
-
You can reverse the priority changes you have made by clicking the Restore the priority changes icon.
-
To save your priority changes, click Save the priority changes icon.
Action Rule priorities
When there are several classification rules, the HaloENGINE prioritizes them from top to bottom. For instance, if Rule 1, Rule 2, Rule 3, and Rule 4 are present in the Classification Engine.
-
The Classification Engine starts verifying the topmost rule "Rule 1" first. If all classification expressions are correct, the first action rule is applied.
-
If not, it moves on to "Rule 2" and does more verification.
-
This verification process continues until a classification expression with the correct classification expression is found, or none apply.
Extended Tags Configuration (Only for SAP)
Besides MPIP metadata, some users may wish to add additional metadata while downloading a file from SAP. In such cases, the user should add an extended key and value.
-
After saving the rule for SAP, you can see the Extended Tags Configuration icon on the Action Rules for Download page.
-
Adding an extended tags feature is only applicable to the SAP Client type. Extended tag configuration is not available in case of block or exclude action.
-
Click on the tag icon, and the Extended Tag Configuration page will appear as shown in the figure below:
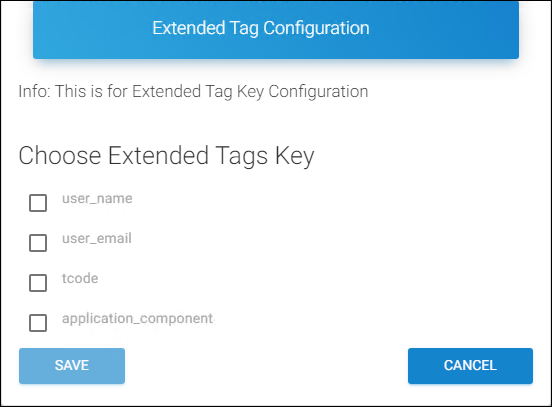
Extended tag configuration page
-
Select one or more tags (user_name, user_email, tcode, application_component) from the list.
-
Click Save to save the setting.
Results:
-
You will receive a confirmation message after adding or updating the tags.
-
Double-click on the Action Rule and the Action Rule Overview page will appear as shown in the figure below:
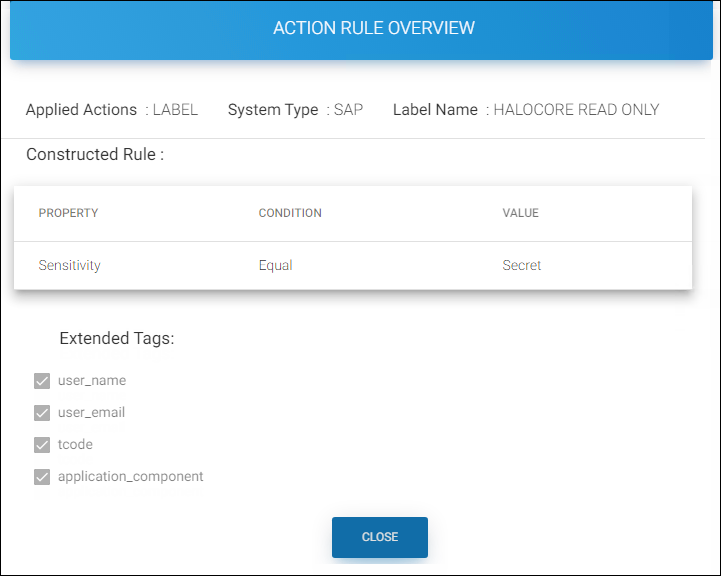
Overview page
-
-
Click Close to close the page.
Owner Configuration (Optional)
This feature defines how a user can be determined as an owner of exported documents.
Supported client systems
-
Supported in SAP, Teamcenter, Windchill, and Autodesk_Vault systems.
-
Not supported in the BO system.
Prerequisites:
-
Make sure the HaloENGINE Service is installed.
-
Make sure to map a HaloENGINE Service to a profile.
Follow the below steps to configure owner rights:
-
On the Owner Configuration tab, click Configure.
-
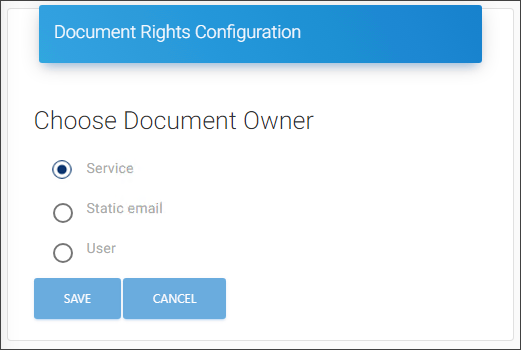
The Document Rights Configuration page will appear as shown in the figure below:
Owner rights
-
Select one of the following three options:
-
Service (default) − The Application ID that is used to initialize the HaloENGINE Service will be the owner of the document.
-
Static email − The email address entered in the text box will be considered the owner of the document.
-
User − The mail address is derived from the Client (For example,
SAP User ID).
-
-
Click Save to save the rule.
Results: You will receive a confirmation message after updating the assigned rights.
Create Upload Classification Rules
Upload rules define classification rules based on metadata types and action rules decide how a file must be decrypted when uploading a file. These two rules derive the resulting action for uploading the documents.
Prerequisites:
-
Make sure that the HaloENGINE Service is installed.
-
Make sure that the profile is mapped to a registered HaloENGINE Service. For more details, please refer to the section "Phase 4. Register HaloENGINE Service".
Follow the below procedure to enable the upload rules:
-
To create classification and action rules for file uploads, you need to enable Upload Rules first.
-
On the Upload Rules tab, turn on the Activate button as shown in the image "Classification Configuration".
-
To the question, Would you like to Enable/Disable Upload configuration? Upload Configuration will be Enabled, answer Yes.
-
You will receive a confirmation message on changing the upload switch for decryption.
-
Now, click Configure, Upload Rules Configuration page will appear as shown in the figure below:
Upload rules configuration page
Create Upload Rules
Classification rules can be created based on metadata types.
-
On the Classification Rules tab, click Configure.
-
The Upload Classification Rules page will appear as shown in the figure below:
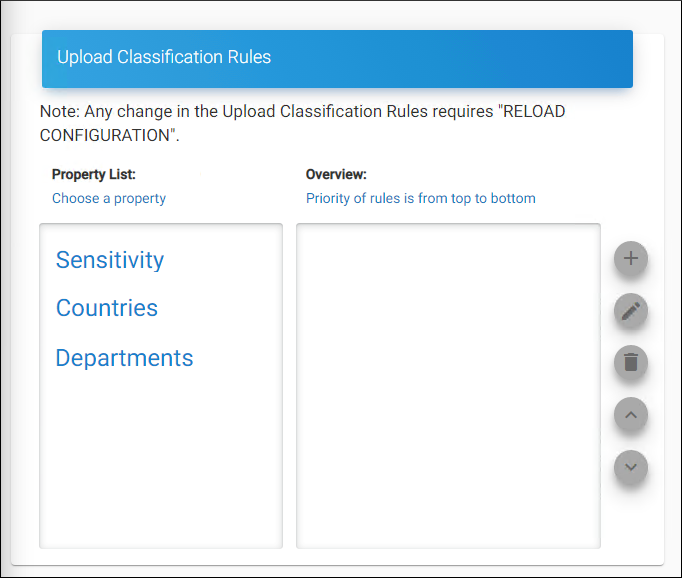
Upload classification rules page
-
Select a property from the Choose a property table and then click on the plus icon.
-
The Classification Rules Configuration page will appear as shown in the figure below:
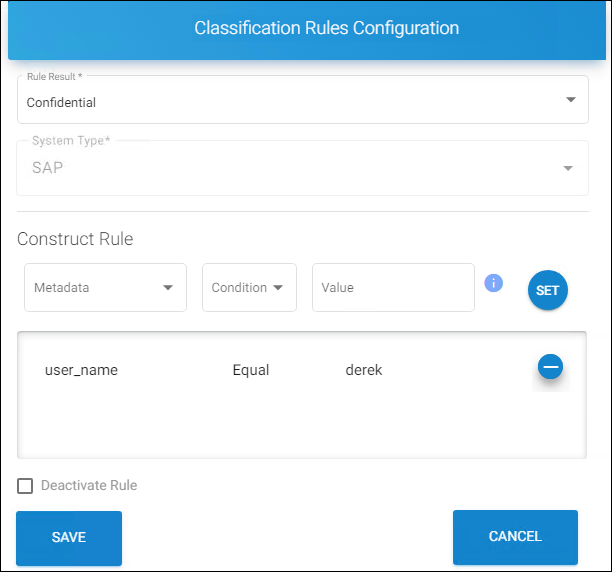
Upload Classification Rules Configuration #1
-
On the Classification Rules Configuration page, enter the values for the following:
-
Rule Result − Select a value from the list.
-
System Type − SAP will be displayed by default. Currently supported only for SAP system type.
-
Metadata − Select a value from the list.
-
Condition − Select a condition (Equal/Not Equal) from the list.
-
Value − Enter a value for the selected metadata (case-sensitive).
-
Deactivate Rule − By default, the current rule will be activated. However, you can turn off the Rule by selecting the Deactivate Rule check box.
-
-
Click Set to apply the rules. The selected metadata and its condition will be added to the list.
-
Click Save.
Results:
-
You will receive a confirmation message after adding or updating the rule.
-
Please note that it is not possible to add the same rule that already exists in Download Rules.
-
-
The rule is added to the list under the Overview table as shown in the figure below:
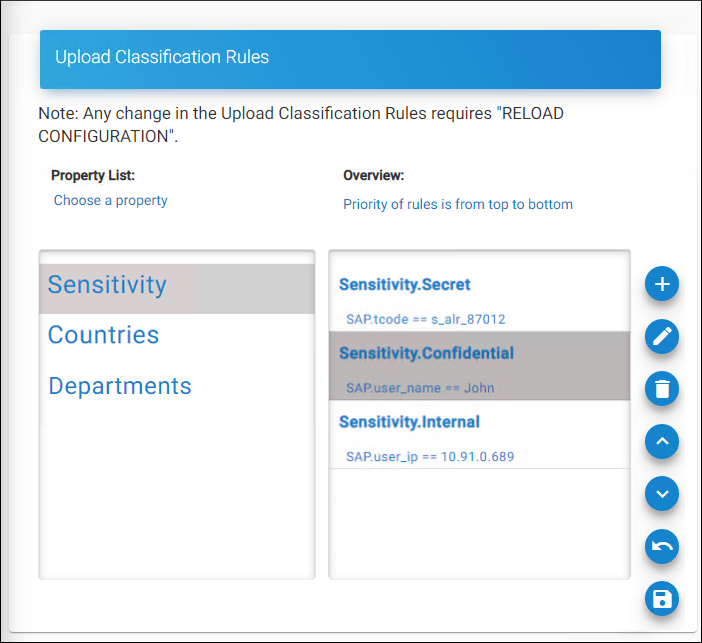
Upload Classification Rules Configuration #2
Related tasks
-
You can manage the action rule by using the edit/delete icons.
-
If you wish to increase/decrease the priority of a rule, you can do so by selecting the rule and then clicking on the respective up arrow/down arrow icon.
-
You can undo the priority changes you have made by clicking the Restore the priority changes icon.
-
To save your priority changes, click Save the priority changes icon.
Add Action Rules
Action rules are created to apply decryption while uploading the documents.
Follow the below procedure to configure rules to unprotect:
-
On the Action Rules tab, click Configure.
-
Click on the plus icon on the Action Rules for Upload page.
-
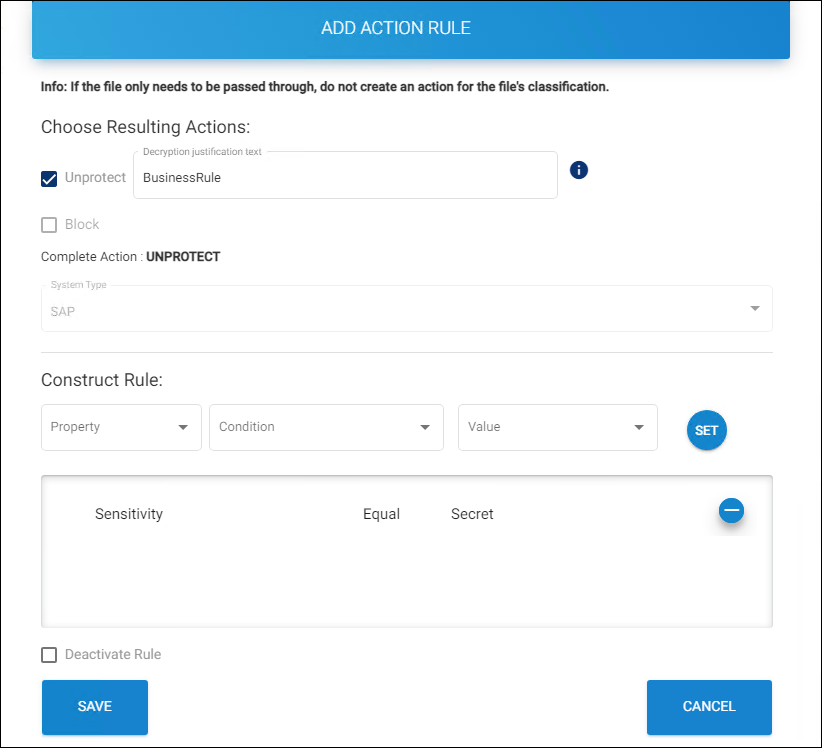
The Add Action Rule page will appear as shown in the figure below:
Add action rule page
-
Under Choose Resulting Actions select any one of the actions:
-
Unprotect − Select the check box, if the uploaded file needs to be decrypted and enter a justification message or you can leave it blank in the Decryption justification text box. The justification text can be up to 15 characters without space or special characters. Proceed to point 6.
-
Block − Select the check box, if the uploaded file needs to be blocked. Proceed to point 6.
-
-
System Type − SAP will be displayed by default. Currently supported only for SAP system type.
-
Enter the values for the following under Construct Rules:
-
Property −Select a value from the list.
-
Condition − Select a condition (Equal/Not Equal) from the list.
-
Value − Select a value from the list.
-
Deactivate Rule − By default, the current rule will be activated. However, the admin portal allows you to turn off the Rule by selecting the Deactivate Rule check box.
-
-
Click Set to set up the rules. The selected property and its condition will be added to the list.
-
Click Save.
Results:
-
You will receive a confirmation message after adding or updating the rule.
-
The rule is added to the Action Rules for Upload page as shown in the figure below:

Action rules for upload
-
Related tasks
-
The rule is added to the list. If you wish to increase/decrease the priority of a rule, you can do so by selecting the rule and then clicking on the respective up arrow/down arrow icon. However, a rule with more conditions cannot be moved below the rule with fewer conditions.
-
You can reverse the priority changes you have made by clicking the Restore the priority changes icon.
-
To save your priority changes, click Save the priority changes icon.
Metadata Configuration
SetMetadata/Unprotect Action (only for Teamcenter): It allows you to set existing metadata back onto the file while checking-in, based on the MPIP label. This aids in the consistency of file classification. As an example, for Teamcenter IP_Classification values can be returned. Note: It is not currently supported by other PLMs.
Follow the below steps to configure metadata:
-
On the Metadata Configuration tab, click Configure.
-
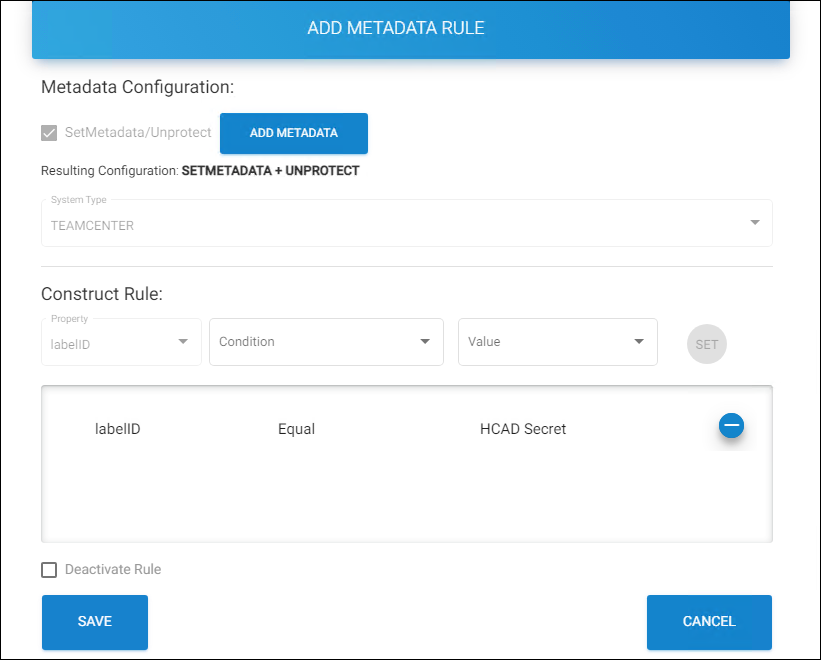
Click on the plus icon, and the Add Metadata Rule page will appear as shown in the figure below:
Add metadata rule
-
By default, SetMetadata/Unprotect option will be selected.
-
Click ADD METADATA.
-
The Add Metadata page will appear as shown in the figure below:
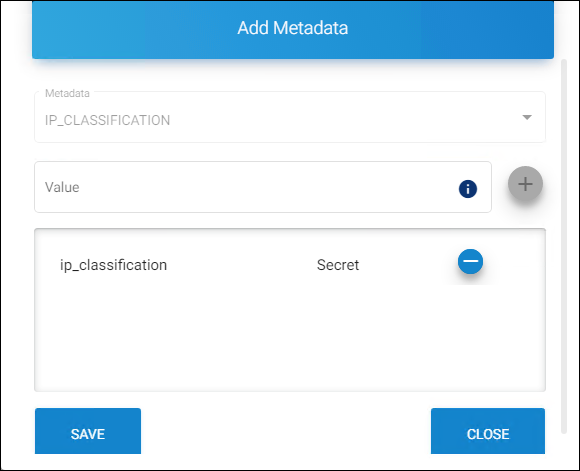
Add metadata page
-
Metadata − IP_CLASSIFICATION will be displayed by default. Currently supported only for ip_classification metadata.
-
Value − Enter the metadata that is used during encryption (minimum of 3 characters, maximum of 30 characters, and case sensitive.)
-
Click on the plus icon to apply the rules. The selected metadata and its condition will be added to the list.
-
Click Save.
-
-
System Type − Teamcenter will be displayed by default. Currently supported only for Teamcenter system type.
-
Enter the values for the following under Construct Rules:
-
Property − labelID will be displayed by default. Currently supported only for labelID.
-
Condition −Select a condition (Equal/Not Equal) from the list.
-
Value − Select a label from the list.
-
Click Set to set up the rules. The selected property and its condition will be added to the list.
-
Deactivate Rule − By default, the current rule will be activated. However, the admin portal allows you to turn off the Rule by selecting the Deactivate Rule check box.
-
-
Click Save.
Results: You will receive a confirmation message after adding or updating the rule.
The table below outlines the key attributes that are allowed on each system type.
|
Profile Configuration |
||||||||
|---|---|---|---|---|---|---|---|---|
|
System Types |
Download Rules (default) |
Upload Rules |
PII and Fin. Info. |
Cust. Pre-Exp. |
Owner Config. |
Metadata Config. |
Sys. Metadata Config. |
Auth./Comm. Endpoint |
|
SAP |
Yes |
Opt. |
Yes |
Opt. |
Opt. |
N/A |
Opt. |
Mutual |
|
HaloCORE BO |
Yes |
N/A |
N/A |
Opt. |
Opt. |
N/A |
Opt. |
Mutual |
|
Teamcenter |
Yes |
N/A |
N/A |
Opt. |
Opt. |
Opt. |
Opt. |
Mutual |
|
Autodesk_Vault |
Yes |
N/A |
N/A |
Opt. |
Opt. |
N/A |
Opt. |
Mutual |
|
Windchill |
Yes |
N/A |
N/A |
Opt. |
Opt. |
N/A |
Opt. |
Mutual |
|
Keytech |
Yes |
N/A |
N/A |
Opt. |
Opt. |
N/A |
Opt. |
Mutual |
|
SOLIDWORKS PDM |
Yes |
N/A |
N/A |
Opt. |
Opt. |
N/A |
Opt. |
Supports mutual and server-side |
|
HaloENGINE_API |
Yes |
N/A |
N/A |
Opt. |
Opt. |
N/A |
Opt. |
Supports mutual and server-side |
Key attributes of each system type
Abbreviations used in the above table
-
N/A - Not Applicable
-
Opt. - Optional
-
Fin. Info. - Finance Information
-
Cust. Pre-Exp. - Custom Pre-Expression
-
Owner Config. - Owner Configuration
-
Metadata Config. - Metadata Configuration (Profile Configuration > Profile Classification > Classification Configuration > METADATA CONFIGURATION)
-
Sys. Metadata Config. - System Metadata Configuration (Profile Configuration > System Metadata Configuration)
-
Auth. - Authentication
-
Comm. - Communication
Assign User Permission
HaloENGINE uses three roles—ROLE_SUPER_ADMIN, ROLE_CUSTOMER_ADMIN, and ROLE_CUSTOMER_USER—for authentication and authorization. These roles are set up and managed through the Azure portal. For more details, please refer to the section “User Management Settings”. The Assign User Permission page allows you to add users who have been assigned to the role ROLE_CUSTOMER_USER.
The following configurations are possible for the ROLE_CUSTOMER _USER. Using these read-and-write permissions, a user can manage multiple profiles.
For example,
-
User 1 - assigned with full rights as an admin user. So he could access the entire portal without any limitations.
-
User 2 - assigned with read-only access. This user can view the configuration of a particular profile but is restricted to changing the settings.
-
User 3 - assigned with write access. This user is allowed to change the configuration of a particular profile.
User accounts
-
Administrator with Super User role—Granted, the highest level of access to the entire HaloENGINE component.
-
Domain Users with Customer_Admin roles—Have fewer admin privileges than Super User.
-
Domain Users with Customer_User roles must be configured with access. Access to this user is granted by either Customer_Admin or Super User.
Follow the below procedure to configure user access:
-
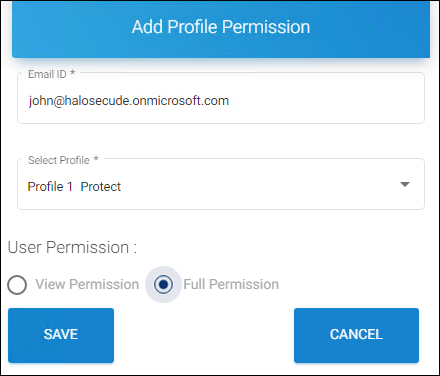
On the Assign User Permission tab, click Configure. The User - Profile Permission page will appear.
-
Click on the plus icon and enter the following details on the Add Profile Permission page.
Adding a user page
-
Enter the following details:
-
Email ID - Enter the email ID, which is mapped to the role ROLE_CUSTOMER_ADMIN/ROLE_CUSTOMER_USER in the Azure portal. For more details, please refer to the section "User Management Settings".
-
Select Profile - Select a profile from the list.
-
User Permission - Select either View Permission or Full Permission for the user.
-
-
Click Save.
Results:
-
You will receive a confirmation message after adding the user permission.
-
The Email ID will be added to the list as shown in the figure below:
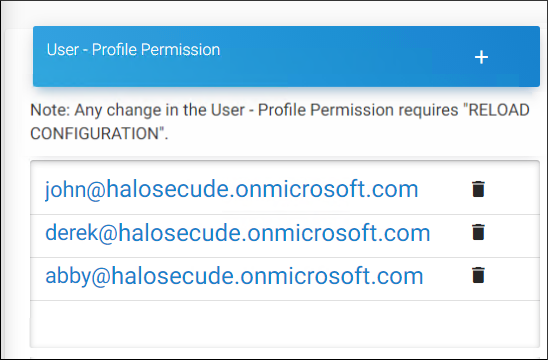
User profile permission #1
-
Related tasks
To know the details of a user.
-
Click on the user email id. The Profile Permission Details page will appear as shown in the figure below:
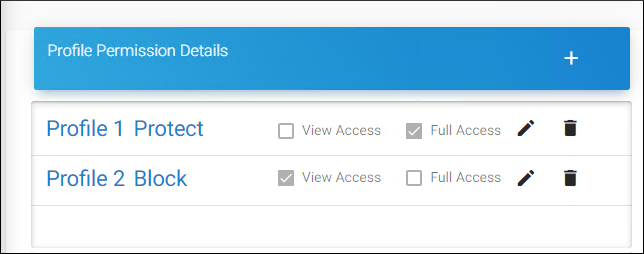
User profile permission #2
-
You can manage the permission by using the edit/delete icons.