
The HaloENGINE Admin portal includes a reliable approach for dealing with certificates. It provides two approaches for dealing with a server certificate:
-
A self-signed server certificate is generated by the server itself.
-
Or using the organization's own certificate.
The figure below depicts the high-level steps involved in administering the server certificate.
HaloENGINE Certificate
HaloCAD for SOLIDWORKS PDM client relies on server certificate authentication, therefore, you can use either a self-signed certificate (HaloENGINEServer.cer) or a company-owned signed certificate for authentication.
Change of server certificate name
If you want to continue using the older version of the certificate, rename HalocoreServer.cer to HaloENGINEServer.cer and use it.
The figure below depicts the high-level steps involved in administering the client certificate.
HaloENGINE Client Certificate
Step 1. Use Server Certificate Generated by HaloENGINE Admin Portal (Option 1)
Step 1a. Create a Self-Signed HaloENGINE (Server) Certificate
-
On the left navigation bar, click System Configuration, and then on the Certificate Configuration tab click Configure.
-
The Overview page will appear as shown in the figure below:
Default Certificate Page
-
Click Server Certificate and then click Create Certificate button.
-
The Add Server Certificate page will appear as shown in the figure below:
Creating a server certificate
-
Enter certificate subject name − Enter a subject name. For example:
CN=COMMONENG.LOCAL, OU=SECUDE, L=ENGLAND, ST=LONDON. -
Enter server keystore password − Enter a server Keystore password. For example,
HaloENGINE_1. Note: Copy and paste are not allowed in this field. Please refer to the section “Keystore password policy”. -
Validity (days) − Enter certificate validity in days (1 to 5475). The default value is 3650.
-
Enter subject alternative name (IP addresses) − Enter the server IP address. For example,
10.91.0.171. -
Enter subject alternative name (DNS) − Enter an alternative subject name (FQDN). For example,
COMMONENG.LOCAL. -
Click Save.
Results:
-
You can see a confirmation message after updating the certificate successfully.
-
A self-signed server certificate (
HaloENGINEServer.cer) is generated along with two other files (HaloENGINEServer.csr, serverKeystore.jks) in...Tomcat\conf\cert. -
The page will display server certificate information.
What to do next
-
In the case of other client systems, refer to Step 4 to create a client certificate.
-
In the case of the SAP client, the next step is to download the self-signed certificate (
HaloENGINEServer.cer) and import it into the SAP System. -
Click the download icon and on the Download Server Certificate dialog, click Download CER File. A copy of the self-signed server certificate
HaloENGINEServer.cerwill be downloaded.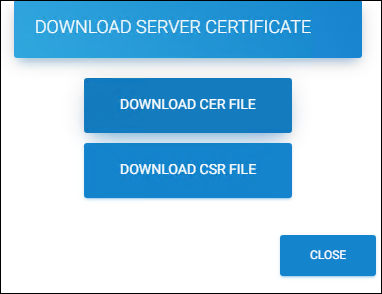
Download Server Certificate
-
-
Click Close to close the dialog.
Keystore Password Policy
Before creating the password, make sure to follow the policies listed below:
-
Passwords must be between 6 to 30 characters long
-
The password should not contain a space
-
The first letter should be an alphabetic character [upper or lower case letter]
-
It must contain at least 1 numerical character [0-9]
-
It must contain at least 1 symbol [$ _ #]
For example: HaloCORE_1
Step 1b. For a CA-Signed HaloENGINE Certificate
You can convert the self-signed certificate created in Step 1a into a CA-Signed certificate by signing it with your Certificate Authority (CA).
-
Click the download icon and on the Download Server Certificate dialog, click Download CSR File. A Certificate Signing Request (CSR)
HaloENGINEServer.csrwill be downloaded. -
Submit the
HaloENGINEServer.csrfile to your Certificate Authority and get the signed certificate asHaloENGINEServer.cer. -
Import the CA - refer to Step 3. Please note that a signed certificate cannot be imported before uploading its corresponding CA.
-
As the certificate (
HaloENGINEServer.cer) is signed now, you need to import it into the HaloENGINE Tomcat Service. -
Import Signed Certificate:
-
After importing the CA (in Step 3. Import Intermediate CAs), continue to import the signed certificate.
-
From the list, choose Import signed certificate.
-
Click on the attachment button and select the signed
HaloENGINEServer.cercertificate from the Open Windows dialog.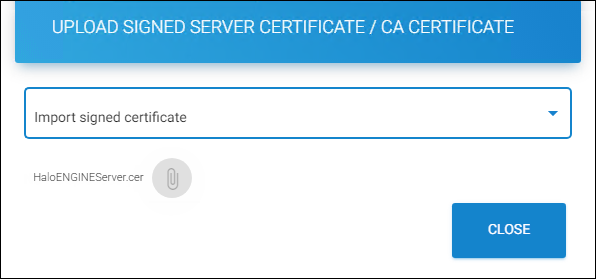
Importing the signed HaloENGINEServer.cer certificate
Results: The name of the certificate will be displayed on the screen, and you will receive a confirmation message after uploading the certificate. To close the dialog, click Close. The Server Certificate page appears as shown in the figure below when you upload your certificate:
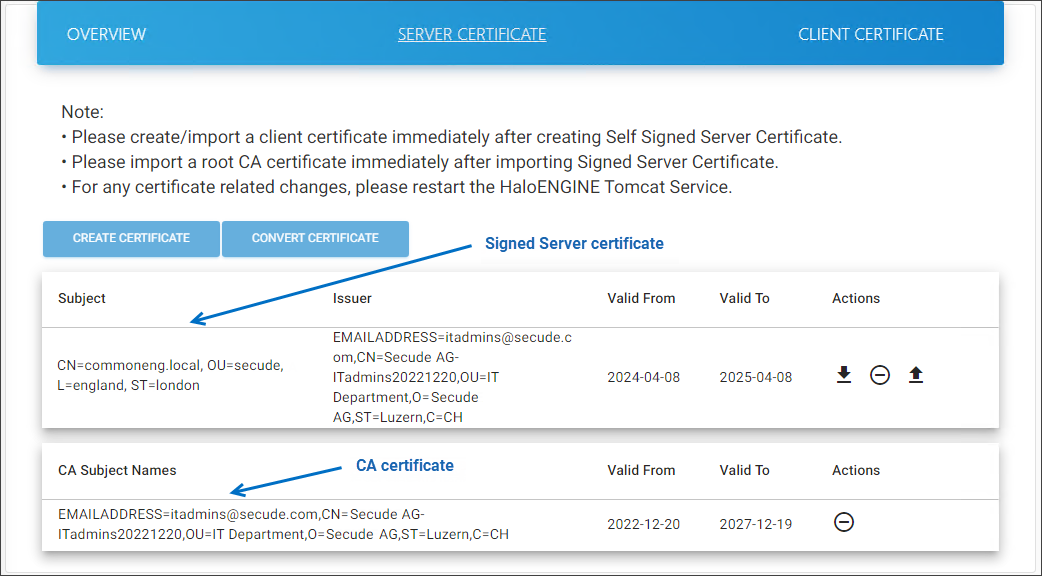
Signed Server certificate and Root CA #1
Illustration for the self-signed certificate.
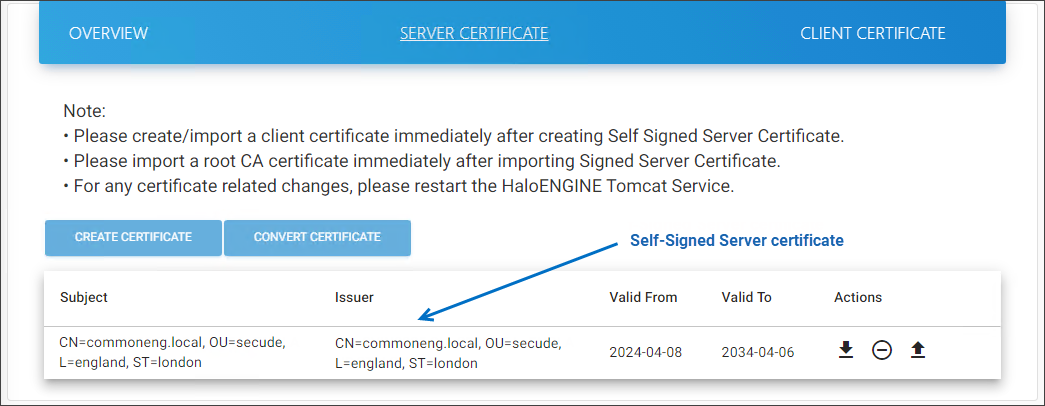
Self-Signed Server certificate #2
-
-
What to do next: Continue from Step 4.
Step 2. Use Company Own Certificate as Server Certificate (Option 2)
Alternatively, if you already have a certificate for your company, you can use it with the HaloENGINE Admin Portal. However, the company's own certificate must be converted in order to work with HaloENGINE. Conversion is as simple as uploading to the admin portal and downloading it as HaloENGINEServer.cer.
To convert the company's own certificate, follow the steps below:
-
On the left navigation bar, click System Configuration, and then on the Certificate Configuration tab, click Configure.
-
Click Server Certificate and then click on Convert Certificate.
-
The Convert .pfx/.p12 to HaloENGINE Certificate dialog will appear.
-
Enter the source password for the PFX/P12 file you want to convert. Note: Copy and paste are not allowed in this field.
-
Enter the server keystore password. Please refer to the section “Keystore password policy”.
-
Click on the attachment button and select the PFX/P12 file from the Open Windows dialog.
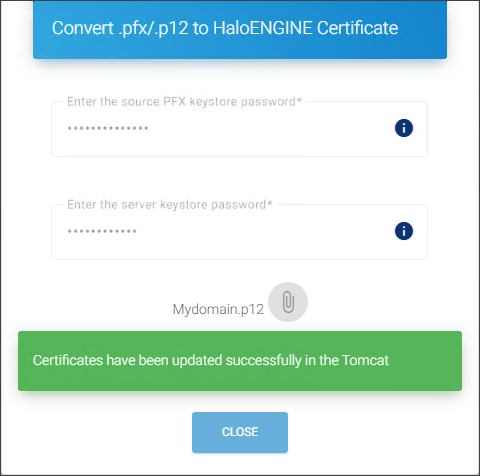
Convert existing certificate into HaloENGINE certificate
-
The certificate's name is displayed on the page.
Results:
-
You will receive a confirmation message after uploading the certificate.
-
Click Close to close the dialog.
-
What to do next
-
Import the CA - refer to Step 3. Please note that a signed certificate cannot be imported before uploading its corresponding CA.
-
If your certificate is signed, you need to import it into the HaloENGINE Tomcat Service - refer to next Step 1b.
-
After uploading your certificates, the Server Certificate page looks as shown in the figure below:
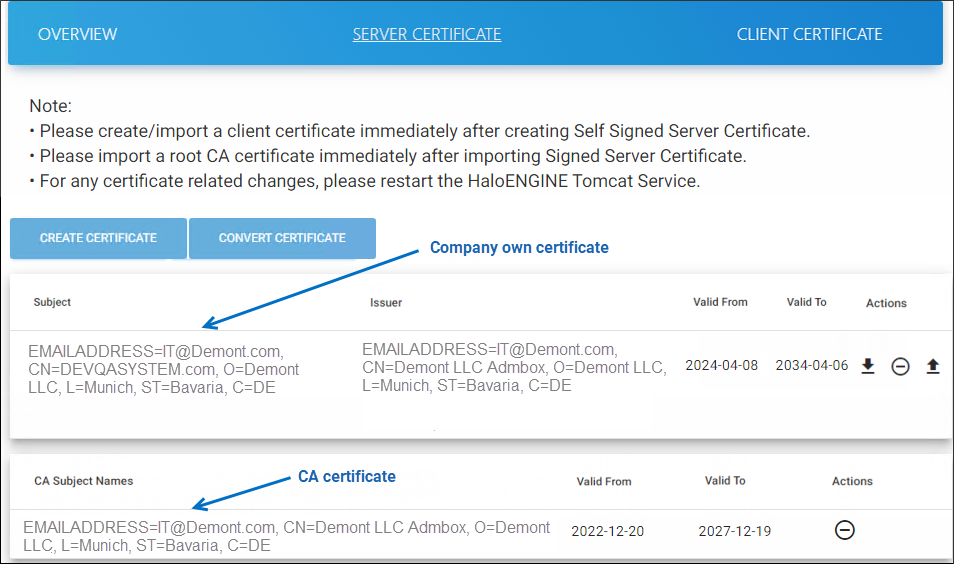
Company own certificate and its Root CA
-
Continue from Step 4.
Step 3. Import Intermediate CAs
To evaluate a system's overall security level, the HaloENGINE needs a root CA or intermediate CA. You must include all intermediate CAs in the following cases:
-
If an intermediate CA has signed
HaloENGINEServer.cer- Step 1b. -
If you use the company's own certificate, which is signed by an intermediate CA - Step 2.
-
If an intermediate CA has signed your client's (SAP/BO) certificate.
To upload the CA Certificate, follow the steps below:
-
Click the upload icon and a pop-up window Upload Signed Server Certificate / CA Certificate will appear.
-
From the list, choose Import CA certificate and enter an alias name of your choice for Root CA (e.g.,
itadminsca). -
Click on the attachment button and select your root CA from the Open windows dialog box.
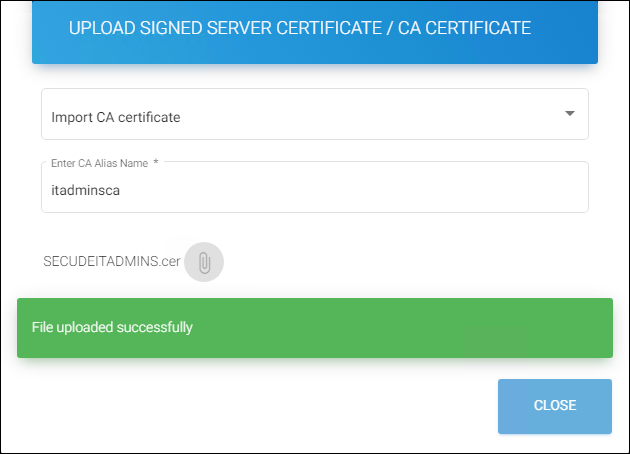
Importing CA certificate
-
The name of the certificate appears on the page.
Results:
-
You will receive a confirmation message after uploading the certificate.
-
Repeat the steps above to add all intermediate CAs.
-
For SAP client
If you are using a self-signed certificate, you must import the HaloENGINEServer.cer certificate into your SAP client machine using STRUST. This ensures that the HaloENGINE and the SAP system are properly connected.
-
Import HaloENGINE Certificate into SAP System - For further details, please refer to the section "Importing the HaloENGINE Certificate into ABAP System" in the HaloCORE Installation Manual.
-
Export and install SAP system's certificate into HaloENGINE - refer to Step 5.
Step 4. Use Client Cert from Admin Portal (Option 1 - For Non-SAP Clients Only)
Similar to how the Server certificate is handled, HaloENGINE provides two ways to handle a client certificate:
-
A self-signed client certificate is generated by the server - see Step 4a.
-
Or use the company's own certificate - refer to Step 5 (Note: For an SAP client also need to refer to Step 5)
Step 4a. For a Self-Signed HaloENGINE Client Certificate
This instruction applies to the clients listed below. Note: Self-signed client certificates can be generated using the HaloENGINE. At the time of creation, it will be added to the client Keystore.
|
Client systems |
Required Keystore format |
|---|---|
|
BO |
|
|
KPro |
|
|
Windchill |
|
|
Teamcenter |
|
|
Keytech |
|
|
Autodesk_Vault |
|
Client Keystore
Follow the below steps to create a self-signed client certificate:
-
On the left navigation bar, click System Configuration, and then on the Certificate Configuration tab click Configure.
-
Click Client Certificate and then click Create Certificate button.
-
The Add Client Certificate page will appear as shown in the figure below:
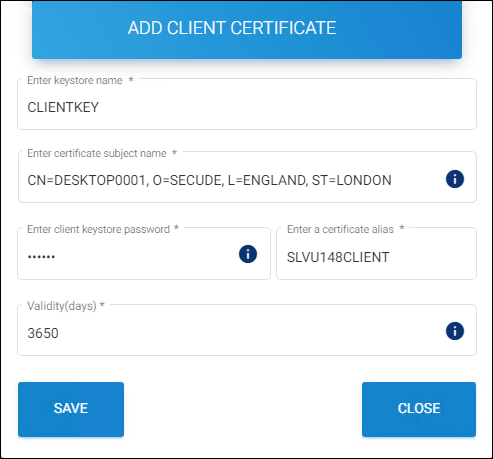
Creating a client certificate
-
Enter keystore name − Enter a Keystore name for the client. For example:
CLIENTKEY. -
Enter certificate subject name − Enter a subject name. For example:
CN=DESKTOP0001, O=SECUDE, L=ENGLAND, ST=LONDON. Enter client keystore password − Enter a client Keystore password. For example:ckpass1#. Note: Copy and paste are not allowed in this field. Please refer to the section “Keystore password policy”. -
Enter a certificate alias − Enter an alias name. For example:
SLVU148CLIENT. -
Validity (days) − The default period is 3650 days.
-
Click Save.
Results:
-
You can see a confirmation message after adding the client’s certificates successfully.
-
A self-signed (
CLIENTKEY.cer) certificate is generated along with two other files (CLIENTKEY.pfx,CLIENTKEY.jks) in...Tomcat\conf\cert. The user-specified Keystore name is used as the filenames. -
Click Close to close the page.
-
The client certificate is generated and installed into the HaloENGINE Tomcat Service.
-
What to do next: Download the HaloENGINE Client Certificate.
To establish the connection between the client and server, you need to download this certificate/Keystore and add the client machine
-
Click the download icon, and the Download Client Certificate dialog will appear.
-
HaloENGINE client systems such as BO, KPro, Windchill, Autodesk_Vault, and Teamcenter require a JKS Keystore to operate. Hence, click Download JKS File to download a copy of the JKS file. As per the above-shown example, a file named
CLIENTKEY.jkswill be downloaded.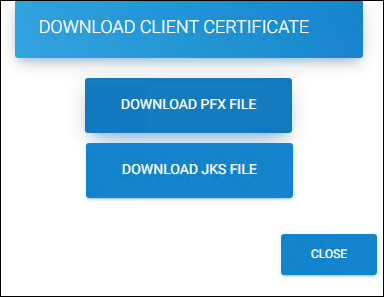
Downloading client certificate
-
Click Close to close the page.
Step 5. Use Company Own Certificate as Client Certificate (Option 2)
If you want to use your company's certificate, you must add it to the HaloENGINE Tomcat Service. For SAP choose this option.
Prerequisites:
-
In the case of a SAP client, export the SAP system's certificate (SSL System Client SSL client). Please refer to the section "Exporting the SAP Certificate" in the HaloCORE Installation Manual to learn how to obtain your SAP certificate.
-
In the case of other clients, have client certificates ready in advance.
-
If your client certificate is signed by an intermediate CA, you must upload it as described in section Step 3.
To upload an existing client certificate, follow the steps below:
-
Click Import Certificate.
-
The Import Client Certificate dialog will appear.
-
Click on the attachment button and select the client certificate from the Open Windows dialog box. (For example, SAP instance certificate,
SAP Standard.cer). -
Perform the same steps to upload other client certificates as well.
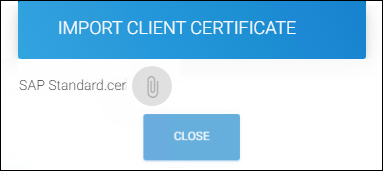
Uploading existing client certificates
-
Click Close to close the dialog.
Results: After uploading your certificates, the Client Certificate page looks as shown in the figure below:
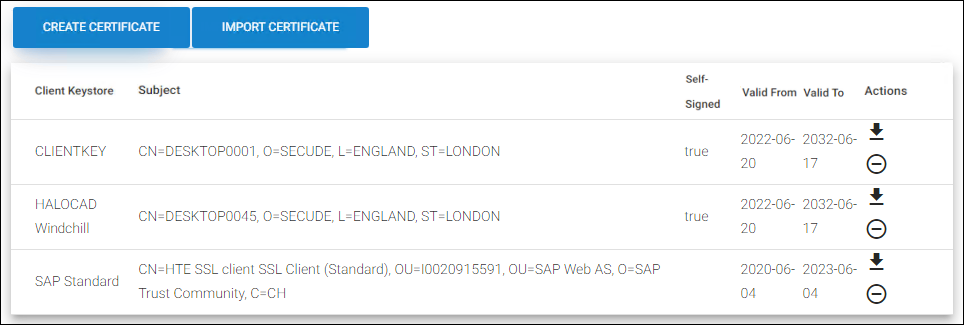
Uploaded client certificates
How to Delete the HaloENGINE Client Certificate?
To remove the client certificate, perform the following steps:
-
On the left navigation bar, click System Configuration, and then on the Certificate Configuration tab click Configure.
-
Click Client Certificate on the right corner.
-
Now, select the client certificate and click the delete icon under the Actions column.
-
To the question "Are you sure to delete ?", answer OK.
-
By clicking OK, you agree to delete the client certificate permanently.
Results: You can see a confirmation message after deleting the certificates successfully.
How to Delete the HaloENGINE Certificate?
Please be aware that removing the server certificate will also permanently remove all other certificates (including client and CA certificates). Upon deleting the certificates, the admin portal will not load. To access the admin portal, manually change the protocol to HTTP and the port number to 8383. Additionally, clear browsing data.
CA Certificate(s)
To remove the CA certificate(s), perform the following steps:
-
On the left navigation bar, click System Configuration, and then on the Certificate Configuration tab, click Configure.
-
Click Server Certificate on the center.
-
Now, select the CA certificate and click the delete icon under the Actions column.
-
To the question "Are you sure to delete server CA certificate?", answer Yes.
-
By clicking Yes, you agree to delete the CA certificate from the Keystore.
Results: You can see a confirmation message after deleting the certificates successfully.
Server Certificate
To remove the server certificate, follow these instructions:
-
On the left navigation bar, click System Configuration, and then on the Certificate Configuration tab, click Configure.
-
Click Server Certificate on the center.
-
Now, select the server certificate and click the delete icon under the Actions column.
-
To the question "Are you sure to delete the HaloENGINE Certificate?", answer OK.
-
By clicking OK, you agree to delete the Server and the Client certificates from the Keystore permanently.
Results: You can see a confirmation message after deleting the certificates successfully.
Restart HaloENGINE Tomcat service
Restart the HaloENGINE Tomcat service after making all necessary certificate-related adjustments.