
This section contains supplementary information.
Appendix 1 - SNC Configuration
Secure Network Communication (SNC) protects the logical link between the endpoints of a communication. To have a secure connection between the components, you need to enable SNC. The module SAPJCo is used to send data from the HaloENGINE to the AS ABAP. This communication uses the protocol RFC and needs to be protected with SAP Secure Network Communications (SNC).
The explanation presented in this section is solely for purposes of illustration. For details regarding the setup and configuration of SNC in AS ABAP, please refer to the SAP Online Help (http://help.sap.com) to find an authoritative source of content.
Step 1: Enable SNC in AS ABAP
Before you start the enabling process in HaloENGINE, make sure that the following requirements are met in your SAP AS ABAP system:
-
Configured and started with SNC enabled.
-
An RFC user with access rights to the HaloENGINE audit Log.
-
The SNC-Name of the RFC user is set in the AS ABAP user management.
-
The PSE file with the client X.509 certificate of the RFC user and the PSE file password are available.
Step 2: Create folder structure in HaloENGINE
Create the following folder structure:
-
\<path>\snc\bin -
\<path>\snc\sec
Step 3: Download and Install CommonCryptoLib in HaloENGINE
-
Login to "SAP Software-Downloads".
-
Navigate to "By Category -> SAP Cryptographic Software -> SAPCRYPTOLIB -> COMMONCRYPTOLIB 8 -> Downloads".
-
Select your operating system e.g., "WINDOWS ON X64 64BIT".
-
Download the latest version of SAPCRYPTOLIB.
-
Extract the archive via SAPCAR.
-
Copy the following files to
\<path>\snc\bin\.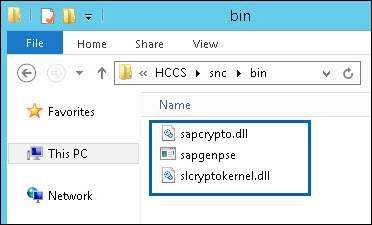
CommonCryptoLib files
Step 4: Set Environment Variable SECUDIR in HaloENGINE
The CommonCryptoLib uses the Environment Variable SECUDIR to access the PSE files and the Credentials.
-
Set the System Environment variable
SECUDIR to \<path>\snc\sec.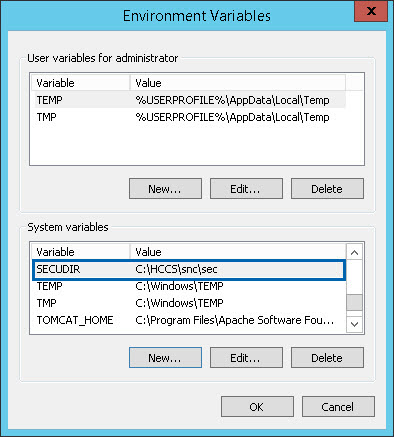
Environment Variable SECUDIR
-
Restart the computer to make your system aware of these changes.
Step 5: Create PSE for the Client (HaloENGINE)
-
Execute the following command to generate the PSE.
-
In this step, a text file with certificate details will be generated.
-
This text file must be signed by your CA before you go to step 5a.
Run:
"\<path>\snc\bin\sapgenpse" get_pse -p "\<path>\snc\sec\<client>.pse" -x <password> -r \<path>\snc\sec\<client>.txt "CN=<distinguishedname>, O=<companyname>, C=<name>


Output would look similar to this example below:
Certificate Request
 Signed Part
 Subject :CN=JCOSNC, O=SECUDE, C=IN
 Key
 Key type :rsaEncryption (1.2.840.113549.1.1.1)
 Key size :2048
 Attributes
 Signature
 Signature algorithm :sha256WithRsaEncryption (1.2.840.113549.1.1.11)
 Signature (size="2048") :<Not displayed>
Step 5a: Import Root/Issuing CA certification into PSE
-
Make sure you have the Root CA.cer and signed
client.cerin\<path>\snc\sec\. -
Execute the following command to import the Certificate Authority.
Run:
"\<path>\snc\bin\sapgenpse" import_own_cert -p "\<path>\snc\sec\<client>.pse" -x <password> -c "\<path>\snc\sec\<client>.cer" -r "\<path>\snc\sec\ROOTCA.cer"


Output:
CA-Response successfully imported into PSE "C:\HCCS\snc\sec\jcosnc.pse"
Step 5b: Check the configuration
To check the configuration, run the following command:
Run:
"\<path>\snc\bin\sapgenpse" get_my_name -p "\<path>\snc\sec\<client>.pse" -x <password> -v

Output would look similar to this example below:
Retrieving my certificate... ok.
Getting requested information... ok.
.
.
.
MY Certificate:
----------------------------------------------------------------------------
Subject : CN=JCOSNC, O=SECUDE, C=IN
Issuer : EMAIL=itadmins@secude.com, CN=itadmins20110916, OU=IT Department, O=Secude AG, SP=Nid walden, C=CH
.
.
.
----------------------------------------------------------------------------
No additional forward certificate path (CA certificates).
Root Certificate:
----------------------------------------------------------------------------
Subject : EMAIL=itadmins@secude.com, CN=itadmins20110916, OU=IT Department, O=Secude AG, SP=Nid walden, C=CH
Issuer : EMAIL=itadmins@secude.com, CN=itadmins20110916, OU=IT Department, O=Secude AG, SP=Nid walden, C=CH
.
.
.
----------------------------------------------------------------------------
Note:
-
Check whether the version of CommonCryptoLib is 8.5.10 or higher.
-
Check whether the Environment Variable $SECUDIR points to \<path>\snc\sec.
Step 5c: Generate Credentials
The PSE file is protected with the PSE file password. To give access to the PSE file, the Credentials file (cred_v2) needs to be created. The Credentials file contains the path and the password of the PSE file. To create the Credentials file, run the following command:
 Run:
"\<path>\snc\bin\sapgenpse" seclogin -p "\<path>\snc\sec\<client>.pse" -x <password> -O SYSTEM


Output would look similar to this example below:
running seclogin with USER="Administrator"
 creating credentials for well-known group "NT AUTHORITY\SYSTEM" ...
 Adjusting credentials and PSE ACLs to include "NT AUTHORITY\SYSTEM"...
   C:\HCCS\snc\sec\cred_v2  ... ok.
   C:\HCCS\snc\sec\jcosnc.pse  ... ok.
 Added SSO-credentials for PSE "C:\HCCS\snc\sec\jcosnc.pse"
Note: If you run the CMD with the account which is used by the SAP JCo to access the Credentials file, then the option -O need not be given.
Step 5d: Check the content of the folder:
Your "sec" directory should contain the following files.
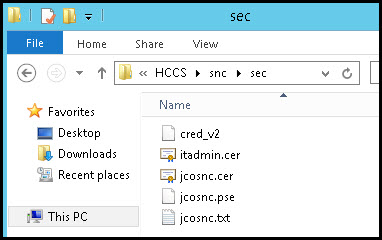
Folder content
HaloENGINE SNC configuration is done, now the SAP JCo should be able to protect the RFC communication to the AS ABAP with SNC.
Appendix 2 - Uninstalling the HaloENGINE
Method #1
When you no longer use the service, you may uninstall the application. Uninstalling removes all files and registry settings that were added to your computer during the initial installation.
-
Click Start menu > go to Control Panel > Programs > Programs and Features > Uninstall a Program > select HaloENGINE application from the list > right-click and select Uninstall option or double-click on the installer
HaloENGINE_Setup.exe. -
Depending on your Windows security settings, you may get a security warning as "Do you want to allow the following program to make changes to this computer?". If you get this security warning, click the Yes button to confirm that you want to uninstall the application.
-
The following confirmation message will appear:
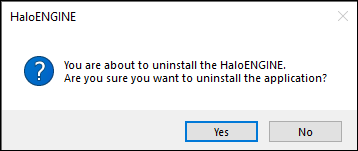
Uninstall message #1
-
Click Yes to confirm that you want to remove it from the computer.
-
You will be prompted to save a backup of the configuration files.
Uninstall message #2
-
Click Yes to save and continue with the uninstallation (The previous configuration files will be kept in the same location) or choose No to proceed with the uninstallation without saving.
Uninstall message #3
-
Click OK to close the message.
Method #2
The application can be removed using the command line, as illustrated in the sample below.
-
Open a command prompt.
-
Navigate to the application installer's directory.
-
Use the following commands to uninstall:
Example #1: uninstall and keep the configuration files
HaloENGINE_Setup.exe -uninstall -keepconfig true
Example #2: uninstall and delete the configuration files
HaloENGINE_Setup.exe -uninstall -keepconfig false
Appendix 3 - Uninstalling the HaloENGINE Service
When you no longer use the service, you may uninstall the application. Uninstalling removes all files and registry settings that were added to your computer during the initial installation.
Method #1
-
Click Start menu > go to Control Panel > Programs > Programs and Features > Uninstall a Program > select HaloENGINE Service from the list > right-click and select Uninstall option.
-
Depending on your Windows security settings, you may get a security warning as "Do you want to allow the following program to make changes to this computer?". If you get this security warning, click the Yes button to confirm that you want to uninstall the add-on.
-
The following confirmation message will appear.
Uninstall message #1
-
Click Yes to confirm that you want to remove it from the computer.
-
The service is uninstalled successfully. Click OK to close the dialog.
Uninstall message #2
Method #2
Follow the below procedure to uninstall the service using a command.
-
Open a command prompt.
-
Navigate to the installation directory where the setup
exewas extracted. -
Use the following command to uninstall:
Example:
HaloENGINE_Service_Installer.exe -uninstall -silent true