
SAP Add-On Configuration
This section provides conceptual information and procedures for configuring HaloCORE's SAP Add-On in your environment. The general settings explained in this section are delivered as standard configuration (please refer to the section "Import standard configuration"). You can analyze the standard configuration and change the settings if necessary.
For feature-specific settings, please refer to the respective sections: Monitor, Block, and Protect.
General Switches
HaloCORE switch serves the following purposes:
Diagnostics: in the event of hard-to-track errors, deactivating HaloCORE completely can help to identify the source.
HaloCORE can be activated and deactivated for selectively specific users or user groups.
HaloCORE performs three levels of checks when a download is triggered.
Checks if HaloCORE Main Switch is on or off for the entire system (client).
Checks if HaloCORE is on or off for the particular (logon) user in "User Default" and "User-Related Switches". Based on the settings:
If determined as "off", HaloCORE is inactive.
If determined as "on", HaloCORE runs normally.
Checks for the user basic authorization - J_9BSD_PRT. When a user does not have any HaloCORE specific authorizations, the following states (in "Unauthorized User") define how HaloCORE should behave.
If Unauthorized User = On, HaloCORE runs normally; this will lead to an error message being stored in the HaloCORE log.
If Unauthorized User = Off, HaloCORE is inactive.
If Unauthorized User = Audit Only, HaloCORE will run in audit-only mode. (no user interaction, no blocking, no labeling, and no changes to the file)
To activate/deactivate HaloCORE, proceed as follows:
Call transaction /n/SECUDESD/HC_SWITCH – General Switches.
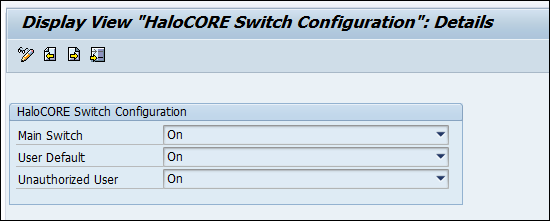
HaloCORE Switch Configuration
Click Display−>Change icon to edit the options.
Main Switch (On/Off)—allows activating and deactivating HaloCORE completely for all users, for the entire system (client).
User Default (On/Off)—default for all users that are not listed in the user-related control table.
Unauthorized User—defines HaloCORE behavior for a user without authorization.
On—HaloCORE runs normally.
Off—HaloCORE is inactive.
Audit Only—HaloCORE will only log the user activity; no protection or labeling will be attempted.
Click Save.
User-Related Switches
This table controls for which users HaloCORE is active (as whitelist or as blacklist):
Call transaction /n/SECUDESD/USR_SWITCH – User-Related Switches.
Click Display−>Change icon to add new entries.
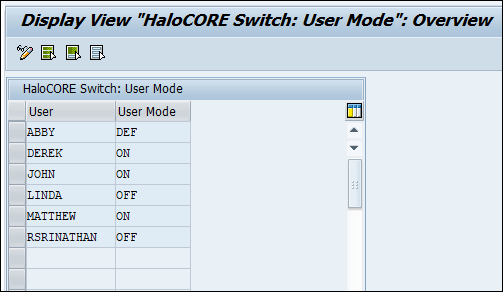
User-Modes
Click New entries and then enter the usernames and select the modes.
On – HaloCORE is on for the specific user.
Off – HaloCORE is off for the specific user.
Default – HaloCORE is active/inactive depending on the value set in the "User Default" table - /SECUDESD/HC_SWITCH. If a username is not found in this table, it is considered to be the "User Default" set in /SECUDESD/HC_SWITCH.
Click Save.
Spool Logging
HaloCORE supports classification, protection, logging and optionally blocking of spool requests of the NetWeaver spool system. (Interactive Forms and Adobe Document Services are not supported.)
Downloading of Spool Requests
A spool request is a document for which a print function has been selected. The spool system uses a spool request to store the print data temporarily and to access it. When a user attempts to download a spool request or to send it using SAPoffice, HaloCORE intercepts the request and protects the data.
What Information is logged?
In the HaloCORE log, the download will appear as coming from the transaction and report where the user triggered the download (e.g., transaction SP01, report RSPOSP01NR, and associated package and application component).
Classification, however, will be based not on this information, but on the program/variant that initially generated the spool list, if the spool request was generated by a batch job because this is far more likely to bear significance for the data's significance. Additionally, in the "Extended Attributes", various spool-specific information can be found, like the spool ID, the background job, the program, the variant, and involved users. Furthermore, HaloCORE work processes are logged in SAP trace for diagnostic purposes.
Prerequisite: Make sure that you have applied the spool list download code enhancements.
Printing of Spool Requests
The primary purpose of the spool system is the printing of documents on paper. It may, however, be interesting to control, audit, and possibly block some more specific use cases, like e.g., PDF generators on a user's front-end. Such cases can be audited and blocked by HaloCORE with the same mechanisms as are used for controlling downloads.
Prerequisite: Make sure that you have applied the spool output printing code enhancements.
Configuration
To avoid auditing mass-printing processes with HaloCORE, uncritical scenarios should be excluded from HaloCORE processing, by whitelisting them in transaction /SECUDESD/SPOCTRL. (The table supports the standard wildcards * and +).
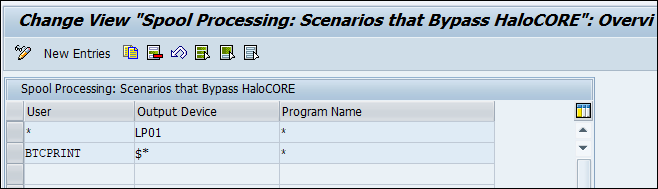
Spool Processing Control
Call transaction /SECUDESD/SPOCTRL.
Click Display −> Change icon to edit the table.
Click New Entries.
Enter the exceptions (User, Output Device, and Program Name) as per your need.
Click Save to save your settings.
Fail-Safe Mode
The Fail-Safe mode controls the behavior of the system in case of inconsistencies that prevent the specified protection from being applied (conflicting configuration, server component unreachable or returning an error message. etc.).
To configure fail-safe mode, follow the below steps:
Call transaction /n/SECUDESD/PARAMS_LOC – System-Local.

Customizing HaloCORE client parameters - Local details
Click Display −> Change icon to edit the options.
Suppress dialogs - Select this checkbox to disable the following warning and information dialogs.
The file had to be renamed and will be saved as "<<new_file_name>>".
Errors occurred - data is downloaded unchanged.
Errors occurred while processing the data (-> long text).
Fail-Safe Mode: you can define any one of the following
Strict: The download is blocked whenever this is technically possible.
Tolerant: If protection cannot be applied, HaloCORE allows downloading a file unprotected.
Log Level: by default, the Detailed log level will be selected. You can configure the log level as follows:
Errors only: When you select Errors only log level, the audit log displays the log of all documents downloaded from the SAP GUI, but it will show a detailed log (message level) only in the case of Error downloads.
Errors and warnings: When you select Errors and warnings log level, the audit log displays the log of all documents downloaded from the SAP GUI, but it will show a detailed log (message level) only in the case of Error and Warning downloads.
Detailed log: When you select Detailed log level, the audit log displays the log of all documents downloaded from the SAP GUI with a detailed log (message level).
Blocking Checks: you can ignore this setting. It is not relevant in this mode.
Click Save to save your settings.
HaloENGINE Connection Parameters
Difference between ABAP classification (default) and HaloENGINE classification.
There are two methods for handling classification in an environment, depending on where the business logic is implemented.
By default, the HaloCORE add-on operates on ABAP classification, which means that the logic defined in the NetWeaver (or S/4HANA) add-on makes decisions about logging and blocking independent of the HaloENGINE. However, it is possible to manually switch to HaloENGINE Classification if necessary.
In HaloENGINE classification, the rule engine reads metadata collected in the ABAP layer along with the file and makes all decisions (blocking, categorization, labeling, and protection). At the same time, the default classification engine can still be used. Classification information derived from ABAP classification is sent along with metadata of type “pre-classification” to HaloENGINE.
Follow the below steps to configure HaloENGINE connection parameters:
Call transaction /SECUDESD/PARAMS_HCS - HaloENGINE Connection Parameters.
Click Display −> Change icon.
HaloENGINE is defaulted to ABAP Classification. Here, the ABAP component blocks downloads that would violate internal data security policy and logs all download activities using authorization objects and download block BAdI.
.png?inst-v=6857700d-e803-410a-87dd-b39fd8a60a56)
ABAP classification (default)
To avail of HaloCORE Monitor, Classify, Block, and Protect features using HaloENGINE, you need to select the Activate HaloENGINE check box.
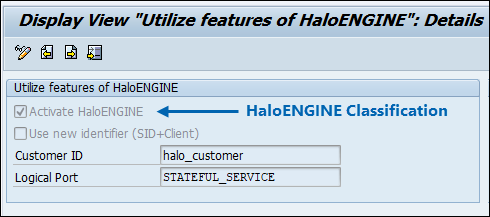
HaloENGINE Classification
You can use any one of the following ways to identify the client in the HaloENGINE (Assign Systems).
To use the Logical system name in HaloENGINE, uncheck the Use new identifier (SID+Client) check box. For example, if the Logical system name is “PD1CNLT400”, then the same must be used in the HaloENGINE.
To use the new identifier, select the Use new identifier (SID+Client) check box. For example, if the System ID is PD1 and the client is 400, then the identifier "PD1_400" must be used in the HaloENGINE.
This setting is only applicable if the HaloENGINE is activated, i.e., the Activate HaloENGINE option is selected.
Enter the Customer ID which is specified in the HaloENGINE.
To append all the individual packages of character-based files that are downloaded in multiple packages and to do the HaloCORE processing to the final file, enter the name of the logical port that is created for the Stateful interface. To know how to create the logical port, please refer to the section "Stateful Process Interface".
Click Save.
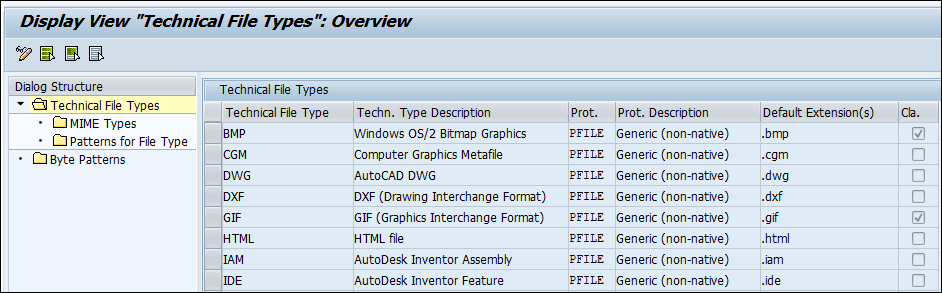
File Types
Configuring file types and extensions helps in logging the type of file being extracted.
File Type Detection
Follow the below steps to create or modify the file type detection:
Call transaction /n/SECUDESD/FTYPE_DET - File Type Detection.
Click Display −> Change icon to edit the options.
File type detection
Byte patterns are delivered for the most common file types. If needed, you may add your own.
Click Save to save your settings.
File Types and Extensions
Please refer to the field-level help (F1) to learn more about the individual fields of the table. To simplify this configuration, several filename extensions (e.g., xlsx, xlsm, xls) can be grouped into one logical file type (e.g., MS Excel). The table is delivered as standard configuration (refer to section "Import standard configuration"), but you are free to change or create such types as required.
Maintain File Types
File types are groups of technical extensions. Follow the below steps to change or create a new file type:
Call transaction /n/SECUDESD/FILETYPE - Maintain File Types.
If you wish to change or create new file types, you can do so.
Click Display−>Change icon to edit the options.
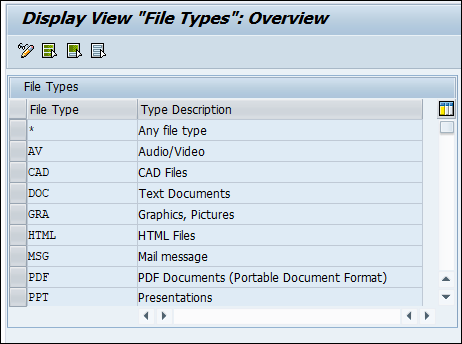
File types
After creating file types, click Save to save your settings.
Maintain File Extensions
To add or change a new filename extension:
Call transaction /n/SECUDESD/FILEEXTN - Maintain File Extensions.
Click Display−>Change icon to edit the options. If you wish to change or add a new filename extension, you need to specify File Type, Technical file type, and RMS Protector.
Click Save to save your settings.
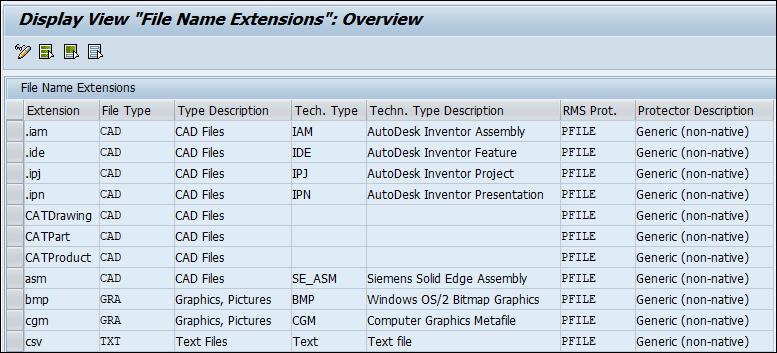
File extensions
Log Administration
Log administration allows you to display the log list, and deal with the large volumes of log data logged continuously by both BAL and SAP Add-On logs. Logs should be deleted in specified intervals (e.g., weekly batch job for deleting logs) to avoid high database load. The SAP Add-On provides options to audit the download log and to delete the SAP Add-On log as well as the BAL log.

Log Administration
HaloCORE Log Dashboard
HaloCORE Log Dashboard provides a simple and easy-to-understand visualization to give insightful information. It helps you to get an at-a-glance view of the HaloCORE Activity log.
Prerequisite:
To use the dashboard, you need to activate the service in SICF.
Call transaction SICF.
Enter DASHBOARD as Service Name.
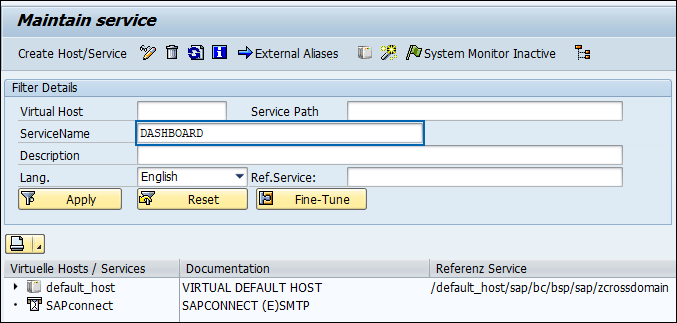
Maintain Services dialog #1
Click Apply.
You will find our service in the tree:
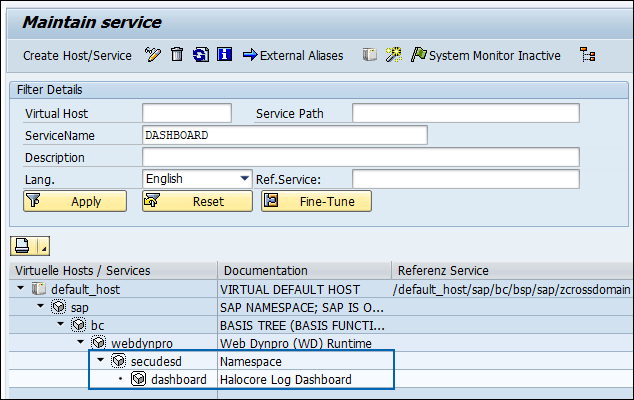
Maintain Service dialog # 2
Right-click on the last line dashboard and select Activate Service.
Confirm the pop-up with Yes:
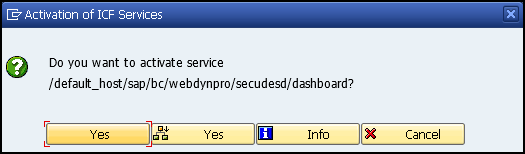
Popup dialog
Activation is done and now you can call the dashboard.
To view the dashboard, follow the steps:
Call transaction /n/SECUDESD/DASHBOARD or, in a browser, enter the URL
[protocol]://[server]:[port]/sap/bc/webdynpro/secudesd/dashboard(e.g.,http://myserver.mycompany.com:8443/sap/bc/webdynpro/secudesd/dashboard) You can determine the path for your system by displaying the service in SICF (as described above), right-clicking on it, and selecting "Test Service" from the context menu.You will find the default dashboard and its settings, but you can change the settings as per your need.

Data Selection and Filters
To filter based on time range, the following options are useful:
Time Range – Last Month, Yesterday, Last 7 Days, Last Year, Select From/To Dates.
To view the log between two timestamps, you need to select the option Select From/To Dates and then enter the start and end dates. (All dates are based on the current user's time zone.)
To filter based on logged events, the following options are useful:
Downloads
Downloads for Viewing (applicable only for DMS/KPro downloads)
Mails
Uploads
Printing
Spreadsheet Display
Copy/Paste
To view blocked and non-blocked entries, select Non-Blocked and Blocked check boxes.
Show Clear Names: Only users with proper authorization object (J_9BSD_LDO with value "UN") will see this check box (see section “Log Pseudonymization”). For an unauthorized user, the Show Clear Names button will not be displayed in the dashboard. (In such a case, the displayed user-related information will be replaced with pseudonyms.)
If Show Clear Names is On, the displayed user-related information will be the real information.
If Show Clear Names is Off, the displayed user-related information will be replaced with pseudonyms.
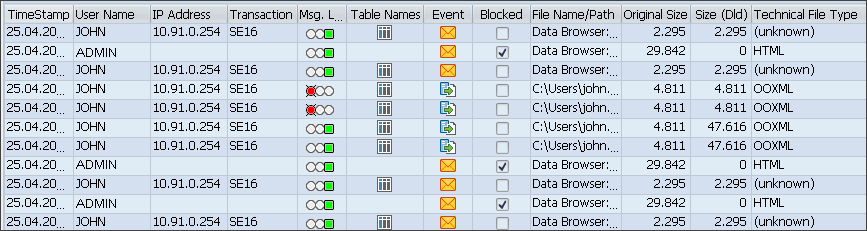
Display Download Log
Once you have installed and configured the HaloCORE Add-On, you will want to examine the log which contains records of each file downloaded from SAP. Note you can either use the transaction included with the Add-On or you can access the raw database table using another tool, such as the Business Objects suite of software from SAP. The instructions below guide you through displaying the logged data using the provided transaction.
(Access to the log display is controlled by authorizations, as described under the section "Authorizations for log display".)
Selection Screen
To display the log list, follow the below steps:
Call transaction /n/SECUDESD/DISP_LOG and you will be presented with the following screen:
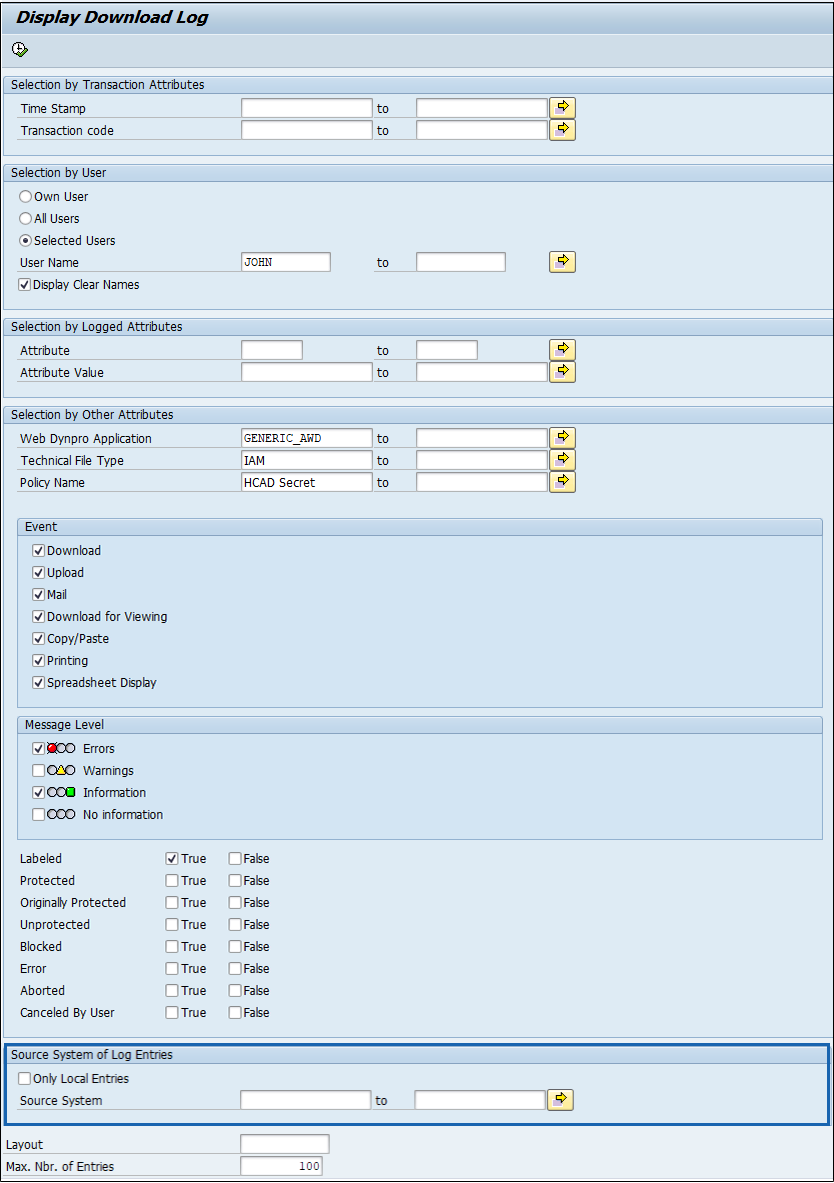
Display download log - selection of attributes
Note: Depending on your authorizations, not all options may be available.
Under the Selection by Transaction Attributes group box, specify the following options as you need:
Enter the time range (date) in the Time Stamp box.
Enter the transaction code in the Transaction code box.
Under the Selection by User, select any one of the three options:
Select Own User option to list the logs of the logged-in user.
Select All Users option to list the logs of all the users.
Select Selected Users option to list the logs of the specified users.
Display Clear Names: Only users with proper authorization objects can enable this check box. For more details, refer to the section “Log Pseudonymization”
Under the Selection by Logged Attributes, specify the following options as you need:
Enter the attribute(s) in the Attribute box.
Enter the value of the attributes in the Attribute Values box.
Under the Selected by Other Attributes group box, specify the following options as you need:
Enter the name of the Web Dynpro application in the Web Dynpro Application text box.
Enter the technical file type identified by HaloCORE in the Technical File Type text box.
Enter the policy name in the Policy Name text box.
Under the Event group box, select the following checkboxes as you need. Only the log entries with the selected events will be displayed.
Download
Upload
Mail
Download for Viewing
Copy/Paste
Printing
Spreadsheet Display
Under the Message Level group box, select the following checkboxes as you need. Only the log entries with the selected message levels will be displayed.
Message Level
Errors
Warnings
Information
No Information
Select the following checkboxes for further filtering based on the action that happened.
Labeled
Protected
Originally Protected
Unprotected
Blocked
Error
Aborted
Canceled By User
Source System of Log Entries: This option appears ONLY if you have selected "Central Log" in /SECUDESD/CNF_LOG.
To display only local log entries, select the Only Local Entries check box.
To display log entries from a specific system, enter a Source System (unique identifier).
Enter the number in Max. No. of Entries box. The maximum number of log entries to be displayed at a time.
After configuring the options, go to Program > Execute or press F8.
The audit log will be displayed.
Reorganize Download Log
This program helps you to check/delete the log entries as per your selection criteria.
Prerequisite: To check or delete the log, you must have the authorizations described under "Authorizations for Log Reorganization".
Follow the below steps to delete the SAP Add-On log and BAL:
Call transaction /n/SECUDESD/DEL_LOG to reorganize/delete obsolete log entries.
The Delete Download Log screen appears:

Delete Download log
Under Log Selection, specify the following options as you need:
Enter the number of days in the Entries Older Than N Days box. The default value is 7 set via /n/SECUDESD/PARAMS_HC. The BAL entries older than 7 days can be deleted.
Enter the transaction code in the Transaction code box. The entries related to the specified tcode can be deleted.
Enter a user name in the User Name box. The entries related to the specified user name can be deleted.
Enter a number in Max. Nbr. of Entries box. The maximum number of log entries to be deleted at a time.
Under Additional Selection Criteria, you can further filter the entries based on whether the download is protected or not.
If the Protected checkbox is selected, only the log entries that have the “PROTECTED” indicator set will be deleted.
If the Not Protected checkbox is selected, only the log entries that do not have the “PROTECTED” indicator set will be deleted.
Under Processing Options, specify the following options as you need:
Select Delete BAL Entries check box to delete the BAL entries corresponding to SAP Add-On logs (Message Level column in SAP Add-On logs - holds all the messages that describe the various derivation steps).
Select Delete HaloCORE Log check box to delete the SAP Add-On logs.
Select Delete non-expired check box to forcibly delete the BAL entries even though they are not expired.
Select Test Mode (no DB Update) check box to check the number of logs available for deletion as per set selection criteria, but no DB update will happen.
Click Execute to delete the logs. Note: If none of the processing options is selected, the log result will be displayed without deletion.
The Download Log Reorganization appears with the selected entries older than the specified day details, the number of matching records as per selection criteria, and the number of deleted logs.
How to Set Log Expiration
Setting log expiration applies only to BAL entries. Follow the below steps to set log expiration:
Call transaction /n/SECUDESD/PARAMS_HC – HaloCORE Client Parameters.
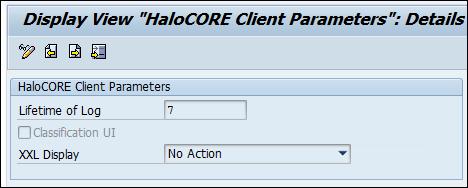
Setting log expiration
Click Display −> Change icon to switch to change mode.
Log expiration: In the Lifetime of Log, specify the number of days after which the details logged in the BAL can be deleted, i.e., the expiration day for the BAL. The default value is 7. The logs can be deleted using the transaction SLG2 or log reorganization program /n/SECUDESD/DEL_LOG. Note: If no value is entered (=0), the log can be deleted immediately.
Please refer to the section "Enable Classification UI" to know more about pre-defined classification and XXL Display.
Click Save to save the changes.
How to Delete the Application (BAL) Logs
Follow the below steps to delete the application logs:
Call transaction /nSLG2 to delete the application log entries.
The Application Log: Delete Expired Logs screen appears.
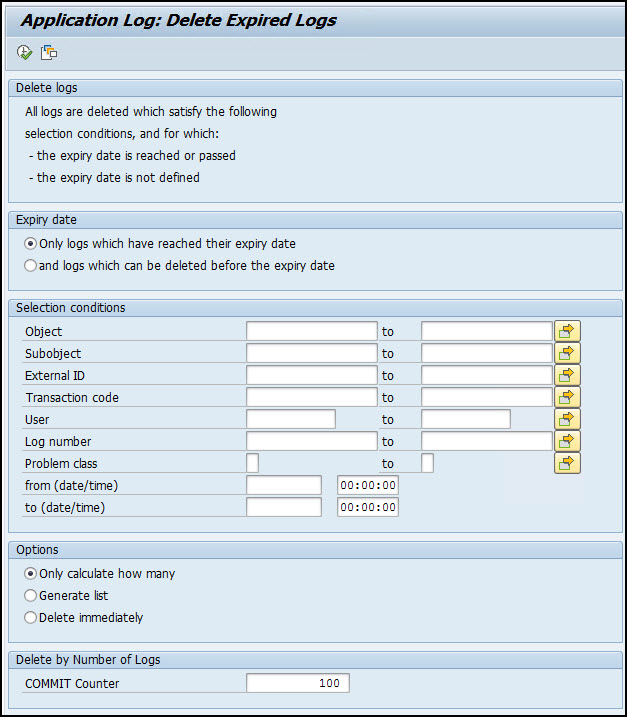
Delete Expired log
In the Expiry date section, select the appropriate expiry option for log deletion.
In the Selection conditions section, specify the criteria for log deletion.
In the Options section, select a relevant option.
In the COMMIT Counter box, enter the number of logs to be deleted at a time.
Click Execute.
The log result will be displayed.
Log Modes
HaloCORE Log Configuration: This allows you to configure where the HaloCORE log records should be stored. If you want to store the logs locally, you need not do anything; this is the default setting.
Resend Log Entries to Central Log: This allows you to resend the log entries that were locally queued when the RFC connection to the central log was unavailable.
Please refer to the section "HaloCORE Log Configuration".
Log Pseudonymization
Pseudonymization is the process of replacing personally identifiable information with a pseudonym, to address privacy concerns, by showing only the pseudonym in the log. When it is enabled, HaloCORE will mask usernames and other identifying information with a pseudonym (random-generated artificial identifier). For example, the username "JOHN" will be replaced with the pseudonym "ABC123". Displaying a pseudonym can help protect personal data from unauthorized misuse because it removes the individual's association with the remaining data in the log. Please note that "External Attribute" details of log records coming from non-NetWeaver-based clients are not pseudonymized, as they generally should not contain any personally identifiable information.
The following identifiers are replaced:
SAP user IDs
Mail addresses
IP addresses (the last two blocks are replaced with random numbers between 1 and 255)
File download paths.
In addition, the display of full usernames and terminal IDs is suppressed. Pseudonyms are generated at every execution of the log display. The pseudonymized display is active by default; to turn it off, the user needs authorization object J_9BSD_LDO with the value "UN" (see section "Authorizations for log display").
Limitations:
In a mail event, the original mail can be viewed by clicking on the Mail icon.
In Detail trace (Message Level), some of the collected trace entries may display such information in clear form.
If you want to avoid this, make sure your users DO NOT have the following authorizations:
For mail display: authorization object J_9BSD_LDD with values J_9BSD_LEV="M" and J_9BSD_LOW="ALL".
For detail trace display: authorization object S_APPL_LOG with values ALG_OBJECT="/SECUDESD/" and ALG_SUBOBJ="GUI_DOWNLOAD".
Procedure:
Call transaction /n/SECUDESD/DISP_LOG.
Display Clear Names: Only users with proper authorization objects can enable this check box.
If the Display Clear Names check box is selected, the displayed user-related information will be the real information as shown below:
Log with clear names
Users without proper authorization will not be allowed to select the Display Clear Names check box. In this case, the displayed user-related information will be replaced with pseudonyms.

Log with pseudonyms
Download of Diagnostic Information
For analyzing issues in connection with HaloCORE , you may be asked by Secude support to provide details about the download event in question. This is done from the HaloCORE Log display (transaction /SECUDESD/DISP_LOG). The function generates a compressed XML file, which is first locally saved to a location of your choice, and contains the log entry, detailed trace information (if available), and related configuration settings. The data is human-readable so that you can review the content before transmitting it.
Call transaction /n/SECUDESD/DISP_LOG.
From the log table, select a log entry for which you need to download the information and then click on Downl. of diagnostic information button on the toolbar.
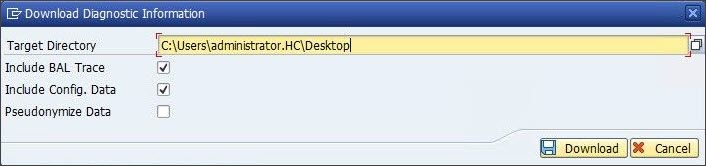
Diagnostic information
Choose a file path (Target Directory) to save the zip file.
Select the Include BAL Trace check box to include detailed trace information from the Business Application Log (BAL).
Select the Include Config. Data check box to include HaloCORE configuration details.
Select the Pseudonymize Data check box if you wish to replace user-related information (user name, IP address, etc.) in the log record with a pseudonym; if unchecked, the displayed user-related information will be the real information. (Please be aware that user-related data may still be visible in the detailed BAL trace.)
Click Download.
The zip file will be saved in the specified location.