
Installing the SAP Add-On
This chapter explains how to install the HaloCORE Add-On and apply necessary code modification and enhancement.
Precondition: Make sure that you have acquired the product package and access to the product documentation that you need for installation.
Import the Add-On Packages
Add-ons and Support Packages
Sometimes HaloCORE Add-on comes along with support packages that contain quality improvements or bug fixes. So, please check the delivery package and import them accordingly as recommended below:
With transaction SAINT, import the packages, including the support packages.
Or with transaction SAINT, import the main packages and then use the transaction SPAM to import the support packages.
With transaction SAINT, import the .SAR files from your installation package <product version>\HaloCORE for NetWeaver\1_Installation\Data\K-[...].SAR:
Logon to client 000 with a user having SAP_ALL authorizations (but not with DDIC or SAP*).
In the menu option, click Installation Package > Load Packages > select Front End option.
Choose a SAR file from the selection window.
Note: The SAP GUI Security dialog may or may not appear depending on the user's GUI settings. On the GUI settings, click the Allow button.
When prompted, click Decompress.
After decompression, a message such as “File 'k-a59coinsecudeco.sar' successfully transferred, decompressed, and deleted” will appear.
Repeat steps 2–5 to upload more files.
Press Start to view your package queue.
Secude packages (SECUDECO and SECUDESD) are ready to install.

Installing HaloCORE Add-On
First, select the SECUDECO Add-On and click Continue.
Click Continue again.
To the question "Do you want to add Modification Adjustment Transports to the queue?", answer No.
You may choose to run the import in dialog or the background. (The import process may run for 30 minutes or longer, depending on various factors.)
Click Finish button.
Follow the same procedure to install the SECUDESD Add-On.
For more details, please refer to the SAP online documentation.
Import Standard Configuration
After having successfully installed the Add-On, the next step is to load the standard configuration:
Logon to the client where you want to import the settings (not client 000), with a user with SAP_ALL authorizations.
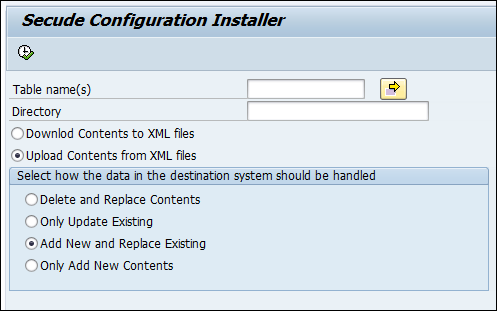
Run transaction /n/SECUDECO/INSTALLER.
In the Directory input field, click on the input help (or) press the F4 key.
The Browse For Folder dialog appears.
Select the directory containing the XML files with the settings (
Secude[…]_nnn.XML)The XML files reside on your installation package
<product version>\HaloCORE for NetWeaver\2_Configuration\Data.Please note that files with a too-long file path cannot be uploaded. Hence, make sure that the complete path (including the filename) does not exceed 128 characters.
Click Upload contents from XML files and Add New and Replace Existing options.
Uploading contents from XML files
From the menu, select Program > Execute or just press F8.
Click OK. Please be patient until the files are uploaded. On successful upload, you can see the upload information in the log.

Log information
Copy the Standard Texts
To facilitate the blocking of mail attachments, the texts for the notification email’s subject and body are delivered as standard texts in the HaloCORE Add-on. Once the add-on is installed, the next step is to copy these texts from client 000, to make them available as a blocking feature.
Logon to the client where you want the texts to be replicated (not client 000).
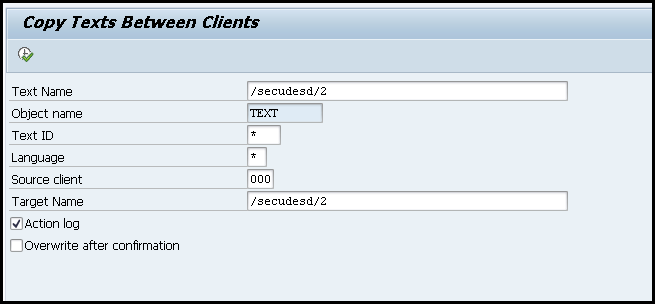
Call transaction SO10.
Go to menu Utilities > Copy from Client.
Enter the Text Name and Target Name as “/secudesd/2” and press Execute button.
Copying the standard texts
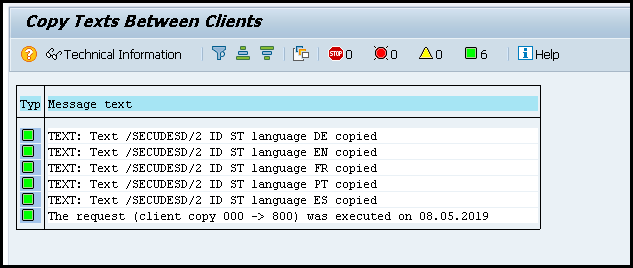
The success messages will be displayed.
Success messages
Repeat step 4 for Text Name and Target Name “/secudesd/3”.
HaloCORE Menu
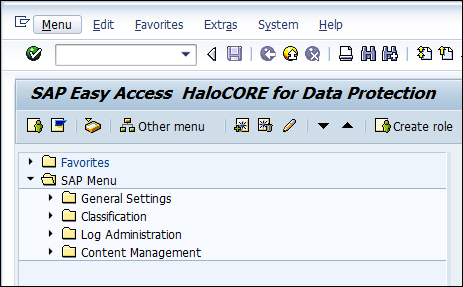
After installing the HaloCORE Add-On, you can view the main menu by using the transaction /n/SECUDESD/ and configure all other settings.
HaloCORE main menu
HaloCORE Standard Role
Configuring the SAP Add-On demands full authorization and, for this reason, a sample standard authorization role for HaloCORE objects is provided, along with the delivered package. You can locate it in your installation package at <product version>\HaloCORE for NetWeaver directory\1_Installation\Authorizations\.
ZSD_SECUDE_ALL.SAP- a sample standard authorization role. When assigned this role, a user will have full authorization to HaloCORE .ZSD_SECUDE_REMOTE_LOG.SAP- a sample authorization role for HaloCORE log configuration. For more details, refer to the section "Settings on Central System".
Uploading the role into SAP
Follow the below steps to upload a role into SAP:
Call transaction PFCG.
On the Role menu, click Upload.
Browse and select the sample role file
ZSD_SECUDE_ALL.SAPfrom the installation package.Switch the role to Change mode.
Click the Authorizations tab.
Click Change Authorization Data.
Click Generate or on the Authorization menu, select Generate.
Press F3 or click Back on the toolbar to exit the screen.
Perform the above steps for
ZSD_SECUDE_REMOTE_LOG.SAProle as well.
Assigning the role to a user
Follow one of the following ways to assign user(s) to the role:
Method 1
Call transaction PFCG.
Enter the name of the role and switch the role to Change mode.
Click the Users tab.
Under the User Assignments section, enter, or select the username in User ID.
Select the user(s) and click User Comparison to compare and update the user master records.
Click Save.
Method 2
Call transaction SU01.
Enter a username and switch the user to Change mode.
Click the Roles tab.
Under Roles Assignments, enter, or select the Role.
Select the role and click User master record to compare and update the user master records.
Click Save.
Required Authorizations
To know more about required authorization for classification, protection, viewing log files, reorganizing logs, and Excel List viewer, please refer to the section “Authorizations for Users”.