
Using the configuration tool, you can quickly set up HaloSHARE.
Administration
HaloSHARE uses a key-based license to control application features. Obtain the license key from Secude Support before installing HaloSHARE. After installation, enter the license key in the configuration tool to activate HaloSHARE and enable all features.
This document does not cover all the specifics of purchasing a license. Please contact Secude’s representative for additional details.
License Activation
To complete the license activation, perform the following steps:
-
Navigate to the installation directory. The default location is
C:\Program Files\Secude\HaloSHARE. -
Right-click
HaloSHAREConfiguration.exeand select Run as administrator. -
In the HaloSHARE Configuration window, click Administration in the top-right corner.
-
The Administration screen appears.
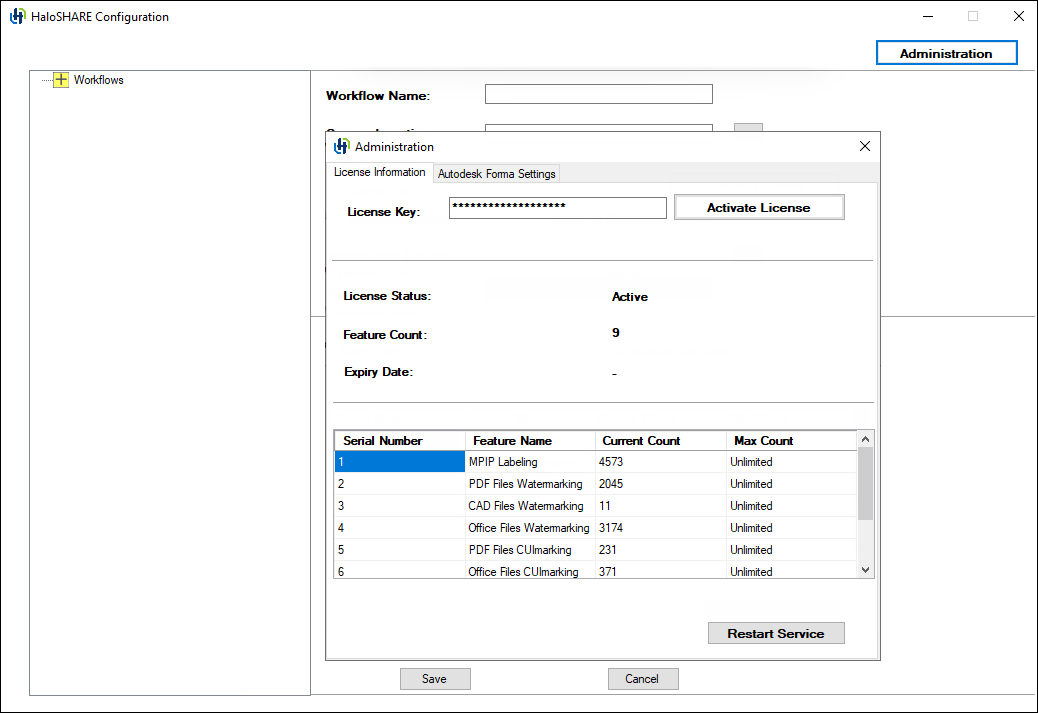
License activation screen
-
Enter the license key and click Activate License.
-
Please be patient while the license key is activated.
Result:
-
After successful license activation, a confirmation message appears displaying the license details, including License Status, Feature Count, and Expiry Date. Additional information is shown in the Feature Name, Current Count, and Max Count fields.
-
If you enter an invalid license key, License Status displays LicenseNotFound.
-
If you enter a valid license key, License Status displays Active.
Related tasks:
-
If your license expires, enter a new license key and click Activate License, or activate the license using the
hsadm.exetool, then restart the service. For more details, refer to the section “Configure the Service by Using the Admin Tool”. -
The license is automatically deactivated when HaloSHARE is uninstalled.
-
You can find license and service information in the log file located at:
C:\Users\UserName\AppData\Local\Secude\HaloSHARE\log.
Autodesk Forma Settings
Autodesk Forma integration ensures seamless data flow and collaboration across platforms. HaloSHARE enhances this ecosystem with MPIP protection, watermarking, CUI marking, digital signing, password protection, and metadata tagging to enable secure and efficient file sharing.
Prerequisites:
-
A valid license with the Autodesk Forma feature enabled.
-
Ensure that you have the Client ID and Client Secret.
To configure HaloSHARE with Autodesk Forma, follow these steps:
-
In the HaloSHARE Configuration window, click Administration in the top-right corner.
-
The Administration screen appears.
-
Click Autodesk Forma Settings.
-
Enter the required credentials:
-
Client id
-
Client secret
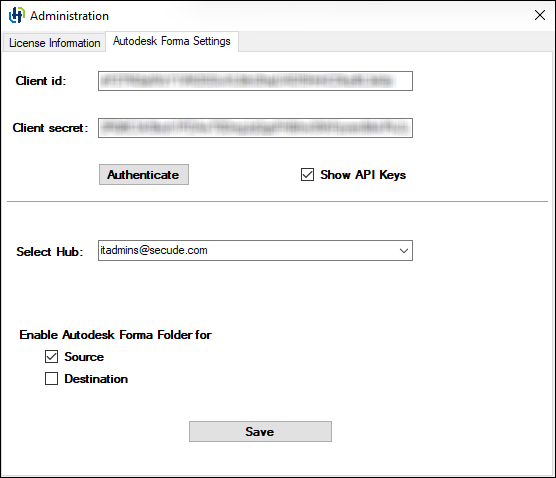
Autodesk Forma Settings
-
-
To view the entered keys, click Show API Keys.
-
Click Authenticate. A confirmation message is displayed upon successful authentication.
-
From the drop-down list, select the required Hub.
-
Configure the Source and Destination by selecting one or both of the options below. If an option is selected, the corresponding Autodesk Forma folders will be displayed in the folder selection dialog; otherwise, the local network folder will appear.
-
Click Save.
Result
A confirmation message appears after the settings are successfully saved.
Quick Start for Workflows
A workflow defines how HaloSHARE automatically processes files from a source location to a destination location. A workflow consists of an ordered set of tasks that run sequentially when HaloSHARE detects a new file in the source folder.
Each workflow can include one or more of the following tasks. The execution order is shown below.
-
Metadata Task – Embeds metadata into files.
-
Watermark Task – Adds watermarks to files.
-
Compliance Mark Task – Applies compliance markings to files.
-
Password Protection Task – Applies password-based protection to files.
-
File Signing Task – Digitally signs files to ensure authenticity and integrity.
-
MPIP Task – Applies Microsoft Purview Information Protection (MPIP) labels for classification and protection.
Workflow Task Execution Order (Combined Configuration)
-
Metadata task
-
Watermark task
-
File Signing task
In a workflow, you cannot combine the Password Protection or File Signing subtasks with the MPIP task because they are mutually exclusive. The MIP SDK does not support digitally signed or password-protected files.
In the Workflow pane, expanding a top-level workflow item displays the associated workflow tasks, along with each workflow and the corresponding source location. For example, designers at Prestin Engineering may store sensitive files in the source folder location C:\PrestinEng\Source1 within the organization. To securely share these files with the external users, they configure a destination location such as C:\SharePoint\PrestinEng_DestUser1. The same approach can be used to configure folders for other workflows.
Points to Remember While Working with HaloSHARE Workflow
-
File overwriting occurs when the same file is moved repeatedly to the same source folder.
-
Case 1: When the Move to Destination Path option is not selected.
MPIP Task: Suppose the source location is configured for the text file (
.txt) type. When you copy a text file, for example,sample.txt, into the source folder, it is encrypted and renamed tosample.ptxt. If you copy the same filesample.txtinto the source folder again, the existingsample.ptxtfile is overwritten.Watermark Task: Suppose the source location is configured for the PDF file (
.pdf) type. When you copy a PDF file into the source folder, it is watermarked. If you copy the same PDF file again, the existing file is overwritten.Note: The same behavior applies when a file is digitally signed, password-protected, CUI-marked, or metadata-tagged.
-
Case 2: When the Move to Destination Path option is selected.
MPIP Task: When a file is placed in the source location, it is encrypted and moved to the destination folder. If the same file is added to the source folder again, it is treated as a new file, encrypted, and moved to the destination folder, overwriting the existing file.
Watermark Task: When a file is placed in the source location, it is watermarked and moved to the destination folder. If the same file is added to the source folder again, it is treated as a new file, watermarked, and moved to the destination folder, overwriting the existing file. For files of type PDF, Excel, and DOCX, if processing fails due to a library error, the failed file is cached and is not processed again in subsequent HaloSHARE operations.
Note: The same behavior applies when a file is digitally signed, password-protected, CUI-marked, or metadata-tagged.
-
-
The OneDrive and HaloSHARE services cannot access the same file simultaneously. Similarly, the HaloSHARE and SharePoint services cannot access the same file at the same time. Attempting to access simultaneously will result in an access violation or an access denied error.
-
Unconfigured file types: Files that are not specified in the HaloSHARE configuration tool will not be moved to the destination folder. HaloSHARE identifies these unconfigured file types and leaves them untouched.
-
A top-level workflow cannot be deleted if it contains configured tasks. Delete all tasks before deleting the top-level workflow.
-
The same location cannot be configured more than once, and existing workflow names cannot be reused.
-
The workflow name cannot be changed after it is created. To rename a workflow, delete the existing workflow and create a new workflow with the desired name.
File Processing in Forma
HaloSHARE identifies each file in Forma using the Item ID and Version ID, ensuring that the source folder is not processed repeatedly.
-
When a new file is added to the source folder, HaloSHARE processes and tracks it. If a file (for example, V1) is already processed by HaloSHARE and added again without changes, HaloSHARE skips processing. Processed files are tagged with Processed by HaloSHARE to prevent duplicate processing.
-
HaloSHARE creates a new version when a file with the same name exists in the destination folder.
-
Unlike local folder configuration, when the Move to Destination Path option is selected in Autodesk Forma, files in the source folder remain unchanged, and the processed files are sent to the destination folder.
-
HaloSHARE tracks the version of each file in the source (Autodesk Forma) folder and the destination folder. This ensures that if a user configures a folder in Autodesk Forma that already contains processed files, HaloSHARE identifies them and does not process them again. File tracking details are stored in
TrackVersions.jsonunderC:\Users\Public\Secude\HaloSHARE\adfcache. -
If a HaloSHARE-protected file is uploaded and relabeling is required, HaloSHARE does not process the file if it has already been processed.
To decrypt/relabel and process the file again, do one of the following:-
Delete the tracking version file.
-
Download the file and place it in a different folder.
This approach prevents repeated processing of the same file when Autodesk Forma folders are configured by tracking item versions.
-
Configure Workflows
To configure the workflow, navigate to the destination folder that you specified during installation. The default folder is C:\Program Files\Secude\HaloSHARE.
Prerequisite:
By default, the HaloSHARE file extension is available for selection. To add additional extensions, update the hs_extension_list.json file. Newly added entries automatically appear in the extension list in the configuration tool.
-
Double-click on the
HaloSHAREConfiguration.exefile, and the HaloSHARE Configuration screen appears as shown below.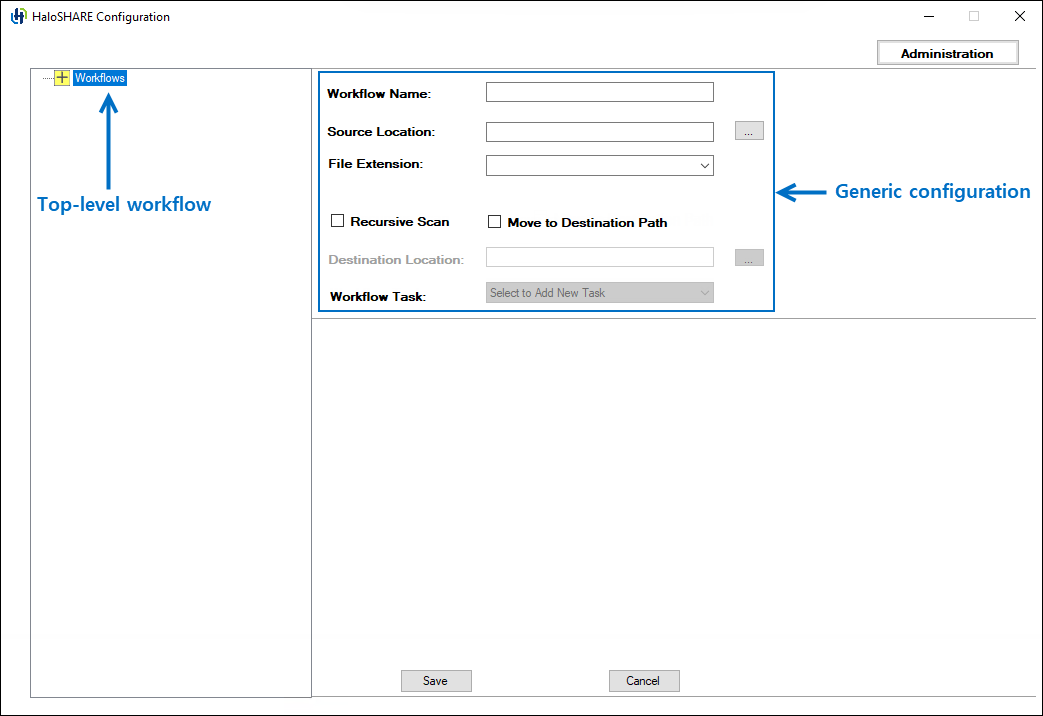
Generic Workflow configuration fields
-
In Workflow Name, enter a name for the workflow. Example: Prestin Engineering
-
In Source Location, enter the path to the source folder that HaloSHARE monitors, or click Browse to select the folder. The folders available in the dialog box depend on your configuration.
-
If Autodesk Forma is integrated, Autodesk Forma folders appear when the Source and Destination options are enabled. Example:
RND_Test:\Project Files\Lib\Assembly. -
If Autodesk Forma is not integrated, local network folders are available. Example:
C:\PrestinEng\Source1.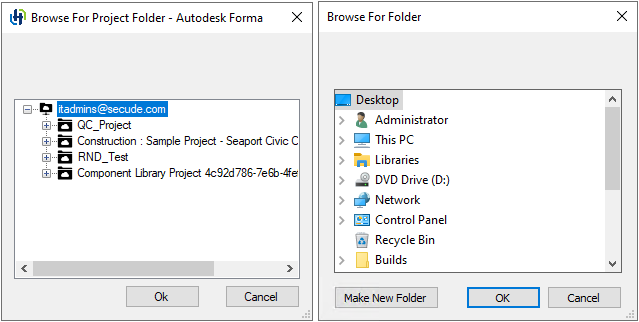
Folder dialogs
-
-
From the drop-down list, select the file extensions. You can also search for a file type and then select it from the results. Files with extensions that are not configured are ignored. However, if Move to Destination Path is selected, both processed and unconfigured files are moved to the destination folder.
-
Select Recursive Scan to scan all subfolders in the source folder. If you don’t select this option, HaloSHARE processes only files in the source folder.
-
Select Move to Destination Path to transfer files from the source location to a destination path. The destination folder can be a shared location for external access, such as a supplier, vendor, or consultant folder. Example: a SharePoint or OneDrive folder.
-
In Destination Location, enter the path to the destination folder where HaloSHARE copies the processed files, or click Browse to select the folder. Ensure that the specified workflow can access this folder. Example: Files from
C:\PrestinEng\Source1are moved toC:\SharePoint\PrestinEng_DestUser1. -
Click Save.
Result:
-
After you successfully add the workflow, a confirmation message appears. The workflow name appears in the left pane under the top-level workflow. Select the workflow name to view its details in the right pane.
-
The Workflow Task list is enabled after you save the workflow successfully. Note: To add a workflow task, the user must have a valid license and a proper installation.
-
To create a new workflow, select top-level Workflow in the left pane. The empty fields appear. Enter the required details to create a new sub-level workflow.
Configure Metadata Task Attributes
This task configures HaloSHARE to add metadata tags to files to help protect sensitive content and provide ownership context.
To tag metadata to files, follow these steps:
-
As described in the Configure Workflows section, configure your workflow task.
-
From the Workflow Task list, select the Metadata Task.
-
On the HaloSHARE configuration screen, the metadata task options appear.
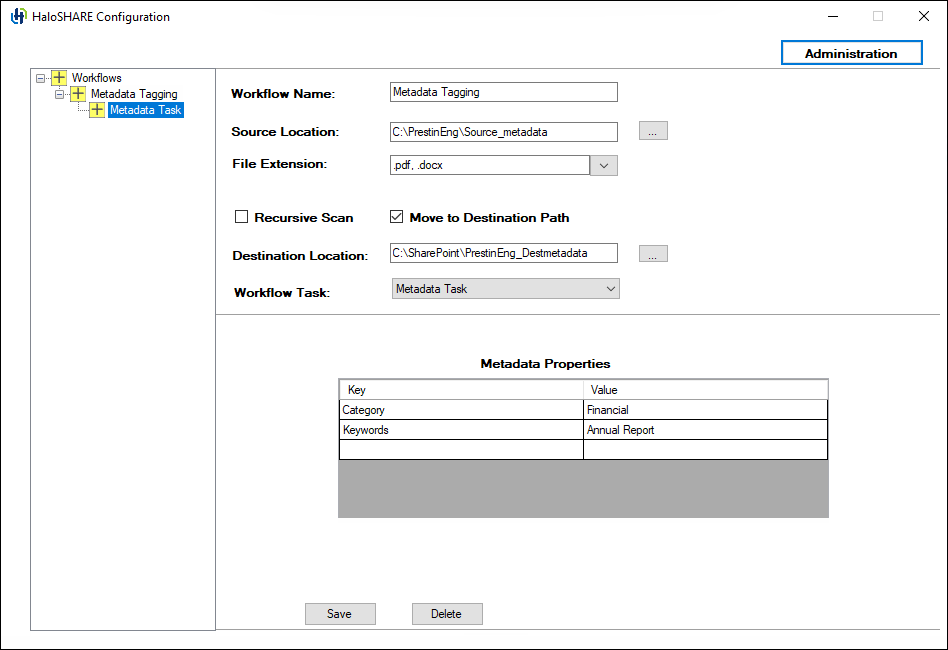
Metadata Task configuration
-
Under Metadata Properties, enter the required metadata values in the designated fields.
Example:
-
Category: Financial
-
Keywords: Annual Report
-
-
To remove added custom properties, select the row, right-click, and choose Delete.
-
Click Save, and then click Restart Service in the Administration UI. Repeat these steps to add additional workflows.
Result:
-
After you successfully add the workflow, a confirmation message appears. The workflow name appears in the left pane under the top-level workflow. Select the workflow name to view its details in the right pane at any time.
-
The files are tagged with the specified metadata values.
-
To delete a workflow, click Delete, and then confirm the action when prompted. The workflow is removed.
-
For examples of the configuration output, see Sample Results section to view the configuration output.
Configure Watermark Task Attributes
This task configures HaloSHARE to apply watermarks to files to help protect sensitive content and indicate file ownership.
To add a watermark to files, follow these steps:
-
As described in the Configure Workflows section, configure your workflow task.
-
From the Workflow Task list, select the Watermark Task.
-
On the HaloSHARE configuration screen, the watermark-related UI field appears.
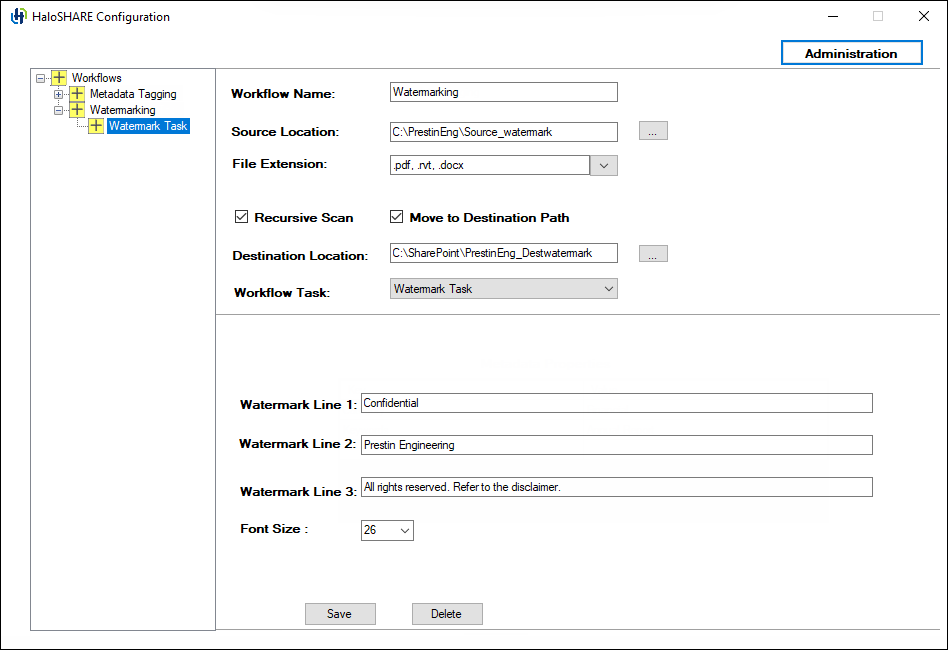
Watermark Task configuration
-
Enter the text to be embedded in the files. By default, the watermark will be applied diagonally. You can type any text suited for the sensitivity level of the document on watermark lines 1, 2, and 3. Example:
-
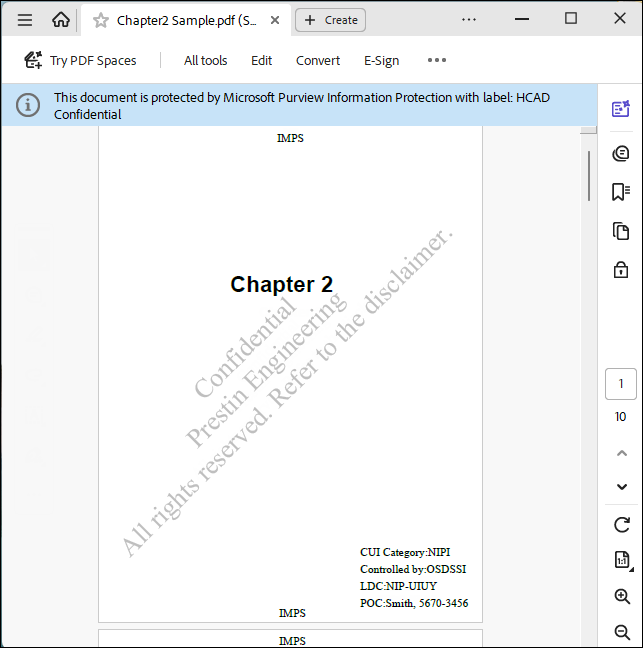
Watermark Line 1: Confidential
-
Watermark Line 2: Prestin Engineering
-
Watermark Line 3: All rights reserved. Refer to the disclaimer.
-
Font Size: Select a font size between 8 and 72. Times New Roman is currently used for watermarking across all file types.
-
-
Click Save, and then click Restart Service in the Administration UI. Repeat these steps to add additional workflows.
Result:
-
After you successfully add the workflow, a confirmation message appears. The workflow name appears in the left pane under the top-level workflow. Select the workflow name to view its details in the right pane at any time.
-
The files are watermarked with the specified text.
-
For examples of the configuration output, see Sample Results section to view the configuration output.
-
To delete a workflow, click Delete, and then confirm the action when prompted. The workflow is removed.
Watermarking Revit Files Using HaloSHARE
This feature enables watermarking of Revit files without using the HaloCAD add-on for Revit.
Prerequisites
-
Ensure that CAD applications such as AutoCAD or Revit are not running during the installation or uninstallation of HaloSHARE.
-
Ensure that Secude add-ons (HaloCAD add-on for Revit or HaloCAD add-on for AutoCAD) are not installed on the watermarking machine.
-
Ensure that HaloSHARE is installed and running.
-
Restart HaloSHARE before proceeding.
To add a watermark to Revit files, follow these steps:
-
Open Task Manager → Details tab and verify whether
hsmetadataMessageProcessor.exeis running. -
If the process is not running, navigate to the HaloSHARE installation path
(C:\Program Files\Secude\common\<version>) and double-clickhsmetadataMessageProcessor.exeto start it. -
Configure a new supplier with source and destination paths specific to Revit file types (for example,
.RVT). -
Place the Revit file (for example,
sample.rvt) in the source folder.
Result
-
The file is watermarked with the specified text and moved to the destination folder.
-
To view the watermark text in Revit, refer to the section “Watermark in RevitLookup”.
Configure Compliance Mark Task Attributes
This task configures HaloSHARE to apply CUI marking to files.
-
As described in the Configure Workflows section, configure your workflow task.
-
From the Workflow Task list, select Compliance Mark Task.
-
On the HaloSHARE configuration screen, the compliance marking options appear.
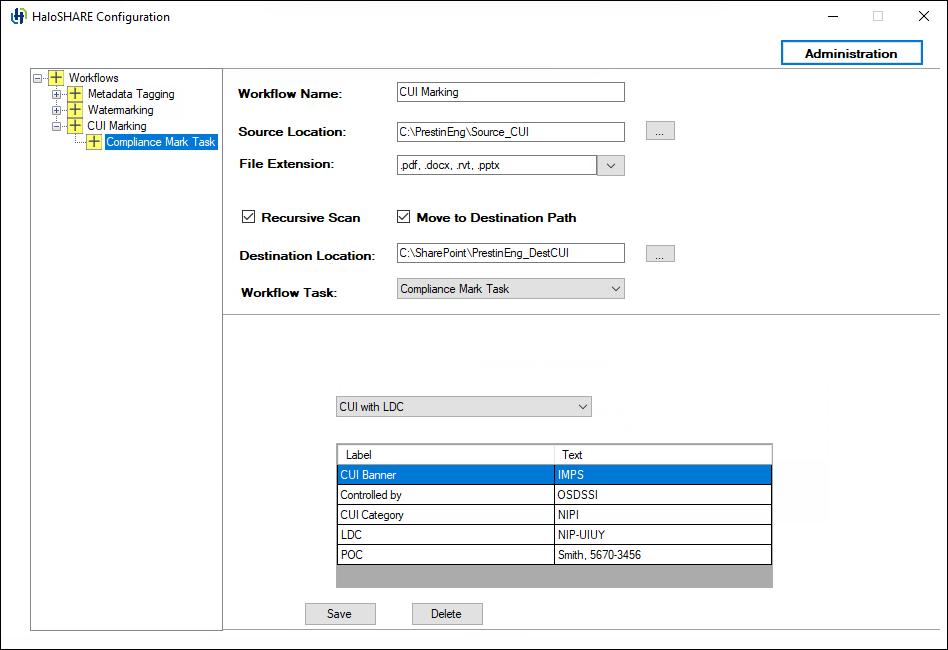
CUI with LDC configuration
-
Select CUI with LDC or CUI with DS, and then enter the required CUI values in the corresponding fields.
Example:
-
CUI Banner: IMPS
-
Controlled by: OSDSSI
-
CUI Category: NIPI
-
LDC: NIP-UIUY
-
POC: Smith, 5670-3456
-
-
To remove added custom properties, select the row, right-click, and choose Delete.
-
Click Save, and then click Restart Service in the Administration UI. Repeat these steps to add additional workflows.
Result:
-
After you successfully add the workflow, a confirmation message appears. The workflow name appears in the left pane under the top-level workflow. Select the workflow name to view its details in the right pane at any time.
-
The first page of the document displays the CUI values as defined in the configuration.
-
To delete a workflow, click Delete, and then confirm the action when prompted. The workflow is removed.
-
For examples of the configuration output, see Sample Results section to view the configuration output.
Adjusting the watermark display to the background
To display the watermark in the background instead of the foreground in Excel and PowerPoint, manually add the following registry key, enable_legacy, with the value true. This makes it possible to add or edit content, just like in Microsoft Word, by enabling the watermark to appear in the background.
|
Name |
Type |
Data |
|
enable_legacy |
REG_SZ |
true |
Manual addition of the key
Configure Password Protection Task Attributes
This task configures HaloSHARE to protect files using a user-defined password. The password must be 8–15 characters long and can contain letters, numbers, or a combination of both. Spaces and special characters are not allowed. HaloSHARE applies only the password; all other behavior is determined by the native functionality of Microsoft Office applications.
To protect files using a password, follow these steps:
-
As described in the Configure Workflows section, configure your workflow task.
-
From the Workflow Task list, select the Password Protection Task.
-
On the HaloSHARE configuration screen, the password protection field appears.
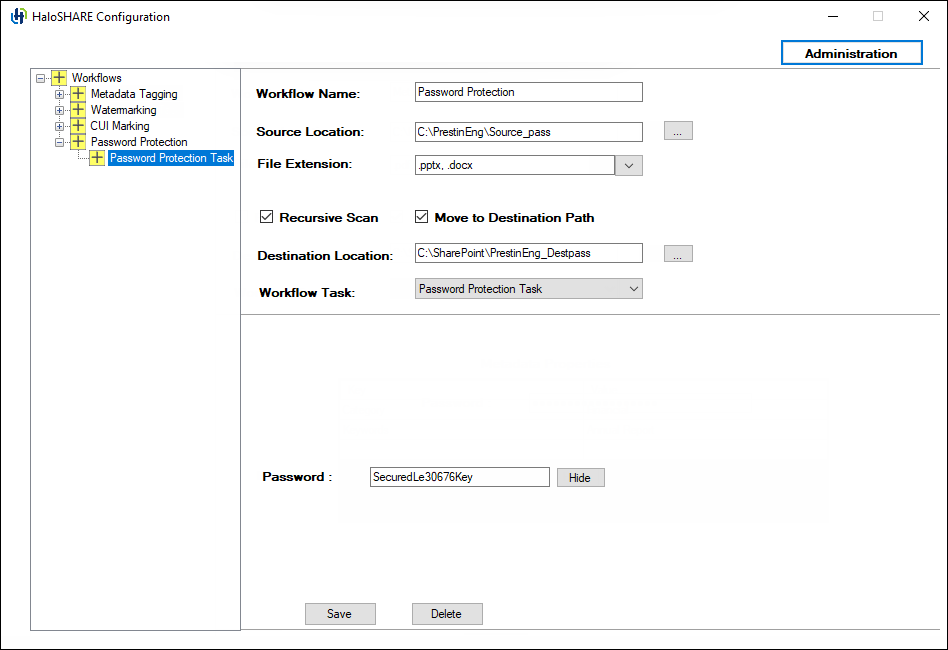
Password Protection Task configuration
-
Enter a password, and ensure that you remember it, as you will need it to edit the file later. You can use the Show/Hide button to view or hide the password.
-
Click Save, and then click Restart Service in the Administration UI. Repeat these steps to add additional workflows.
Result:
-
After you successfully add the workflow, a confirmation message appears. The workflow name appears in the left pane under the top-level workflow. Select the workflow name to view its details in the right pane at any time.
-
Files in the source folder are protected by a user-defined password and moved to the destination folder.
-
For examples of the configuration output, see Sample Results section to view the configuration output.
-
To delete a workflow, click Delete, and then confirm the action when prompted. The workflow is removed.
Configure File Signing Task Attributes
This task configures HaloSHARE to automatically apply a digital signature to files in the background to help ensure file integrity and authenticity.
You can select either Local Computer or Current User. However, both options have certain restrictions.
-
If you select Local Computer, the service running user must have access to the Local Computer certificates or to the specific certificate in the Local Computer store. If the service running user is a local non-admin user, promote the service running user to a local admin user or grant the service running user access to the private key.
-
If you select Current User, the selected certificate must be installed in the certificate store of the service running user.
To sign files, follow these steps:
-
As described in the Configure Workflows section, configure your workflow task.
-
From the Workflow Task list, select File Signing Task.
-
On the HaloSHARE configuration screen, the file signing options appear.

File Signing Task configuration
-
Under Select Certificate Store, select Current User or Local Computer.
-
From the list, select the appropriate certificate.
-
Click Save, and then click Restart Service in the Administration UI. Repeat these steps to add additional workflows.
Result:
-
After you successfully add the workflow, a confirmation message appears. The workflow name appears in the left pane under the top-level workflow. Select the workflow name to view its details in the right pane at any time.
-
Files in the source folder are digitally signed and moved to the destination folder.
-
For examples of the configuration output, see Sample Results section to view the configuration output.
-
To delete a workflow, click Delete, and then confirm the action when prompted. The workflow is removed.
Configure MPIP Task Attributes
In the MPIP task, HaloSHARE encrypts files by using either sensitivity labels or custom permissions. Files encrypted with sensitivity labels can be relabeled by using custom permissions, and files encrypted with custom permissions can be relabeled by using sensitivity labels. Note: You cannot configure File Signing, Metadata, or Password Protection tasks together with the MPIP task. Compliance Mark and Watermark tasks can be configured if your license supports these features.
Relabeling prerequisites
Before relabeling files, ensure that one of the following conditions is met:
-
The user is the document owner.
-
The user has superuser privileges.
-
The user has export permissions assigned to the applied label.
-
The API permission for relabeling is configured in the application. Refer to section “Additional Permission (Only for Relabeling)”.
Difference Between Sensitivity Labels and Custom Permissions
Sensitivity Labels
Sensitivity Labels are defined and managed by an organization’s administrator in the Microsoft Purview portal. Each label includes a predefined set of permissions and is also referred to as administrator-defined permissions.
Custom Permissions
Custom Permissions are user-selectable permission sets available in the HaloSHARE application UI. These permissions are defined by users and are also referred to as user-defined permissions.
To apply file protection, follow these steps:
-
As described in the Configure Workflows section, configure your workflow task.
-
From the Workflow Task list, select MPIP Task.
-
On the HaloSHARE configuration screen, the following MPIP task options appear:
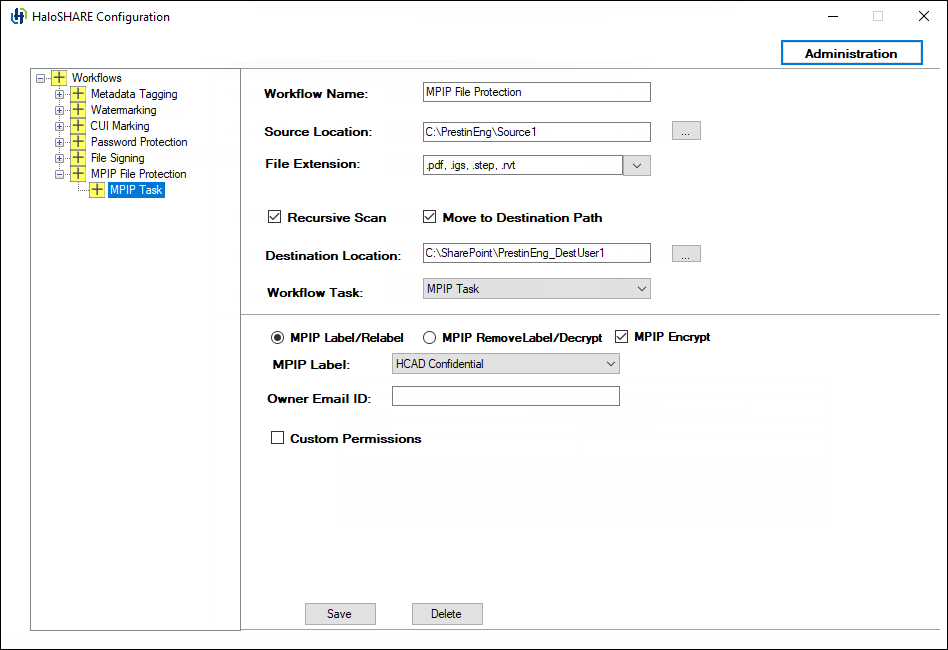
MPIP Task configuration
-
MPIP Encrypt is selected by default, but you can clear it. When selected, the MPIP Label list shows both protection and non-protection labels. When cleared, the MPIP Label list shows only non-protection labels.
-
To apply MPIP labels to files, select MPIP Label/Relabel. This option acts as a toggle between labeling and relabeling.
-
Select a sensitivity label from the MPIP Label list.
-
You may also choose a label without encryption settings. In that case, the following message appears “The selected MPIP label has no encryption settings and can only be applied to MIP SDK–supported file types.” To apply such a label, specify the supported file types, for example,
.txt,.docx, and.pdf. -
Skip to step 8.
-
-
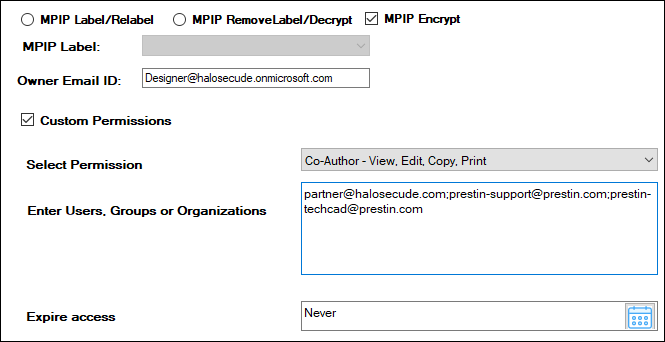
To apply user-defined permissions, select Custom Permissions. The author can then assign permissions to users, groups, or organizations based on the selected permission level.
-
From the Select Permissions list, choose the access level for users when protecting the file: (Viewer - View Only / Reviewer - View, Edit / Co-Author - View, Edit, Copy, Print / Co-Owner - All Permissions / Only for me). To know the usage rights of the permissions, please refer to the section "Permissions Level and Usage Rights".
-
In the Enter Users, Groups, or Organizations field, specify who should have access to your file. Type individual email addresses, group email addresses, or a domain name for all users in that organization, separated by commas, spaces, or semicolons. For example
partner@halosecude.com;prestin-support@prestin.com;prestin-techcad@prestin.com -
In the Expire Access field, specify how long the labeled file can be accessed. Use Never for unlimited access, suitable for less sensitive content. For highly sensitive content, select an expiry date so that recipients (other than the owner) cannot access the file after that date.
Custom permissions
-
-
To decrypt a file, select MPIP RemoveLabel/Decrypt.
-
To make a user the file owner and grant full access, enter the user’s email ID in the Owner Email ID field. For example,
Designer@halosecude.onmicrosoft.com. -
Click Save, and then click Restart Service in the Administration UI. Repeat these steps to add additional workflows.
Result:
-
After you successfully add the workflow, a confirmation message appears. The workflow name appears in the left pane under the top-level workflow. Select the workflow name to view its details in the right pane at any time.
-
MPIP protection: Files are protected based on the selected label.
-
Relabeling: Files in the workflow folder are updated with the new label.
-
Remove protection: Files in the workflow folder are decrypted successfully.
-
For examples of the configuration output, see Sample Results section to view the configuration output.
-
To delete a workflow, click Delete, and then confirm the action when prompted. The workflow is removed.
Configure Combined Workflows
In the previous sections, independent workflows were explained. This section describes how to configure a combined workflow with multiple tasks.
Workflow Task Execution Order (Combined Configuration):
-
Metadata task
-
Watermark task
-
File Signing task
In a workflow, you cannot combine the Password Protection or File Signing subtasks with the MPIP task because they are mutually exclusive. The MIP SDK does not support digitally signed or password-protected files. Attempting to combine them results in the following error message.
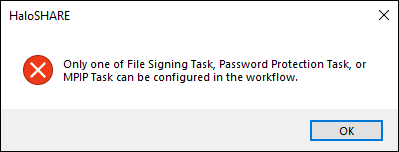
Mutually exclusive error message
Follow the procedure for a combined Workflow:
-
Select an existing workflow. Example: Combined.
-
Under the selected workflow, add the required subworkflow tasks.
-
From the Workflow Task list, select a task. Example: Select the Watermark Task.
-
Enter the required details.
-
Click Save.
-
-
From the Workflow Task list, select another task. Example: Select the Compliance Mark Task.
-
Enter the required details.
-
Click Save.
-
-
From the Workflow Task list, select another task. Example: Select the MPIP Task.
-
Enter the required details,
-
Click Save.

Combined workflow
-
-
Click Restart Service in the Administration UI.
Result
-
The selected workflow contains multiple appended workflow tasks, which are executed as part of the combined workflow.
-
For examples of the configuration output, see Sample Results section to view the configuration output.
Configure the Service by Using the Admin Tool
After installing HaloSHARE, you may want to change the configuration. To do so, run the tool ...\Secude\HaloSHARE\hsadm.exe to view the commands. Please note that the admin tool does not support uppercase.
How to update MPIP labels in HaloSHARE?
If an MPIP label is added, removed, or updated in the Microsoft Purview portal, the administrator should restart the HaloSHARE Service so that the changes will take effect.
When is it necessary to restart the HaloSHARE service?
Whenever you modify the HaloSHARE registry settings, you need to restart the HaloSHARE Service.
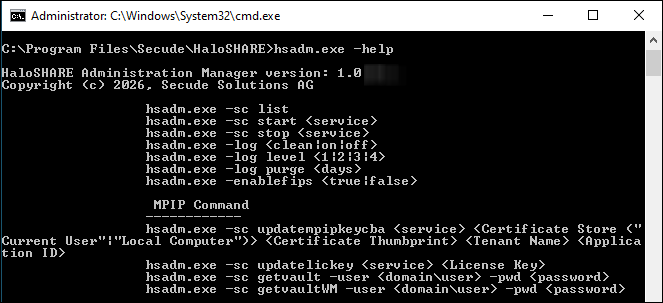
hsadm.exe commands
|
Service Control Commands |
|
Use this command to view the service. Output For a Domain User
For a Non-Domain local user:
|
|
Use this command to start HaloSHARE. Note: This can be used only after setting user credentials to run HaloSHARE. For example,
Output
|
|
Use this command to stop the HaloSHARE. For example,
Output
|
|
Log Command |
|
For example,
Output
|
|
For example,
Output
|
|
Use this command to set a time for log purging, i.e., the number of days by which the logs will be deleted. For example,
Output
|
|
FIPS |
|
Use this command to enable/disable the FIPS mode. For example,
Output
|
|
MPIP Commands |
|
Update MPIP Certificate
Use this command to update the new MPIP CBA (Certificate-Based Authentication) Keys. For example,
Output
|
|
Update MPIP License Key
Use this command to update the License Key For example,
Output Spring License Key updated successfully |
|
Display MPIP key
Use this command to know your MPIP key information. For example,
Output
|
|
Watermark details |
|
Display Watermark key
Use this command to get your watermark licensing key information. For example,
Output
|
Help Commands
Registry Settings
The following section explains how the registry is used to store service settings. To modify the registry value, open Registry Editor, navigate to this path Registry Root Directory = HKEY_LOCAL_MACHINE\SOFTWARE\Secude\HaloSHARE, and modify the Reg Key as you want. Any changes to the registry will require a restart of HaloSHARE to take effect.
|
Name |
Default value |
Type |
Description |
|---|---|---|---|
|
dir_common |
common |
REG_SZ |
The path to the directory where all the dependent DLL files are stored for the execution of HaloSHARE. |
|
dir_log |
log |
REG_SZ |
Log files are generated in the service running user's local profile, i.e., in the following location |
|
dir_tmp |
tmp |
REG_SZ |
It stores the temporary files located at |
|
dir_vendor |
C:\Program Files\Secude\ |
REG_SZ |
This is Secude’s vendor directory under which Secude’s components will get installed. For example, |
|
enable_fips |
false |
REG_SZ |
|
|
enable_relabeling |
on |
REG_SZ |
Defines the status of the relabeling.
|
|
haloshare_config_file |
haloshare_config.enc |
REG_SZ |
Name of the configuration file that includes information about the folders and other essential parameters. |
|
log_enable |
on |
REG_SZ |
Defines the status of the log.
|
|
log_level |
3 |
REG_SZ |
|
|
log_purge |
7 |
REG_SZ |
It indicates removing files older than a defined time frame. By default, the log files older than 7 days will be deleted. |
|
ls_proxy |
|
REG_SZ |
Allows you to use a proxy server to access Secude’s License Manager. This is an optional feature that should only be used if your firewall is blocking License Manager. Enter proxy server settings in the format Please make sure to restart the service. |
|
scan_wait_time |
5 |
REG_SZ |
Specifies the service wait time. For any modification in the local source folder, the service scans every 5 seconds. For the Autodesk Forma folder, the service scans for changes every 30 seconds. If a rate limiter issue is expected, then you can increase the scan time. Example, 2 minutes (120 seconds). |
|
version |
|
REG_SZ |
The version number of the installed service. |
Configuration in the Registry
Endpoint Description
Registry path of endpoint = HKEY_LOCAL_MACHINE\SOFTWARE\Secude\HaloSHARE\ep\HaloSHARE
|
Name |
Default value |
Type |
Description |
|---|---|---|---|
|
block_pii |
|
REG_SZ |
Enable or disable the visibility of Personally Identifiable Information (PII) in the MIP SDK logs. The MIP SDK logs are located at
|
|
cachetype |
|
REG_SZ |
MPIP cache storage type used by the service.
|
|
cacheuserlicense |
|
REG_SZ |
|
|
cloudtype |
|
REG_SZ |
User's Azure Cloud Type. For example: Commercial. |
|
credential |
|
REG_SZ |
Domain or computer name, name of the user under which the HaloSHARE service runs |
|
databoundary |
Default |
REG_SZ |
Audit and telemetry events are sent to the nearest collector, where these events are stored and processed. Other options:
For example, if your AIP administrator sets North_America, the HaloSHARE service forces all telemetry and audit data to go directly to North America. |
|
domain |
|
REG_SZ |
Name of the domain. |
|
enableCUI |
false |
REG_SZ |
|
|
enabledke |
0 |
REG_SZ |
Double Key Encryption
Please be aware that DKE labels are only visible when DKE functionality is enabled. |
|
enablefiletracking |
0 |
REG_SZ |
Obtain the protected file's content ID to track the file.
|
|
enableMIP |
false |
REG_SZ |
|
|
enableWM |
false |
REG_SZ |
|
|
IterationLimit |
10 |
REG_SZ |
Iteration limit for Creo file types. The default value is 10, however, you can modify and set your limit. Example: |
|
MIPAuthType |
|
REG_SZ |
Type of authentication method. MSALCBA for MPIP mode. |
|
mode |
|
REG_SZ |
Type of HaloSHARE features. MPIP, Watermarking, or Combined. |
|
policycloudurl |
|
REG_SZ |
Policy Cloud URL. For example: |
|
protectioncloudurl |
|
REG_SZ |
Protection Cloud URL. For example: |
|
service |
|
REG_SZ |
Name of the service. By default, it is HaloSHARE. |
|
streambuffersize |
|
REG_SZ |
It is a buffer size used for memory-based encryption with the MIP SDK. When the allotted buffer size is exceeded, an additional memory of stream buffer size is allocated, and this process is repeated until the encryption/decryption operation is completed. The default setting is 10 MB. |
Configuring Endpoint
Proxy Configuration
Many enterprises enforce a Group Policy Objects (GPO) that requires all outbound internet traffic routed through a proxy server. These proxy settings must be used by both the MIP SDK and the MSAL library for MPIP authentication and functionality. To use proxy settings for the MSAL library, we need to set the msal_proxy_address in HKEY_LOCAL_MACHINE\SOFTWARE\Secude\HaloSHARE.
|
Name |
Type |
Data |
|
msal_proxy_address |
REG_SZ |
|
Configuring MSAL proxy
If the above steps do not work for the service running user, set the ProxyServer and ProxyEnable registry keys under HKEY_CURRENT_USER\Software\Microsoft\Windows\CurrentVersion\Internet Settings for the service running user.
|
Name |
Type |
Data |
|
ProxyServer |
REG_SZ |
|
|
ProxyEnable |
REG_SZ |
|
Configuring proxy
To allow MIP SDK to use the proxy settings set up in your environment, follow the steps below:
Determine whether the proxy server has been properly set up by running the following command.
C:\Windows\system32>netsh winhttp show proxy
Current WinHTTP proxy settings:
Direct access (no proxy server).
If the response to the command is as shown above, it indicates that the proxy server has not been configured in the registry for WinHTTP.
To configure the proxy server for WinHTTP, use the following command:
Syntax: C:\Windows\system32>netsh winhttp set proxy <proxyservername>:<portnumber>
Example: C:\Windows\system32>netsh winhttp set proxy 190.160.166.191:8080
In this case, the proxy server has been set up with 190.160.166.191:8080. Once this command is executed successfully, the registry is updated with the proxy server URL, and the HaloENGINE Tomcat Service ensures that the configured proxy settings are applied.
Access Protected Files
After setting HaloSHARE in your environment, you may start sharing business files in folders. Once the files have been protected, you should know how to open MPIP-protected files with HaloCAD Add-ons. For information on how to open a protected file, refer to the corresponding HaloCAD Add-on documentation.
Sample Results
To view the HaloSHARE watermarked CAD files, the HaloCAD Add-on is required for the CAD application. For information on how to view a HaloSHARE watermarked CAD file, refer to the HaloCAD Add-on documentation.
Viewing Watermark metadata in CAD files:
-
RVT: Install the RevitLookup tool to view the metadata. For more details, please refer to “Watermark in RevitLookup”.
-
DWG: Go to the file's Custom Properties to view the metadata.
-
IFC: Open the file in any text editor, and scroll to the end to view the metadata.
Metadata Task
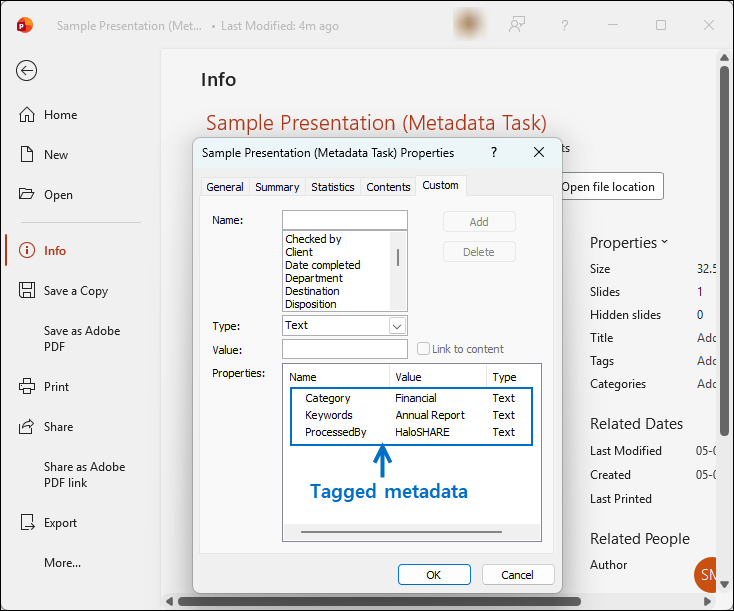
Sample - Metadata Task
Watermark Task
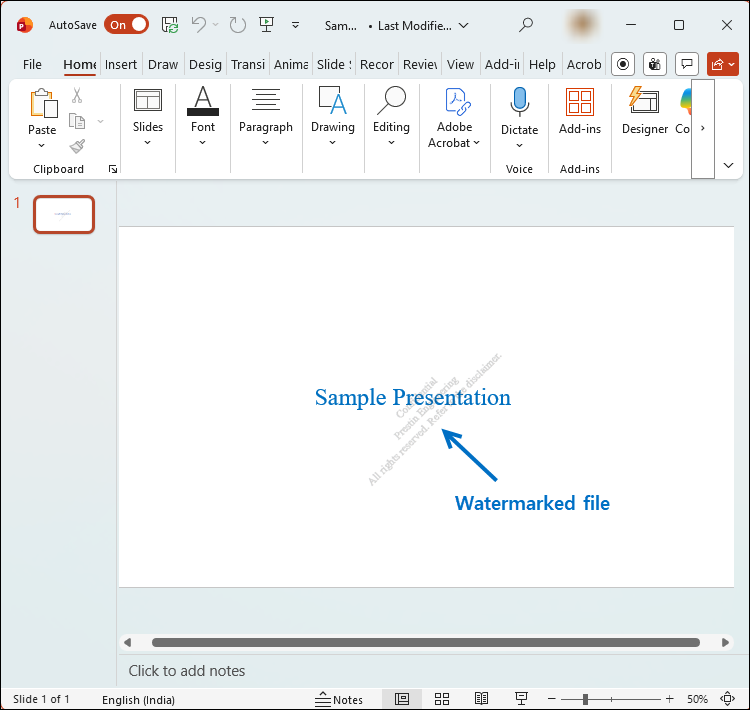
Sample - Watermark Task
Compliance Task
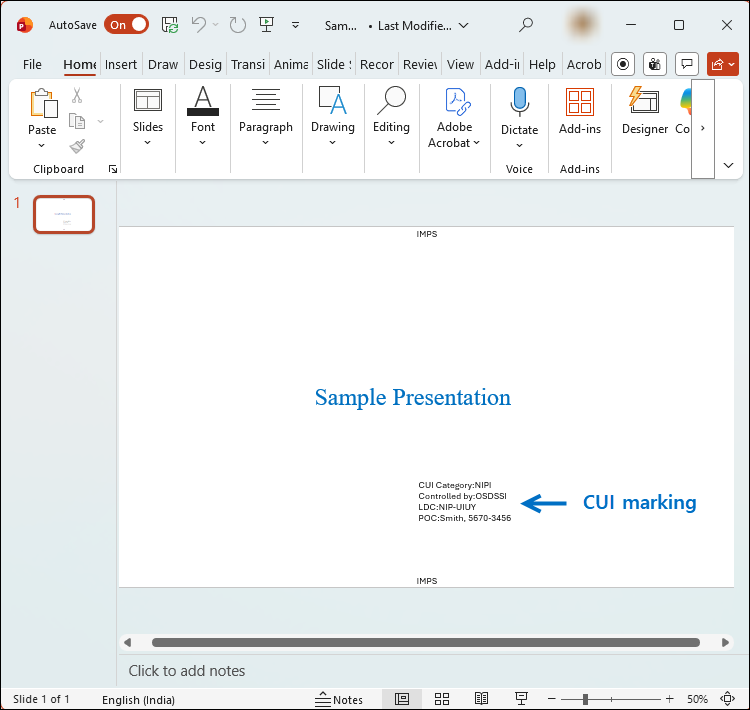
Sample - Compliance Task
Password Protection Task
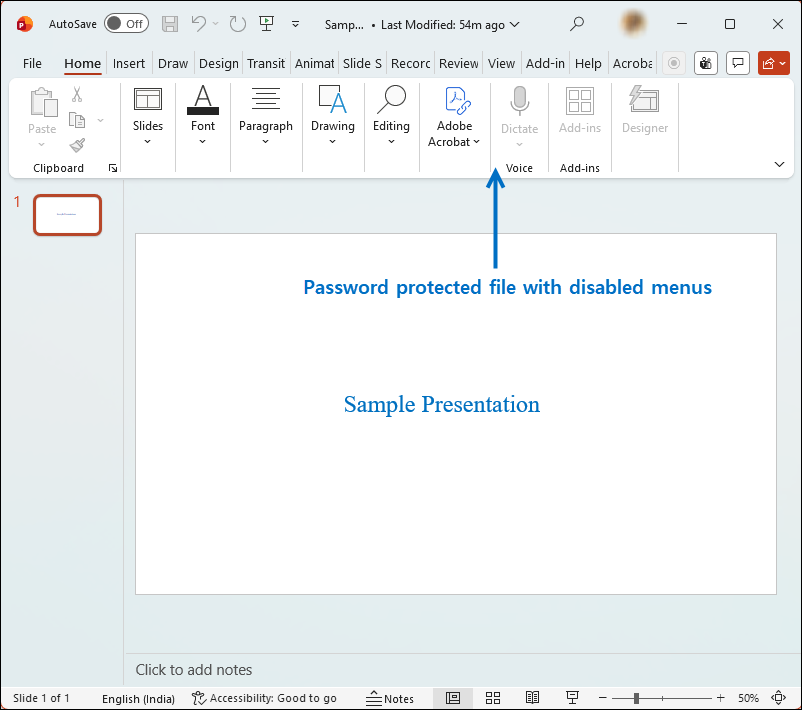
Sample - Password Protection Task
File Signing Task
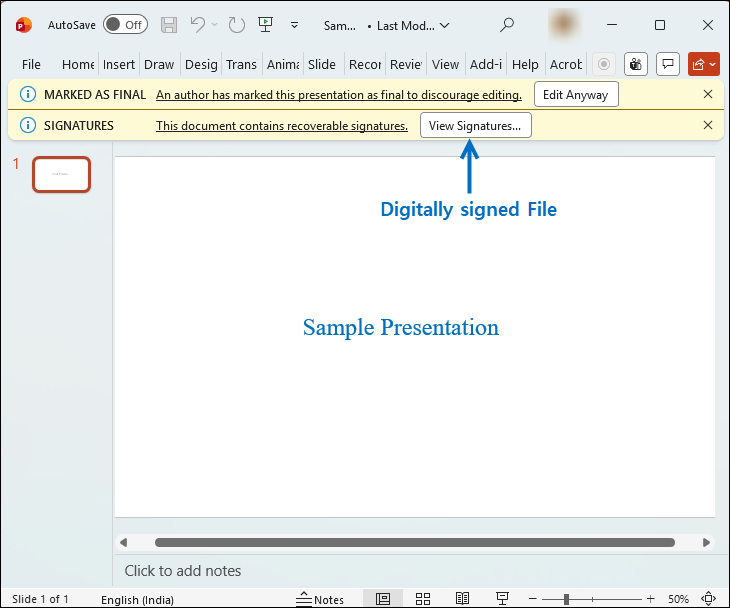
Sample - File Signing Task
MPIP Task
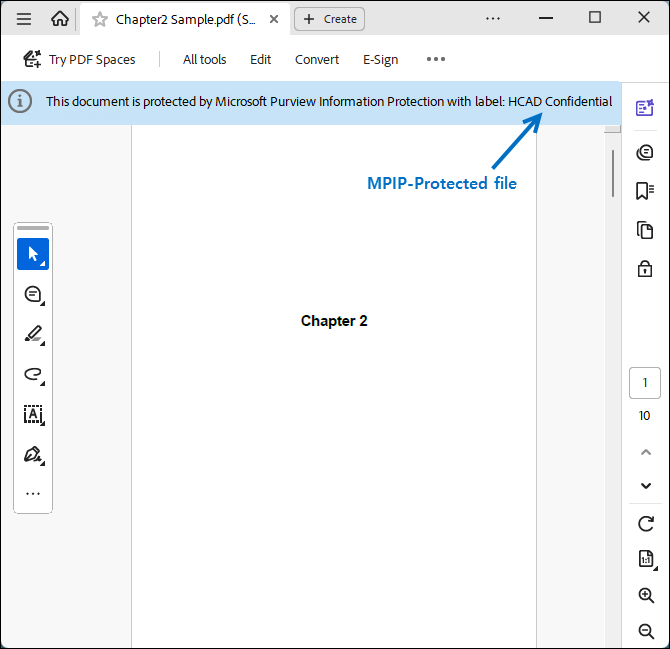
Sample - MPIP Task
Combined Workflow
Sample - Combined Workflow