
For any type of licensed system, the first step is to enable the monitor.
Prerequisite: Verify that the HaloENGINE license is active. Refer to the section "Phase 3. Activate License (First time)".
-
On the left navigation bar, click Customer Configuration, and then from the Customers list, select one of them.
-
On the HaloENGINE Features tab, click Configure. The HaloENGINE Features page will appear as shown in the figure below:
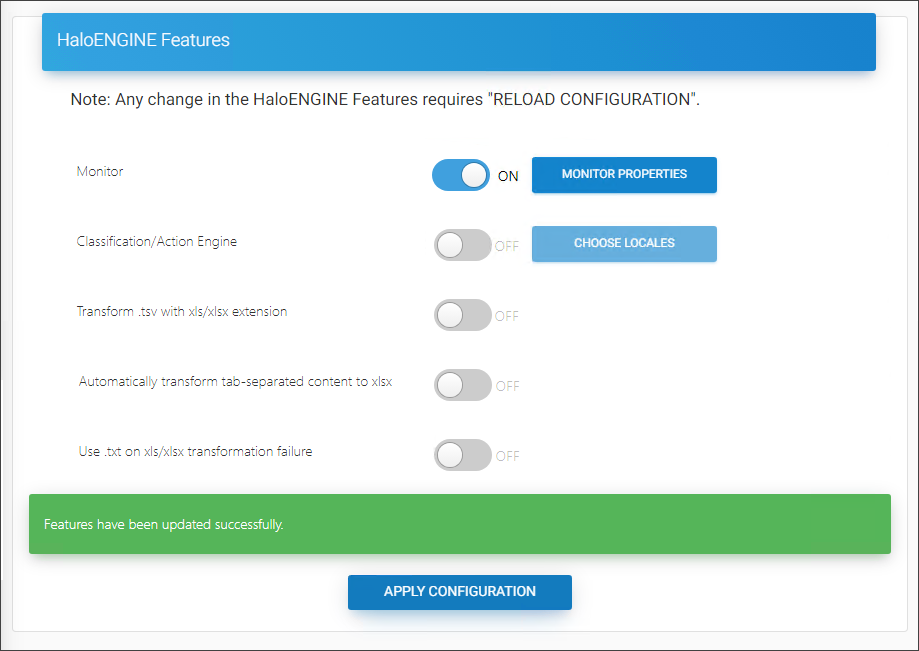
Enable Monitor
-
Enabling the Monitor is the first step.
-
Click on the slider button to enable Monitor and then click Apply Configuration.
Results:
-
You will receive a confirmation message after changing the default configuration.
-
Click Reload Configuration to make the changes take effect.
-
Enable Classification/Action Engine
Follow the below steps to enable the classification engine:
-
Click on the slider button to enable/disable Classification/Action Engine.
-
The Choose locales button will be enabled automatically.
-
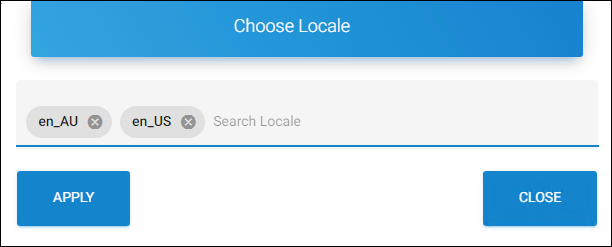
Click Choose locales, Choose Locale page will appear as shown in the figure below:
Locales
-
Search and select one or more texts for translation. For example, en_US.
-
Click Apply.
Results:
-
The chosen texts for translation are added to the list.
-
You can either press Apply Configuration now and then reload configuration to let the changes take effect, or you can configure further settings and then press Apply Configuration.
-
Enable Excel Conversion
Note: If you only have a license for the Block and Monitor feature, the following options will be disabled.
Follow the below steps to configure an Excel file download:
-
Transform
.tsvwith xls/xlsx extension − To transform tab-separated text files (.tsv) named as,.xls/xlsxto proper.xls/.xlsxfiles, click on the slider button. -
Automatically transform tab-separated content to xlsx − To transform tab-separated text files (
.tsv) independent of the extension and convert to XLSX automatically, click on the slider button. -
Use .txt on xls/xlsx transformation failure − If the conversion of
.tsv/.txtthe file to a native XLS/XLSX file fails, the exported file will get labeled as.txt. -
When you complete the HaloENGINE configuration, click Apply Configuration.
-
What to do next: Click Reload Configuration for the changes to take effect. The page will be redirected to the login page once the reload completes.
Dependencies among features
-
It is possible to enable other HaloENGINE features only if Monitor is enabled.
-
Similarly, it is possible to enable “Automatically transform tab-separated content to xlsx”, “Transform
.tsvwithxls/xlsxextension” and Use.txtonxls/xlsxtransformation failure options, only if Classification/Action Engine is enabled. -
Also, please note that activating the “Automatically transform tab-separated content to xlsx” option or Use
.txtonxls/xlsxtransformation failure will automatically activate “Transform.tsvwithxls/xlsxextension” option. -
And deactivating “Transform
.tsvwithxls/xlsxextension” option will automatically deactivate the “Automatically transform tab-separated content to xlsx” option and Use.txtonxls/xlsxtransformation failure option. -
Meantime, “Transform
.tsvwithxls/xlsxextension” option can be stand-alone activated.
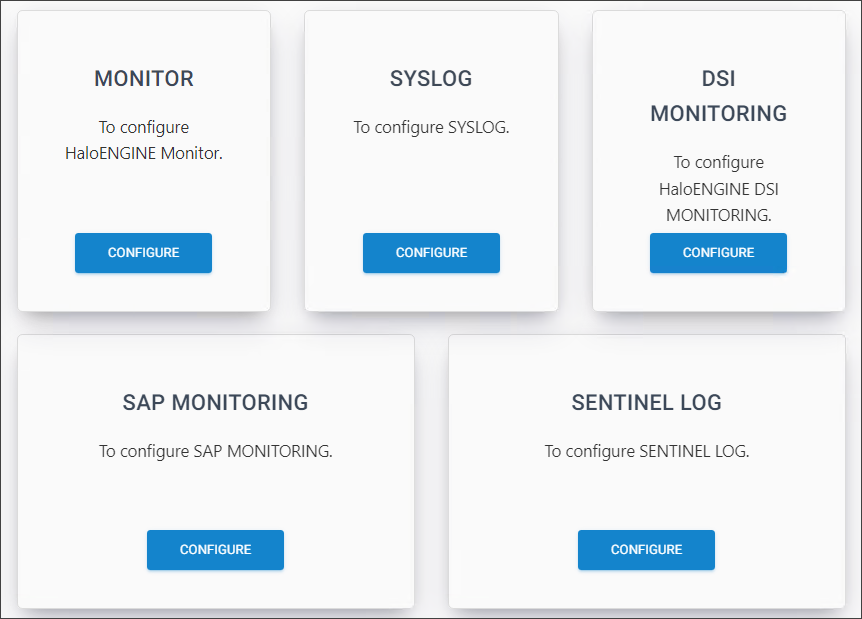
Monitor Configuration
Prerequisite: As mentioned in the section above, ensure that Monitor is enabled.
Note: SAP Monitoring and Sentinel Log options are only applicable to SAP system types. This means that if you are licensed for other system types, these two options will be disabled.
Follow the below steps to configure the Monitor:
-
On the HaloENGINE Features page, click Monitor Properties.
-
The Monitor Configuration page will appear as shown in the figure below:
Monitor Configuration
-
You need to configure Monitor, Syslog, DSI Monitoring, SAP Monitoring, and Sentinel Log one by one, by referring to the following sections.
Monitor Properties
Follow the below steps to configure the monitor properties:
-
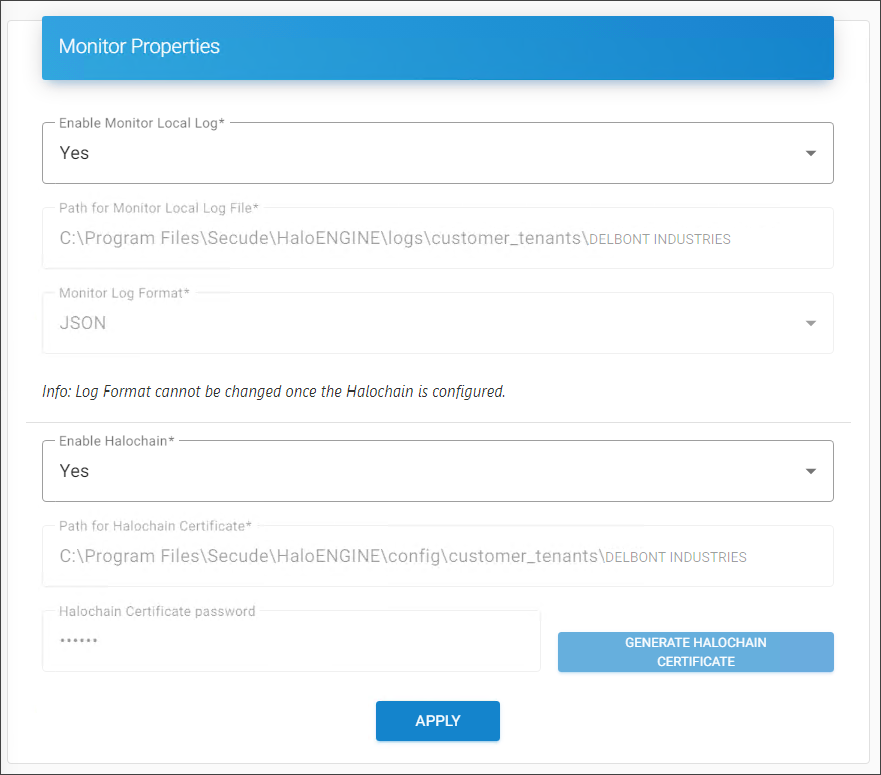
On the Monitor tab, click Configure and then enter the following details on the Monitor Properties page as shown in the figure below:
Monitor Log Configuration
-
Enable Monitor Local Log − Choose Yes/No to enable/disable the local monitor log. If enabled, the default path for Single Customer −
C:\Program Files\Secude\HaloENGINE\logs\customer_tenants\halo_customerand for Multi-Customer − The path varies based on the customer IDs. For example:C:\Program Files\Secude\HaloENGINE\logs\customer_tenants\DELBONT INDUSTRIES. -
Monitor Log Format − Choose one of the following monitor log formats (CEF/LEEF/JSON). Please note that it is not possible to change the log format once the Halochain is configured and the field will be disabled once you enable Halochain.
-
Enable Halochain − Choose Yes/No to enable/disable the Halochain feature. If enabled, the default Halochain certificate path for Single Customer −
C:\Program Files\Secude\HaloENGINE\config\customer_tenants\halo_customerand Multi-Customer − The path varies based on the customer IDs. For example:C:\Program Files\Secude\HaloENGINE\config\customer_tenants\DELBONT INDUSTRIES. -
Halochain Certificate Password − Enter a password for Halochain and click Generate Halochain Certificate. You will receive a confirmation message on creating a certificate.
-
Click Apply.
Results: You will receive a confirmation message after successfully updating the properties.
Syslog Properties
Syslog Requirements
Please make sure that the following requirements are met:
-
UDP/TCP enabled.
-
The firewall accepts UDP/TCP packets on the configured port.
-
To forward audit logs to SPLUNK/RSA, you need to configure the audit Syslog accordingly.
Follow the below steps to configure the Syslog properties:
-
On the Syslog tab, click Configure and then enter the following details on the Syslog Properties page as shown in the figure below:
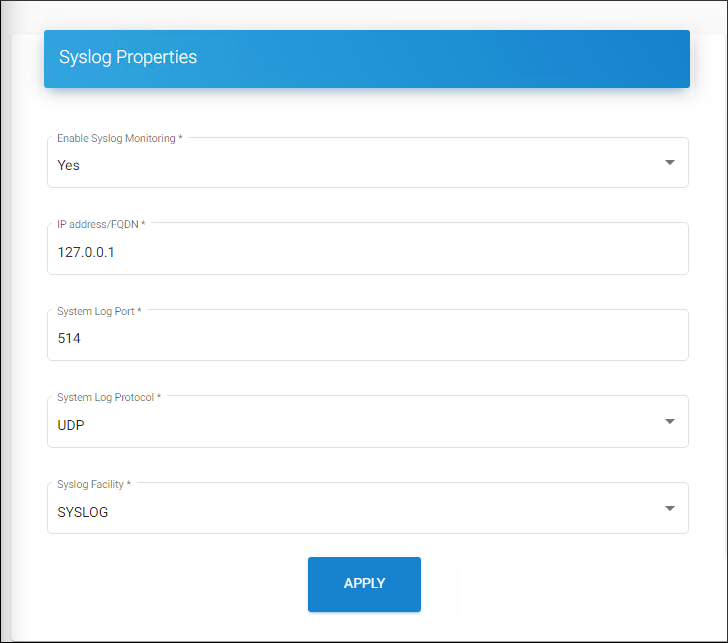
Syslog Properties
-
Enable Syslog Monitoring − Choose Yes/No to enable/disable Syslog.
-
IP Address/FQDN − If enabled, enter the IP address/FQDN.
-
System Log Port − Enter the system log port number. The default port is 514.
-
System Log Protocol − Enter the system log protocol (UDP/TCP). The default protocol is UDP.
-
Syslog Facility − Enter the Syslog facility (KERN/USER/SYSLOG/AUDIT). The default facility is SYSLOG.
-
Click Apply.
Results: You will receive a confirmation message after successfully updating the properties.
DSI Monitoring
Follow the below steps to configure the DSI monitoring properties:
-
On the DSI Monitoring tab, click Configure and then enter the following details on the Monitor DSI Log Configurations as shown in the figure below:
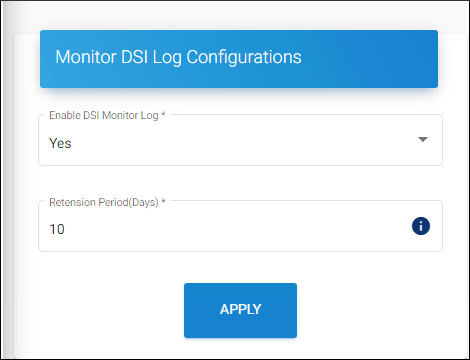
DSI Monitoring
-
Enable DSI Monitor Log − Choose Yes/No to enable/disable the DSI Monitor log.
-
Retention Period (Days) − Specify how long the logs should be available.
-
Forwarded DSI logs from SAP are stored in the
HaloENGINE_DSI.logfile. -
Click Apply.
Results: You will receive a confirmation message after successfully updating the properties.
SAP Monitoring
SAP Monitoring applies to SAP system types and allows you to configure monitor features.
SAPJCo Configuration
SAPJCo is the component that connects HaloENGINE with your SAP instance.
-
Select the SAP Monitoring tab to install or update SAPJCo.
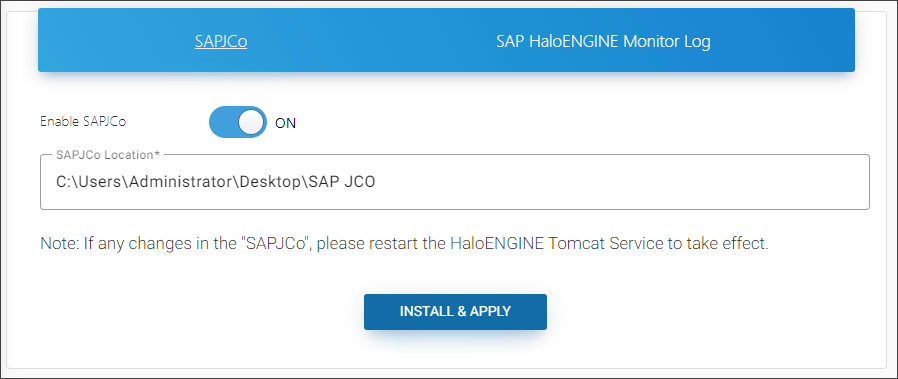
SAPJCo configuration page
-
To Install: Click on the slider button and enter the file path of SAP JCo files.
-
To update: Disable the slider button and then enable it. Now, specify the new file path.
-
Click Install & Apply.
Results: You will receive a confirmation message after successfully updating the properties.
SAP HaloENGINE Monitor Log
Follow the below steps to configure the SAP monitoring properties:
-
Click the SAP Monitoring tab and enter the following details on the SAP HaloENGINE Monitor Log page, as shown in the figure below:
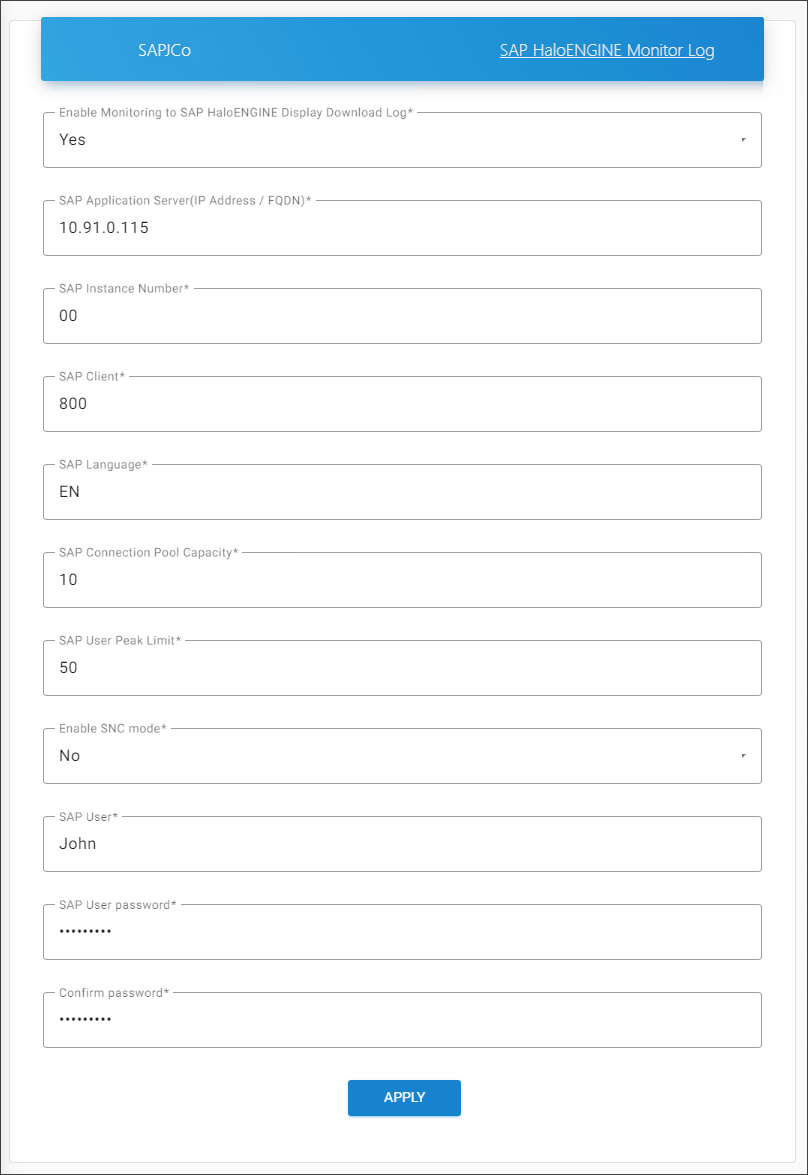
SAP Monitoring
-
Enable Monitoring to SAP HaloENGINE Display Download Log − Choose Yes/No to enable/disable SAP HaloENGINE Monitor Log.
-
SAP Application Server (IP Address / FQDN) − Enter the SAP application server name. For example,
10.91.0.115orSLUV0001.secude-sap.com -
SAP Instance Number − Enter the SAP instance number. The default number is 00.
-
SAP Client − Enter the SAP client. The default client is 800.
-
SAP Language − Enter the SAP language. The default language is EN.
-
SAP Connection Pool Capacity − Enter the SAP pool capacity. The default capacity is 10.
-
SAP User Peak Limit − Enter the SAP user peak limit. The default limit is 50.
-
Enable SNC mode − If SNC is disabled, you need to specify the SAP User password and confirm it. If SNC is enabled, you need to specify the following details:
-
Enter SNC Initiator Name (SNC_MYNAME). Based on the certificate details, your default name will be populated automatically. For example,
p:CN=HCCS, O=SECUDE, C=CH -
Enter Communication Partner (SNC_PARTNERNAME). For example,
p:CN=SAP, O=SECUDE, C=CH -
Enter External Security Library Path (SNC_LIB). Please note that the environment variable must be set manually. For more details, please refer to the section "Appendix 1 - SNC Configuration (Step 4)".
-
Choose any one of the Quality of Protection Level (SNC_QOP) settings. (1 - Authentication only, 2 - Integrity protection, 3 - Privacy protection, 8 - Protection (default), 9 - Maximum protection)
-
Click Apply.
Results: You will receive a confirmation message after successfully updating the properties.
Sentinel Log
Prerequisite: Microsoft Sentinel must be configured. Please refer to the section “Forwarding Logs to Microsoft Sentinel”.
Follow the below steps to configure the Sentinel log properties:
-
Click the Sentinel Log tab and enter the following details in the Sentinel Log dialog as shown in the figure below:
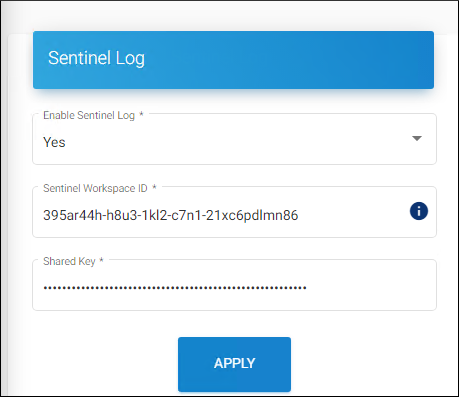
Sentinel Log
-
Enable Sentinel Log − Choose Yes/No to enable/disable Sentinel Log.
-
Sentinel Workspace ID − Enter the Workspace ID of your Microsoft Entra ID. For example,
395ar44h-h8u3-1kl2-c7n1-21xc6pdlmn86. -
Shared Key − Enter the Primary Key of your Workspace ID. For example,
/mjnjgjbKIUTv5M/FJDBFDmdfnidfidi8ujsasusd09uu=ndhdihdkij. -
Click Apply.
Results: You will receive a confirmation message after successfully updating the properties.
What to do next
Test the log after configuration.
Prerequisites:
-
Make sure that the HaloENGINE admin portal is restarted after configuring Sentinel properties.
-
Make sure that actions like uploading and downloading take place after the admin portal has been configured so that a sufficient number of logs can be obtained and forwarded.
Follow the steps to obtain logs in Microsoft Sentinel.
-
Log in to the Microsoft Azure portal.
-
On the search bar, type Microsoft Sentinel. As you start typing, the list filters according to your input.
-
Select Microsoft Sentinel from the search results.
-
The Microsoft Sentinel page will appear. Here, you need to click Create from the top of the page.
-
The page displays available workspaces.
-
Select your workspace.
-
Navigate to General > Logs. Forwarded logs will be stored in the
HALOCORE_CLtable. -
Type
HALOCORE_CLin the right-side query panel. As you start typing, the list filters based on your input. -
Select the table
HALOCORE_CLand choose the appropriate query to fetch the logs. For example. whereaction_s contains "" -
Run it to get the results.
-
Based on the query applied, logs will be retrieved.