
This chapter walks you through the steps of installing the Service using graphic and silent methods. By default, HaloENGINE Service is installed in Microsoft Purview Information Protection (MPIP) mode, which provides label-based protection. Note: Microsoft Purview Information Protection (formerly known as Microsoft Information Protection, MIP). Please note that the term "MIP" is still used in various places all across the manual. Both terminology MIP and MPIP are used interchangeably throughout this document.
You can install the add-on in the following modes:
-
Graphical/Interactive Installation
Graphical mode installation is an interactive, graphical user interface-based method that is driven by a wizard. -
Silent Installation
Silent-mode installation is a non-interactive method of installing the add-on using command lines. If you want to run without a GUI, refer to the section “Silent Installation”.
Interactive Installation
Prerequisites:
-
Azure application registration details. Please refer to the section "Registering an Application in Microsoft Entra ID".
-
A machine certificate, either a Root CA Signed Certificate or a Self-Signed Certificate.
-
Details of your cloud type.
Install HaloENGINE Service using the GUI-based setup program that is provided in the installation package. Make sure the user who installs the HaloENGINE Service has administrator rights. Follow the steps to install the HaloENGINE Service:
-
Navigate to the directory in which the HaloENGINE Service installation package is located and double-click the installer
HaloENGINE_Service_Setup.exe. -
Depending on your Windows security settings, you may get a warning such as "Do you want to allow the following program to make changes to this computer?". If you get this security warning, click the Yes button to continue the installation.
-
When the installer starts, you will see the startup dialog followed by the welcome dialog:

Startup dialog

Welcome dialog
-
Click Next to continue the installation. The end-user license agreement dialog will appear:

End-user License Agreement dialog
-
Read the End-User License Agreement. If you agree, select I accept the terms in the License Agreement and click Next. The default settings dialog will appear:
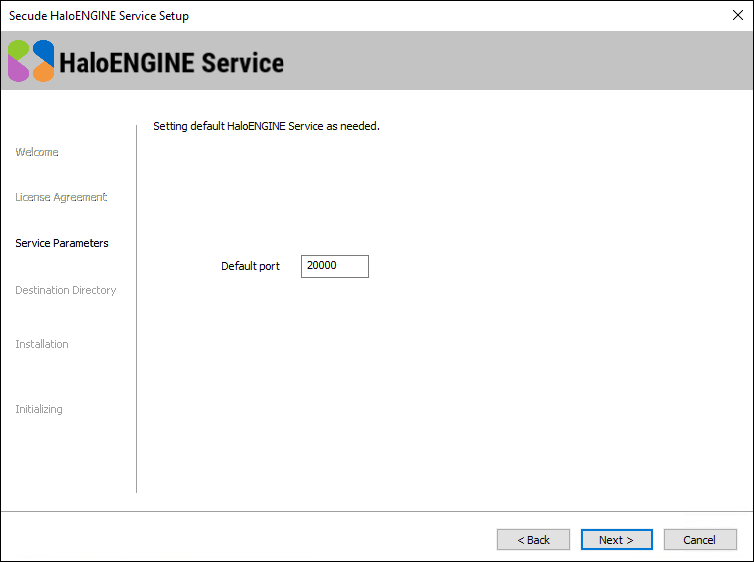
Default settings dialog
-
HaloENGINE Service is defaulted to port 20000, but the port range can be modified between 20000 to 65535 by editing the Default port text box.
-
Click Next to continue. The destination folder selection dialog will appear:
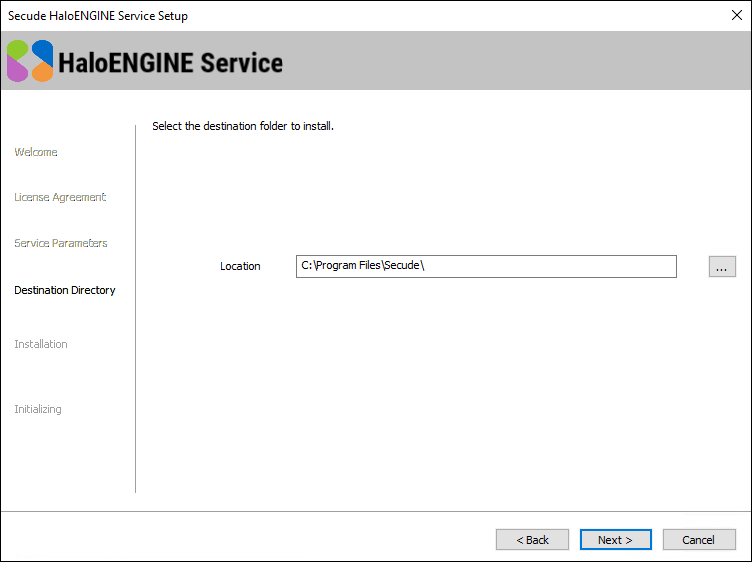
Destination folder selection dialog
-
By default, application files are stored in the program files directory (
C:\Program Files\Secude\). If you would like to choose an alternate location, click the Browse button and select your location preference. When you are finished, click Next. -
The installation begins and progress is shown in the dialog.

Installation progress dialog
-
When the installation is completed, you will see a message confirming that the HaloENGINE Service has been successfully installed.
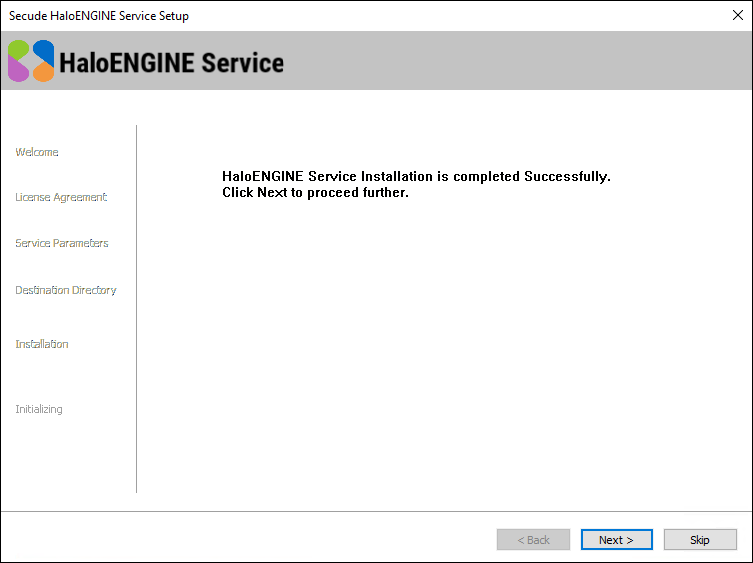
Installation completed dialog
-
Click Next. The user credential dialog will appear:
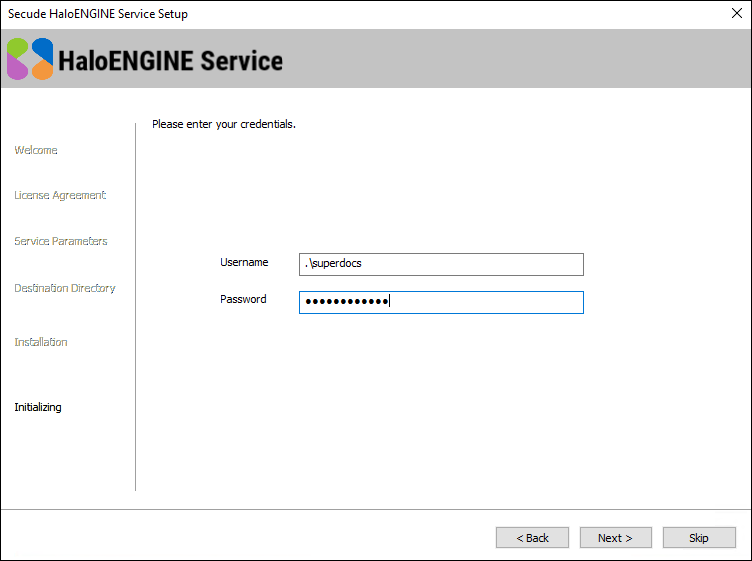
User credential dialog
-
If the computer is connected to a domain and to run the HaloENGINE Service on it, you need to enter a domain user account and password. For example,
[domain]\[user],hc.test\john. -
On a non-domain joined computer, you need to enter the username and password of a user. For example,
.\[user],.\john.
-
-
Click Next. The certificate based authentication dialog will appear. To avoid errors, please ensure that you enter the correct Azure application registration details in the installation wizard.
-
Azure Application ID: Enter your application ID. For example,
9f0de2dd-8d49-4a3f-9676-bf4b6ff17d44 -
Tenant ID/Tenant Name: Enter your Microsoft Entra tenant name (for example,
halosecude.onmicrosoft.com) or its tenant ID (for example,8c425ee7-352a-4657-ac77-7dc198712cb3). -
Certificate Store Location: Select a certificate store (Current User or Local Computer). When selecting Local Computer, ensure that the user running the service has at least local administrator rights.
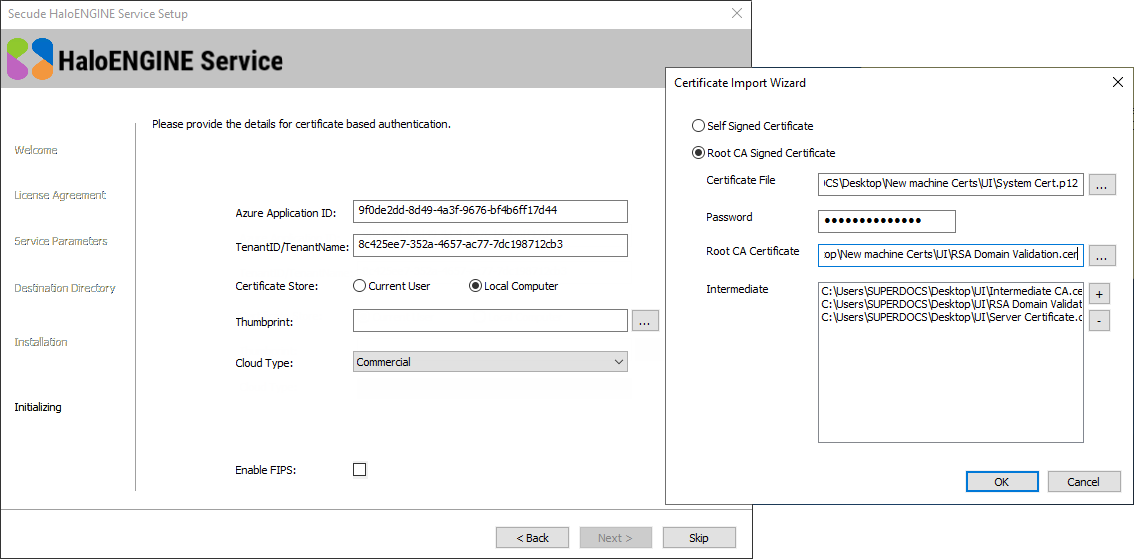
Certificate based authentication dialog
-
Thumbprint: If the certificate is already installed, you need to enter the thumbprint manually. If the certificate is not installed, click the Browse button to select the necessary certificates as explained below:
-
Option 1: Self-Signed Certificate—select this option if you have a self-signed certificate and this must be the certificate that is registered in the Azure portal. Click Browse button to select the certificate (
.pfxor.p12) and type the password. -
Option 2: Root CA Signed Certificate—select this option if you have a certificate that is signed by a CA. Click Browse button to select the signed certificate. The certificate path will appear in Certificate File field. Type its password in Password field. To select the Root CA (
.cer/.crt), click Browse button in Root CA Certificate field. To select the intermediate CA certificates, click Add button in Intermediate CA field. In case, you want to remove a certificate from the "Certificate Import Wizard", click Delete button. Click OK, the thumbprint will be populated automatically. -
Cloud Type: By default, Commercial will be set. However, based on your Azure subscription and configuration, you can change the cloud type from the list — Commercial / Custom / Germany / US_DoD / US_GCC / US_GCC_High / US_Sec / US_Nat / China_01. In the case of Custom cloud type, you need to enter the appropriate URLs in Protection Cloud URL (for example,
https://api.aadrm.com/) and Policy Cloud URL (for example,https://dataservice.protection.outlook.com/). -
Enable Federal Information Processing Standards (FIPS): If you want to utilize encryption algorithms that comply with FIPS standards, enable this option. By enabling the option, MPIP uses only FIPS-compliant encryption algorithms. If not, MPIP uses standard encryption algorithms. However, FIPS mode can be enabled at any moment using the Administration Manager Tool (
hsadm.exe). For more details, please refer to MIP SDK Documentation “MIP SDK FIPS Compliance Statement”. -
Click Next.
-
-
Once the initialization is completed, you will get the success message as shown below.
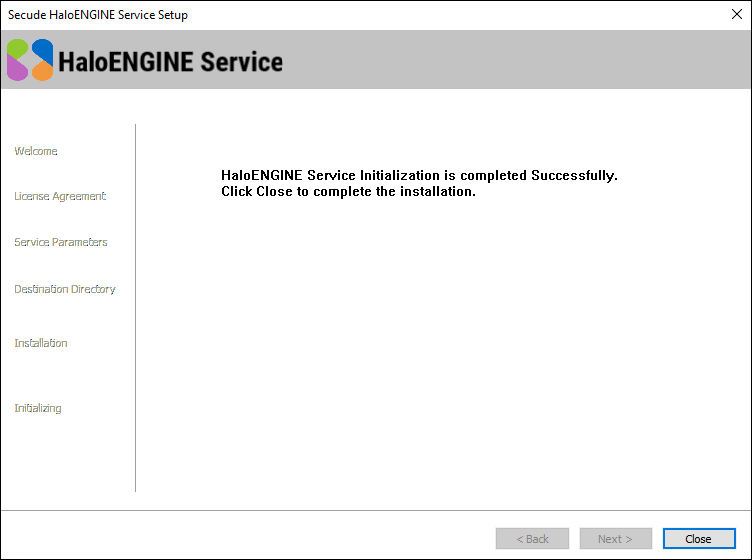
Initialization completed dialog
-
Click Close to complete the installation.
-
Once you have set user credentials to initialize the service, you will be able to start and stop the service using Microsoft Services Control Manager (SCM) or the HaloENGINE Service Administration Manager Tool (
hesadm.exe). Also, you can examine the state of the running "HaloENGINE Service" via SCM. -
You have now successfully installed the HaloENGINE Service with the default settings.
-
Please refer to the section "Configuration of HaloENGINE Service" to know how to configure the other settings.
HaloENGINE Service startup after reboot
Since the HaloENGINE Service is installed as Automatic (Delayed Start), after a reboot or shutdown, the HaloENGINE Service will start after a delay of ~3 minutes. This is dependent on the machine, as a service marked as Automatic (Delayed Start) will be started shortly after all other services designated as Automatic have been started.
Silent Installation
Prerequisite: Make sure to install Visual Studio Redistributable latest VS2015-2022 from the following link - https://aka.ms/vs/17/release/vc_redist.x64.exe.
In addition to interactive installation, the HaloENGINE Service can be installed in silent mode and does not display a user interface or require user interaction. It is a convenient way to streamline the installation process using the command at once.
When running silent mode command lines, it is recommended to enclose each parameter value with double quotation mark characters. For example: hesadm.exe -sc start "HES"
-
Open a command prompt and navigate to the directory of the installer.
-
To know the list of options available in silent mode, follow the steps given below:
TypeHaloENGINE_Service_Setup.exe -help
Press Enter
[-extractinstaller <directory_to_extract>]
Output
TypeHaloENGINE_Service_Setup.exe -extractinstaller "C:\Users\Administrator"
C:\Users\Administrator
Installer extracted successfully. -
You could see another HaloENGINE Service Setup “
HaloENGINE_Service_Installer.exe” got extracted in the specified folder. -
Now, navigate to the extracted setup and type:
HaloENGINE_Service_Installer.exe -helpOutput
[-install [-mpip] [-user <user id>] [-pwd <password>] [-port <port>] [-dir <destination_directory>]
[(if -mpip) [<ApplicationID> <TenantID/Name> <CertificateStore ("Current User"|"Local Computer")> [<ThumbPrint> | <-selfsigned|-rootsigned>] [<-cloudtype> (Commercial|Custom|Germany|US_DoD|US_GCC|US_GCC_HIGH|US_Sec|US_Nat|China_01] [<-enablefips> ("true"|"false")]
[(if -selfsigned) <Certificate File Path> <Certificate Password>]
[(if -rootsigned) <Certificate File Path> <Certificate Password> <RootCertificate File Path> <Count of Intermediate Certificate> <Intermediate Certificate1>...] ] ]
[(if cloudtype is Custom) <protectioncloudurl> <policycloudurl> ][-uninstall -silent <true|false>] -
The following is an example of installing the service in silent mode.
Using the thumbprint Option with FIPS
(Before using this command, you need to either manually install the root signed or self-signed certificate in the particular store and have the details of the thumbprint)
HaloENGINE_Service_Installer.exe -install -mpip -user .\administrator -pwd Pa$wde@123 -port 20000 -dir "C:\Program Files\Secude" 90e42986-b044-y8a7-9a33-a3114f71bd65 halosecude.onmicrosoft.com "Local Computer" 7bxvae61f9686c8c110ab350a28527ab4069515w -enablefips "true"
Using Self-Signed Certificate Option with Cloud Type
HaloENGINE_Service_Installer.exe -install -mpip -user .\administrator -pwd Pa$wde@123 -port 20000 -dir "C:\Program Files\Secude" r5352197-31e0-5rd2-8tfb-0i0027b801fb halosecude.onmicrosoft.com "Current User" -selfsigned "C:\Users\Administrator\cert\SELF-SIGNED.p12" Pa$wde@123 -cloudtype Commercial
Using Root CA Signed Certificate Option (WITHOUT an intermediate certificate)
HaloENGINE_Service_Installer.exe -install -mpip -user .\administrator -pwd Pa$wde@123 -port 20000 -dir "C:\Program Files\Secude" 12e42986-a044-48a7-8a33-a3114f71bd65 halosecude.onmicrosoft.com "Local Computer" -rootsigned "C:\Users\Administrator\cert\Signedcert.p12" Pa$wde@123 "C:\Users\Administrator\cert\Rootca.cer" 0 -cloudtype Commercial
Using Root CA Signed Certificate Option (WITH intermediate certificates)
HaloENGINE_Service_Installer.exe -install -mpip -user .\administrator -pwd Pa$wde@123 -port 20000 -dir "C:\Program Files\Secude" 12e42986-a044-48a7-8a33-a3114f71bd65 halosecude.onmicrosoft.com "Local Computer" -rootsigned "C:\Users\Administrator\cert\Signedcert.p12" Pa$wde@123 "C:\Users\Administrator\cert\Rootca.cer" 2 "C:\Users\Administrator\cert\Secude Intermediate CA.cer" "C:\Users\Administrator\cert\Secude RSA Domain Validation.cer" -cloudtype Commercial