
This chapter walks through the process of installing and configuring the HaloCAD for SOLIDWORKS PDM.
Before you begin
The following preparatory steps or conditions must be met before installing the product.
-
Ensure that you have administrative access to install the HaloCAD component.
-
Ensure that the client computer running the HaloCAD for SOLIDWORKS PDM can connect to the SOLIDWORKS PDM Server.
-
Ensure that the machine with HaloENGINE installed can reach the machine where HaloCAD for SOLIDWORKS PDM is installed.
-
Ensure that your HaloENGINE meets the requirements listed below:
-
License file (enabled with SOLIDWORKS_PDM system type).
-
Proper action rules
-
System Unique ID (assigned to the specific SOLIDWORKS PDM Server)
-
Select one of the following approaches for authentication.
Self-signed Certificate: Download the server certificate (HaloENGINEServer.cer) from the HaloENGINE Admin portal and manually install it on the SOLIDWORKS PDM client machine under Trusted Root Certification Authorities, where HaloCAD for SOLIDWORKS PDM is also installed.Company-Owned Signed Certificate: If you already have a certificate, you can import it into the admin portal. Please refer to the HaloENGINE Manual for additional details. Make sure your company's Root CA is installed in Trusted Root Certification Authorities. In this case, there is no need to install the server certificate (
HaloENGINEServer.cer) on the SOLIDWORKS PDM client machine.
-
-
Ensure that both HaloCAD for SOLIDWORKS PDM and HaloENGINE are installed with the same Directory (Tenant) ID. A mismatch in the Directory (Tenant) ID will result in configuration errors.
-
Ensure that your Microsoft Entra ID application information is available when the setup process prompts for a manual installation. Alternatively, for a safe and automatic installation, use
hc.conf.enc. For more details, please refer to the Technical Reference Manual.
Installation Modes
You can install the add-on in the following modes:
-
Graphical Mode
Graphical mode installation is an interactive, graphical user interface-based method that is driven by a wizard. -
Silent Mode
Silent-mode installation is a non-interactive method of installing HaloCAD using command lines.
Graphical Mode
Installation Procedure
Follow the steps below to install SOLIDWORKS PDM using the GUI-based setup application included in the installation package.
-
To begin the interactive installation, double-click the installer
HaloCAD_SWPDM_Setup.exefile. -
Depending on your Windows security settings, you may get a warning such as "Do you want to allow the following program to make changes to this computer?". If you get this security warning, click the Yes button to continue the installation.
-
When the installer starts, the Startup dialog appears, followed by the restart prompt.

Startup dialog
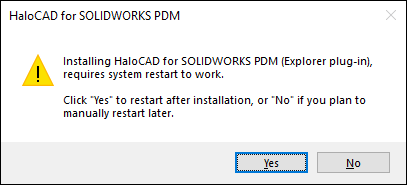
Restart message
-
To activate the HaloCAD component (Explorer plug-in), you must restart your computer after installation. When prompted, choose one of the following options:
-
Yes – The computer will restart automatically after the HaloCAD component is installed.
-
No – The HaloCAD component will be installed, but you must restart the computer manually later.
Note: The HaloCAD component becomes active only after the system is restarted.
-
-
After choosing an option in the restart prompt, the Welcome dialog appears.
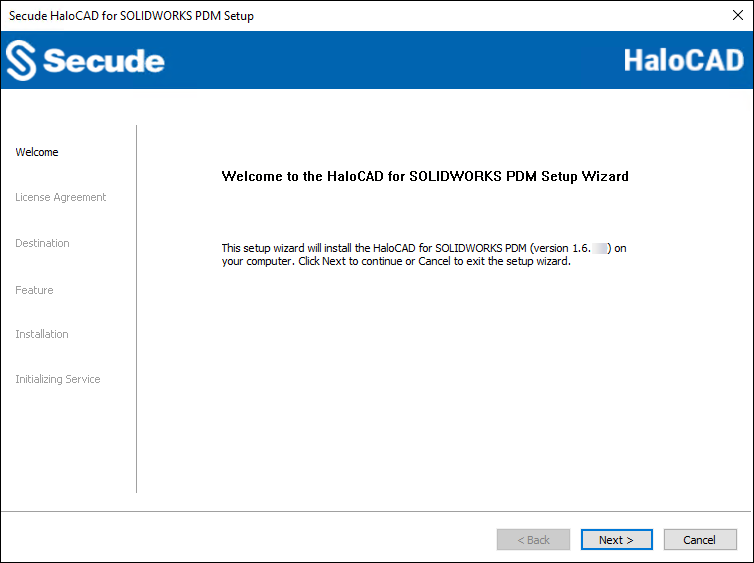
Welcome dialog
-
Click Next to continue the installation.
-
The End-User License Agreement (EULA) dialog appears.
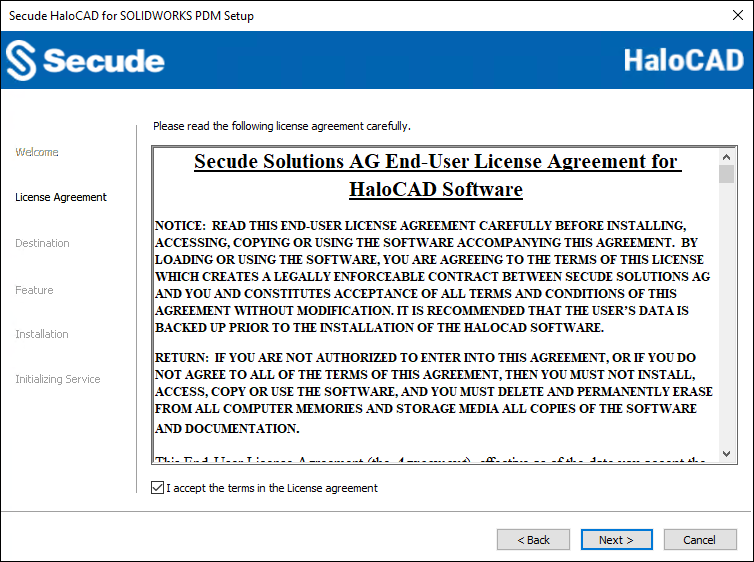
End-User License Agreement dialog
-
Read the End-User License Agreement. If you agree, select I accept the terms in the License Agreement, and click Next to continue.
-
The destination folder selection dialog appears:
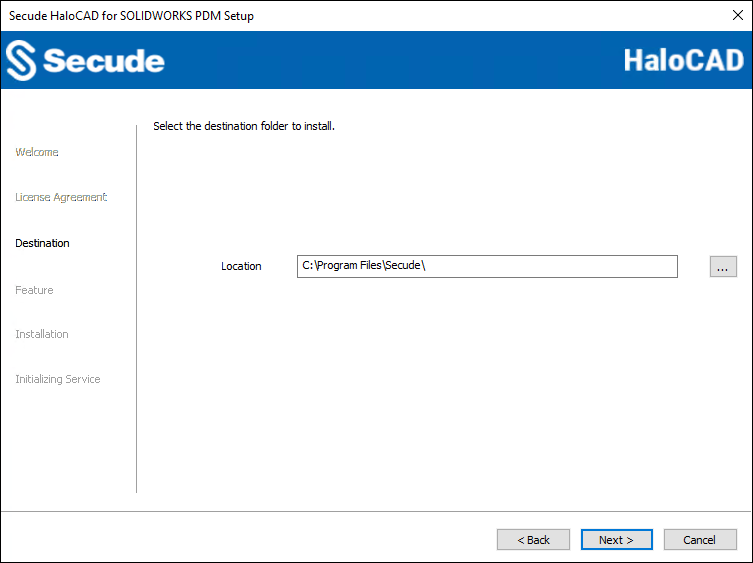
Destination folder selection dialog
-
By default, application files are stored in the program files directory (
C:\Program Files\Secude\). If you would like to choose an alternate location, click the Browse button and select your location preference. When you are finished, click Next. -
The feature selection dialog appears.
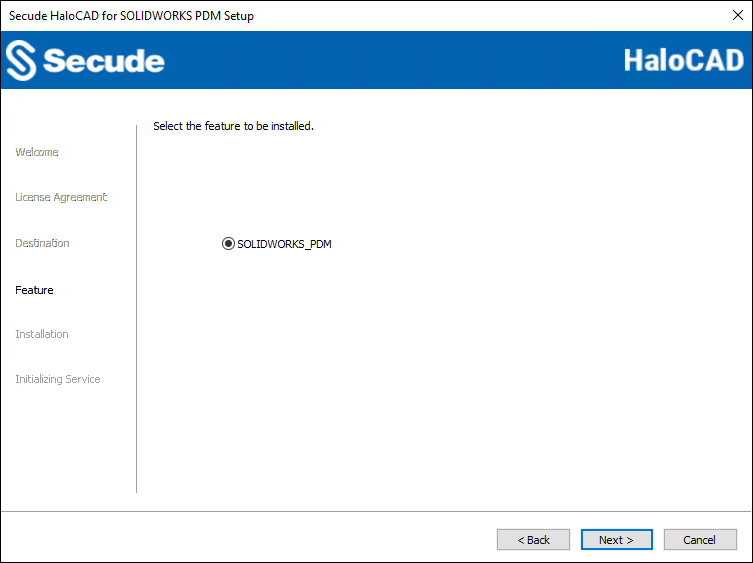
Feature selection dialog
-
By default, the SOLIDWORKS_PDM option is selected.
-
To review or change settings, click Back to return to a previous step in the installation process. Otherwise, click Next to begin installing the application. To cancel the installation at this stage, click Cancel.
-
The installation begins, and the progress is displayed in the dialog.
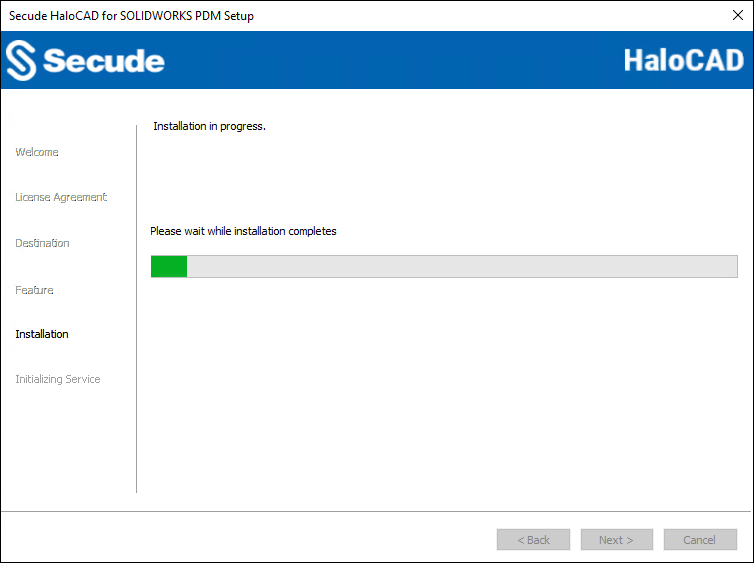
Installation progress dialog
-
When the installation is complete, a message appears confirming that the HaloCAD component has been successfully installed.
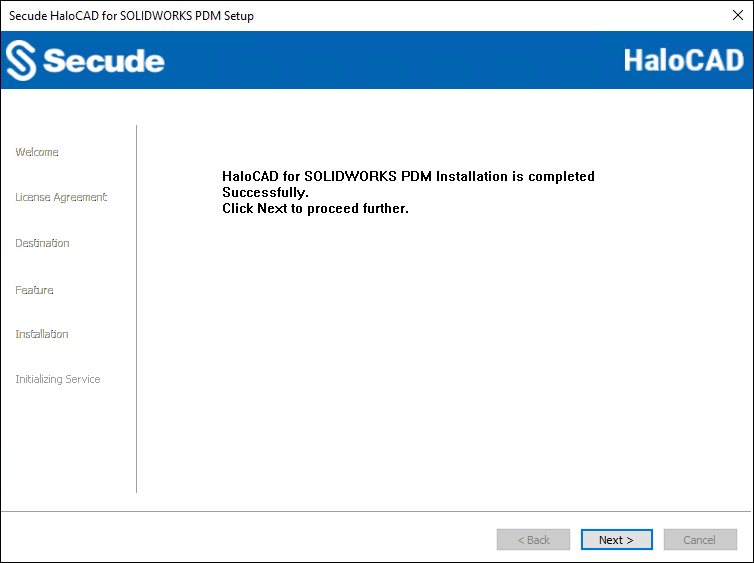
Installation completed dialog
-
Click Next to display the endpoint dialog.
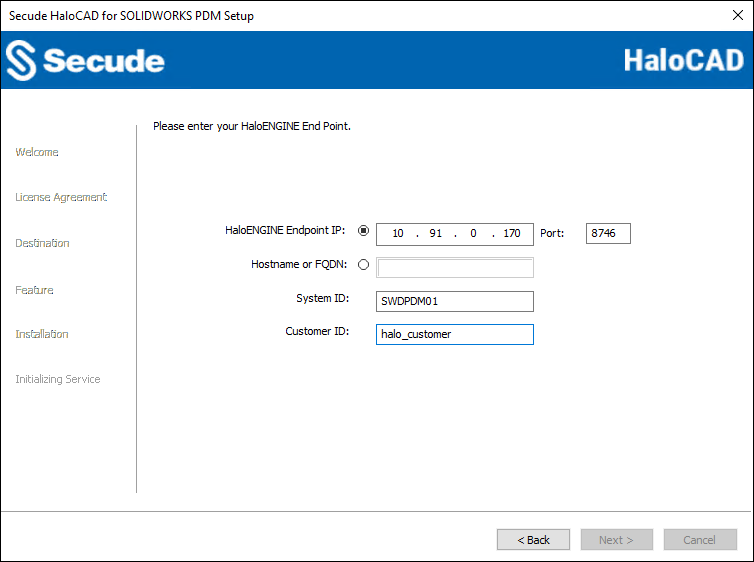
Endpoint dialog
-
Choose either the IP address or the hostname and provide the relevant information. In the HaloENGINE Endpoint IP field, type the HaloENGINE's IP address. For example, 10.91.0.170. Alternatively, type the fully qualified domain name (FQDN) or hostname into the Hostname or FQDN fields. For example,
SOLIDWORKSServer01.secude.com. The default port number 8746 will be displayed; however, you can enter your HaloENGINE port number instead. -
Enter the unique ID of SOLIDWORKS PDM in the System ID, which is assigned in the HaloENGINE Admin Portal. For example,
SWDPDM01. -
Enter the Customer ID that is assigned in the admin portal. For example,
halo_customer. -
At this stage, HaloCAD attempts to connect to the HaloENGINE. If an invalid endpoint is entered or the HaloENGINE server cannot be reached, the installation is terminated with the error message “HaloENGINE API endpoint is invalid or not reachable.” In this case, go back to the previous screen, provide a valid endpoint, confirm that the HaloENGINE is reachable, and then select Next.
-
-
The initialization dialog appears. To prevent connectivity issues, ensure that the correct Microsoft Entra ID application details are entered on the screen. Note: If the
hc.conf.encfile is included with the installer, this initialization screen is skipped and only the completion dialog is shown. The initialization screen appears only when thehc.conf.encfile is not present in the installer folder.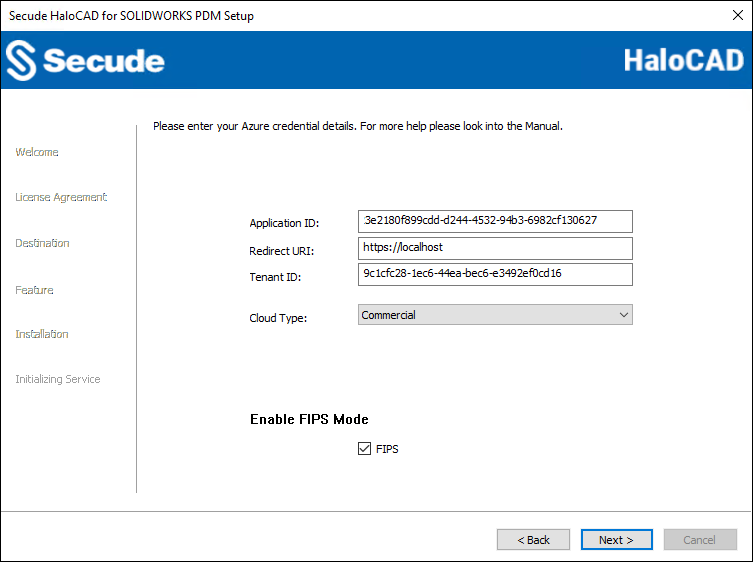
Initialization dialog
-
Application ID: Enter the unique identifier of your registered application. For example,
v6ca776-c74e-437d-98ef-662ecb5751tt -
Redirect URI: Enter the URI that was provided when registering the native application in the Azure portal. For example,
https://localhost. -
Tenant ID: If the registered application is Single tenant, you need to enter the globally unique identifier of your tenant if not, you can leave it empty. For example,
9c1cfc28-1ec6-44ea-bec6-e3492ef0cd16 -
Cloud Type: Commercial is selected by default. Based on your Azure subscription and configuration, select the required cloud type from the list: Commercial, Custom, Germany, US_DoD, US_GCC, US_GCC_High, US_Sec, US_Nat, or China_01. If you select Custom, enter the appropriate URLs in the Protection Cloud URL (for example,
https://api.aadrm.com) and Policy Cloud URL (for example,https://dataservice.protection.outlook.com) fields. -
Enable Federal Information Processing Standards (FIPS): Enable this option to use encryption algorithms that comply with FIPS standards. When enabled, MPIP uses only FIPS-compliant encryption algorithms, and when disabled, it uses standard encryption algorithms. If this option was not enabled during installation, it can later be enabled through a registry entry.
-
Click Next.
-
-
Once the initialization is complete, a success message appears as shown below.
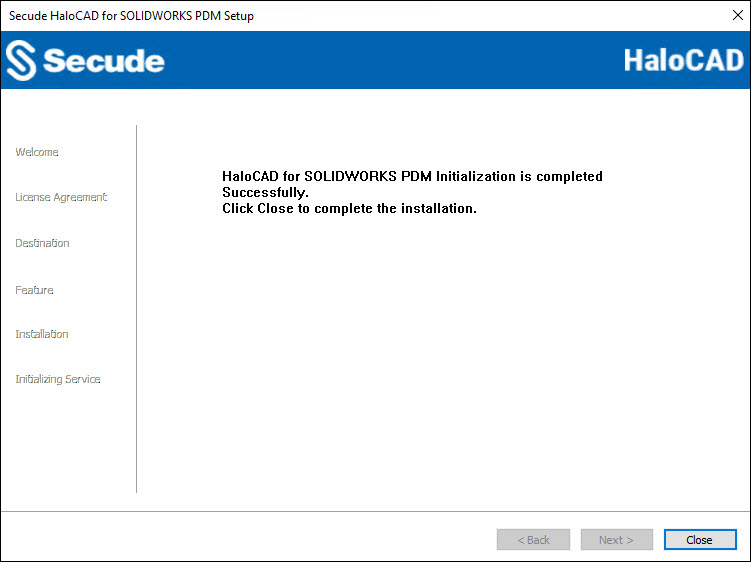
Initialization completed dialog
-
Click Close to close the installation wizard.
-
Based on the selected option in the initial prompt displayed when clicking the installer:
-
If you choose Yes, your machine will restart automatically.
-
If you choose No, you must restart it manually.
-
Post Installation files
-
View log files at:
%AppData%\Roaming\Secude\HaloCAD\SOLIDWORKS PDM\halocad.log -
HaloCAD stores configuration settings in the Windows registry at
HKEY_LOCAL_MACHINE\SOFTWARE\Secude\HaloCAD for SOLIDWORKS PDM; do not modify registry values unless required. Only theenable_fipssetting may be changed (true: MPIP uses FIPS-compliant encryption algorithms;false: MPIP uses standard encryption algorithms). -
To update HaloENGINE settings (such as endpoints, System ID, or Customer ID), edit:
HKEY_LOCAL_MACHINE\SOFTWARE\Secude\HaloCAD for SOLIDWORKS PDM\ep\HCADSWPDM -
Back up the registry before modifying any entries.
Silent Mode
Besides graphical mode, the add-on can be installed in silent mode, which does not require user involvement or display a user interface. It is a convenient way to streamline installation with a single command.
-
Open the Command Prompt with elevated rights (Run as Administrator).
-
Navigate to the add-on installer directory.
-
To know the list of options available in silent mode, follow the steps given below:
TypeHaloCAD_SWPDM_Setup.exe -help
PressEnter
Output
...
HaloCAD_SWPDM_Setup.exe [-install [-solidworkspdmshield] [-dir <destination_directory>]
[<ApplicationID> <Redirect URI> <TenantID/Name>] <haloengine_api_endpoint> <haloengine_api_port> <haloengine_api_SystemId> <haloengine_api_CustomerId> <RestartRequired <true|false>> <Cloud Type ("Commercial"|"Custom"|"Germany"|"US_DoD"|"US_GCC"|"US_GCC_High"|"US_Sec"|"US_Nat"|"China_01"|"")>
[(if Custom) <Protection Cloud Url> <Policy Cloud Url>] [enablefipsmode <true|false>]]
For Silent Mode Installation if ENC file already exists in the same location
HaloCAD_SWPDM_Setup.exe [-install [-solidworkspdmshield] [-dir <destination_directory>] <haloengine_api_endpoint> <haloengine_api_port> <RestartRequired <true|false>> <haloengine_api_SystemId> <haloengine_api_CustomerId> <enablefipsmode <true|false>>]HaloCAD_SWPDM_Setup.exe [-uninstall -silent <true|false>]Note: By selecting
true, your computer will restart immediately after installing the HaloCAD component. If you selectfalse, the HaloCAD component will be installed, but you must restart your computer manually later. Please note that the HaloCAD component becomes active only after a machine restart. -
The following command shows how to install and initialize HaloCAD.
HaloCAD_SWPDM_Setup.exe -install -solidworkspdmshield -dir "C:\Program Files\Secude" v6ca776-c74e-437d-98ef-662ecb5751tt https://localhost 9c1cfc28-1ec6-44ea-bec6-e3492ef0cd16 10.41.14.69 8746 SWPDM01 halo_customer true Custom https://api.aadrm.com https://dataservice.protection.outlook.com -enablefipsmode true -
The example below shows how to install the add-on using the
hc.conf.encfile located in the same installation location.
HaloCAD_SWPDM_Setup.exe -install -solidworkspdmshield -dir "C:\Program Files\Secude" 10.41.0.116 8746 false SWPDM01 halo_customer -enablefipsmode true -
Press Enter.
-
The installation is complete.
Next Step
After the installation is complete, you can view the HaloCAD-protected files. Please refer to the Operations Manual for more information.