
Operations
This section includes thorough guidance and step-by-step instructions for using HaloCORE and HaloCAD solutions (Label and Protect).
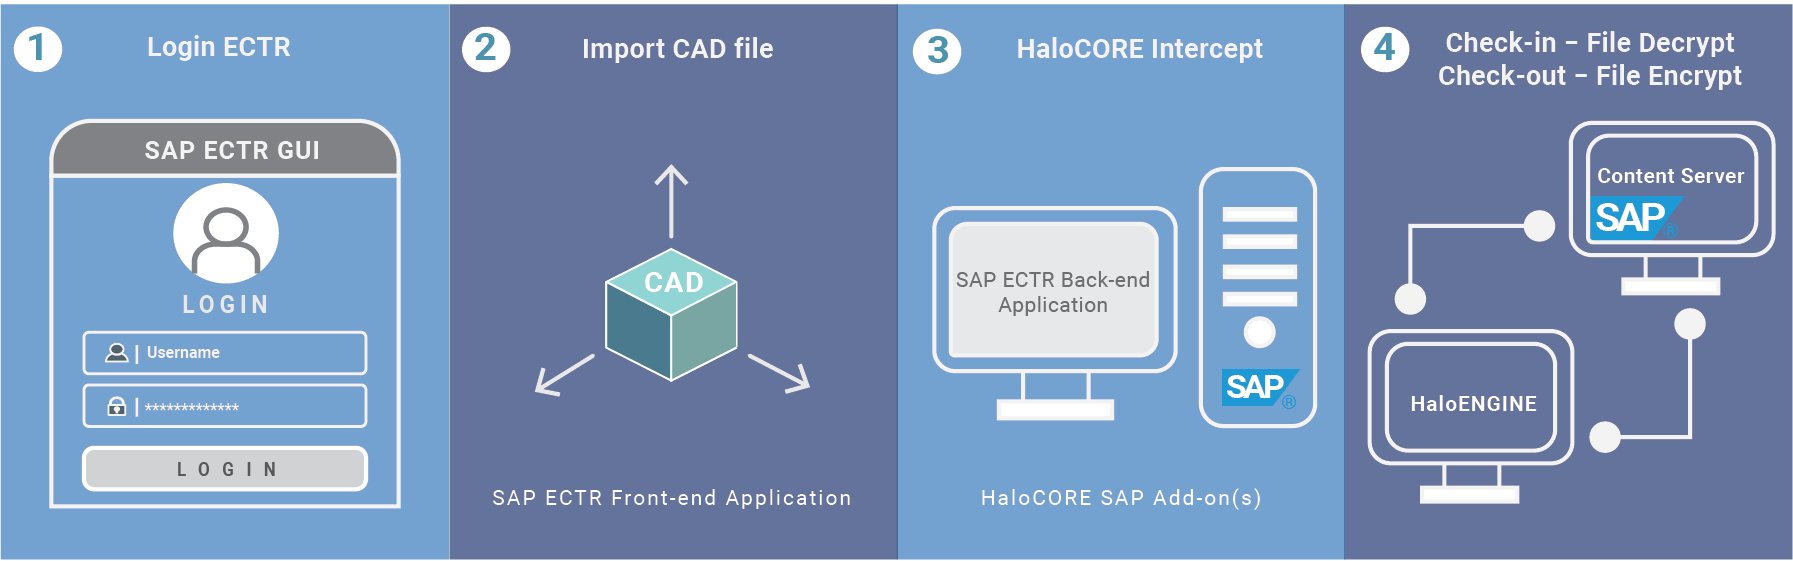
How does it Work?
At a high level, HaloCAD workflow involves the following steps:
HaloCAD Add-on for CAD with SAP PLM
Upload (Check-in)
User logins to SAP ECTR.
Launches the CAD application and imports a file.
HaloCORE SAP add-on runs in the background and intercepts the upload action and passes on the required details along with the content server’s upload URL of the file to the HaloENGINE.
Based on the collected metadata, the HaloENGINE determines the action to be executed on the file. If the file is already protected, it decrypts and then allows the file to get checked-in to the Content Server.
Download (Check-out)
User logins to SAP ECTR.
Removes the files and folders related to the file to be downloaded that are already present in the session (sess) directory and cache (cache) directory, if available.
Opens the file from ECTR by double-clicking on it.
HaloCORE SAP add-on runs in the background intercepts the download action and passes on the required details along with the content server’s download URL of the file to the HaloENGINE.
The file is retrieved from the Content Server via the provided URL, and based on the collected metadata, the HaloENGINE determines the action to be executed on the file. HaloENGINE Service encrypts the file as defined in the Classification Engine and sends the encrypted file to HaloENGINE. HaloENGINE then generates a new URL of the encrypted file and sends it back to the user, i.e., to SAP, which is then passed on to the CAD application for opening.
How to Protect a CAD File (via SAP PLM)?
Prerequisites:
HaloENGINE must be installed and configured.
The classification Engine must be configured. For illustration purposes, a simple classification profile is explained here.
Step 1: Enter a name for the profile.
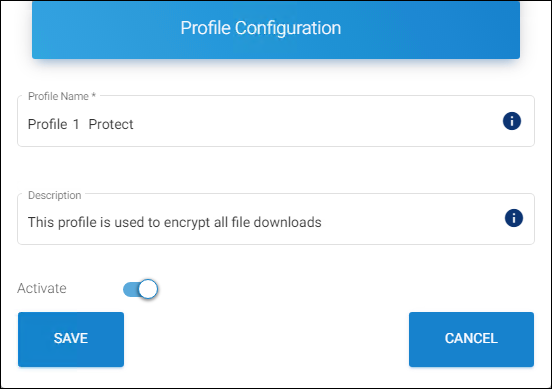
Sample profile
Step 2: Configure classification properties and their values.
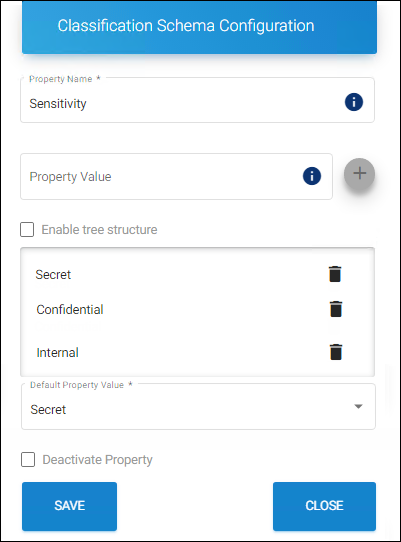
Classification properties
Step 3: Create classification rules based on "Kpro_doc_attributes" metadata types. For example: (document_number=10000000400).
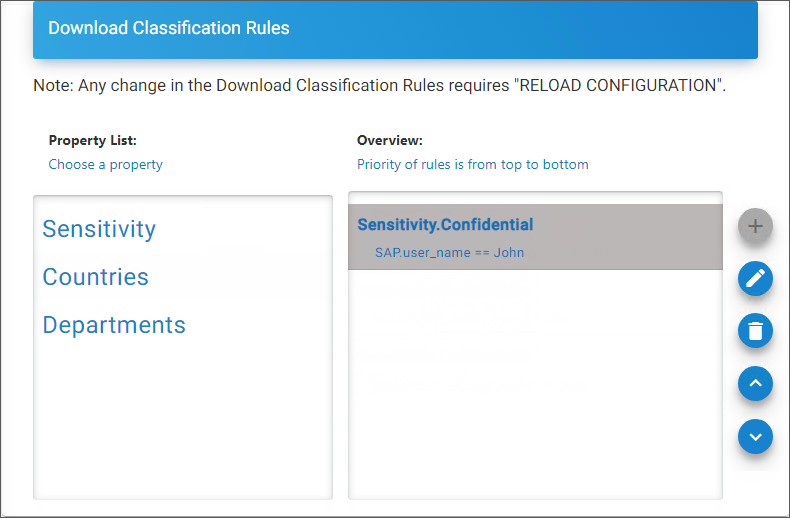
Rules
Step 4: Create Action rule = label
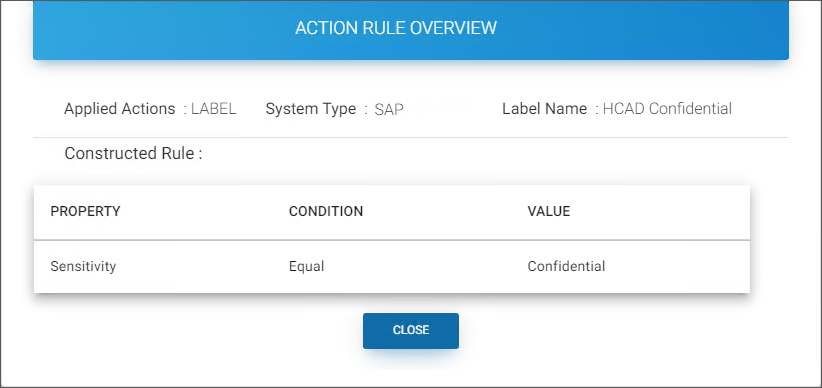
Action rules
Step 5: Assign Systems to the profile.

Assign Systems
HaloENGINE Service must be installed and configured.
HaloCAD add-on must be installed.
Remove the files and folders related to the file that is about to be downloaded that are already present in the session (sess) directory and cache (cache) directory, if available.
Follow the instructions below to protect CAD files via PLM:
Download a file via ECTR.
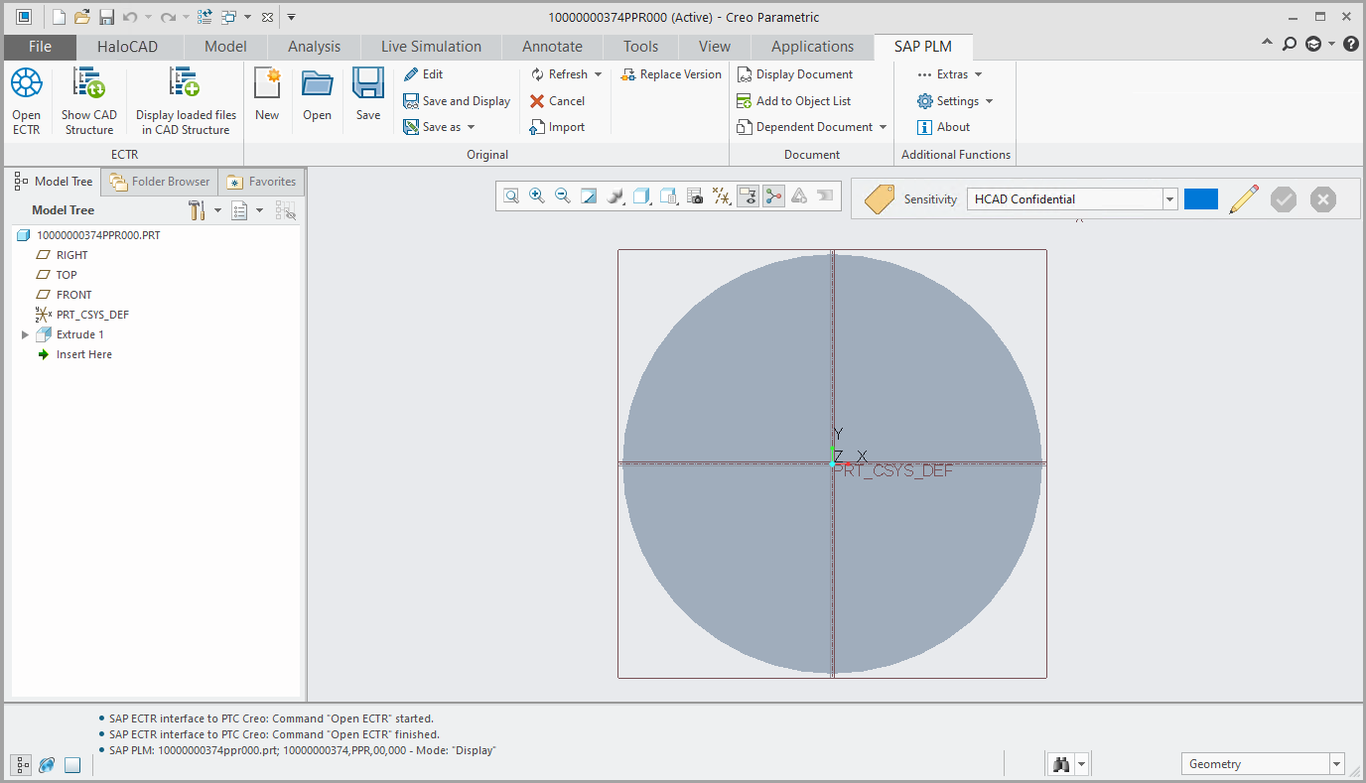
Labeled file opened via ECTR
Results:
The protected file is downloaded as defined in the HaloENGINE. The encryption settings from the label are enforced and remain with the file wherever it is stored.
The export event is logged in the HaloCORE Display Download Log and HaloENGINE audit log.

Sample Display Download Log
What to do next:
If you are an authorized user, you can modify the label and save the file.
If you wish to view the audit log, you can view the export event in the HaloENGINE audit log.
Common Scenarios
This section presents some common scenarios for illustrative purposes and is meant to provide general guidelines.
How to Open a Protected CAD File?
Click on the protected file.
The first time when you try to open a protected file, the Rights Management Service will prompt you to sign in.
Follow the on-screen prompts to complete the authentication process.
Results:
On successful confirmation, the file will open.
Users could experience different access results for the same document based on the policy settings.
For more details on standalone HaloCAD protection scenarios, refer to the respective operations manual:
For HaloCAD Add-on for Creo, please refer to the "Operations Manual of HaloCAD Add-on for Creo”.
For HaloCAD Add-on for AutoCAD, please refer to the "Operations Manual of HaloCAD Add-on for AutoCAD”.
For HaloCAD Add-on for Solid Edge, please refer to the "Operations Manual of HaloCAD Add-on for Solid Edge”.
For HaloCAD Add-on for SOLIDWORKS, please refer to the "Operations Manual of HaloCAD Add-on for SOLIDWORKS”.
File Upload and Download Sequence in AutoCAD
The following is an example of an upload and download sequence in SAP PLM integrated with HaloCAD.
Login to SAP ECTR.
In the SAP ECTR window, click the System menu, and then click Launch Application > Launch AutoCAD. (By default, the "SAP PLM" ribbon of SAP Engineering Control Center Interface to AutoCAD is immediately available after AutoCAD is launched.)
Draw an object, select a sensitivity label, and click Save. (For example, select the least restrictive sensitivity label, such as Public or General).
On the SAP PLM menu, click Import.
The Import on Demand Dialog will appear, select the document that you want to import and click OK.
Check-in will be in progress.
Results:
On successful check-in, you will get a “
Check-in was successful" message in the status bar.During the upload/check-in sequence, the original label "
Public or General" is removed, and the decrypted file is imported to SAP PLM.The upload/checked-in event is logged in the HaloENGINE and HaloCORE Display Download Log.
Check-out sequence: Remove the files and folders related to the previously uploaded file that is present in the session (sess) directory and cache (cache) directory, if available. Login to SAP ECTR, if you have not already done so. Select and double-click on the previously uploaded file in the SAP ECTR application.
Results:
During the download/check-out sequence, the file is exported from SAP with a new label that is defined in the Classification Engine.
The download/check-out event is logged in the HaloENGINE and HaloCORE Display Download Log.
File Upload and Download Sequence in Creo
Prerequisite
When you use the SAP Engineering Control Center Import option, the files that need to “Check-in” must be copied into the “session” directory. The session directory refers to the working directory of a user at a workstation. Note: During the Import event, the files are imported from the session directory into new documents in SAP PLM.
The following is an example of an upload and download sequence in SAP PLM integrated with HaloCAD:
Login to SAP ECTR.
In the SAP ECTR window, click the System menu, and then click Launch Applications > Launch PTC Creo. (By default, the "SAP PLM" ribbon of SAP Engineering Control Center Interface to Creo is immediately available after Creo is launched.)
Select a file:
Create a new part file with drawings, select a sensitivity label and click Save. The file will be saved in the session directory automatically. (For example, select the least restrictive sensitivity label, such as Public or General).
Alternatively, if you already have a labeled file, then make sure to place it in the session directory.
On the SAP PLM menu, click Import.
The Identify further files for Import dialog will appear, click Import.
The Import on Demand Dialog will appear, select the file again and click OK.
Results:
On successful check-in, you will get a “
Check-in was successful" message in the status bar.During the upload/check-in sequence, the original label "
Public or General" is removed, and the decrypted file is imported to SAP PLM.The upload/checked-in event is logged in the HaloENGINE and HaloCORE Display Download Log.
Check-out sequence: Remove the files and folders related to the previously uploaded file that is present in the session (sess) directory and cache (cache) directory, if available. Login to SAP ECTR, if you have not already done so. From your workstation, select the same file that is uploaded in the previous section. Double-click on it.
Results:
During the download/check-out sequence, the file is exported from SAP with a new label that is defined in the Classification Engine.
The download/check-out event is logged in the HaloENGINE and HaloCORE Display Download Log.
File Upload and Download Sequence in Solid Edge
The following is an example of an upload and download sequence in SAP PLM integrated with HaloCAD.
Login to SAP ECTR.
In the SAP ECTR window, click the System menu, and then click Launch Application > Launch Solid Edge. (By default, the "SAP PLM" ribbon of SAP Engineering Control Center Interface to Solid Edge is immediately available after Solid Edge is launched.)
Create a new document or open an existing document.
Select a sensitivity label and click Save. (For example, select the least restrictive label, such as Public or General).
On the SAP PLM menu, click Import.
The Import on Demand Dialog will appear, select the document that you want to import and click OK.
Check-in will be in progress.
Results:
On successful check-in, you will get a “
Check-in was successful" message in the status bar.During the upload/check-in sequence, the original label "
Public or General" is removed, and the decrypted file is imported to SAP PLM.The upload/checked-in event is logged in the HaloENGINE and HaloCORE Display Download Log.
Check-out sequence: Remove the files and folders related to the previously uploaded file that is present in the session (sess) directory and cache (cache) directory, if available. Login to SAP ECTR, if you have not already done so. Select and double-click on the previously uploaded file in the SAP ECTR application.
Results:
During the download/check-out sequence, the file is exported from SAP with a new label that is defined in the Classification Engine.
The download/check-out event is logged in the HaloENGINE and HaloCORE Display Download Log.
File Upload and Download Sequence in SOLIDWORKS
The following is an example of an upload and download sequence in SAP PLM integrated with HaloCAD.
Login to SAP ECTR.
In the SAP ECTR window, click the System menu, and then click Launch Application > Launch SOLIDWORKS. (By default, the "SAP PLM" ribbon of SAP Engineering Control Center Interface to SOLIDWORKS is immediately available after SOLIDWORKS is launched.)
Create a new document or open an existing document.
Select a sensitivity label and click Save. (For example, select the least restrictive label, such as Public or General).
On the SAP PLM menu, click Import.
The Import on Demand Dialog will appear, select the document that you want to import and click OK.
Check-in will be in progress.
Results
On successful check-in, you will get a “
Check-in was successful" message in the status bar.During the upload/check-in sequence, the original label "
Public or General" is removed, and the decrypted file is imported to SAP PLM.The upload/checked-in event is logged in the HaloENGINE and HaloCORE Display Download Log.
Check-out sequence: Remove the files and folders related to the previously uploaded file that is present in the session (sess) directory and cache (cache) directory, if available. Login to SAP ECTR, if you have not already done so. Select and double-click on the previously uploaded file in the SAP ECTR application.
Results
During the download/check-out sequence, the file is exported from SAP with a new label that is defined in the Classification Engine.
The download/check-out event is logged in the HaloENGINE and HaloCORE Display Download Log.