
HaloCAD in Windows Environment
This section explains how to set up HaloCAD using an installer for Windows-based Master and Replica Servers. The installer is included in the installation package.
Installation Modes
You can install the HaloCAD component in the following modes:
Graphical Mode
Graphical mode installation is an interactive, graphical user interface-based method that is driven by a wizard.Silent Mode
Silent-mode installation is a non-interactive method of installing the HaloCAD component using command lines.
Graphical Mode
To begin the interactive installation, double-click the installer
HaloCAD_Windchill_Setup.exefile. Depending on your Windows security settings, you may get a warning such as "Do you want to allow the following program to make changes to this computer?". If you get this security warning, click the Yes button to continue the installation.When the installer starts, you will see the startup dialog followed by the welcome dialog:

Startup dialog
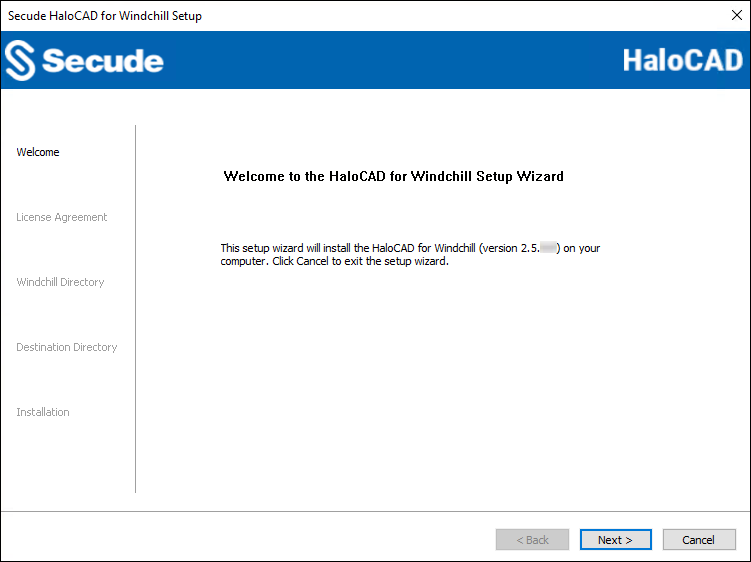
Welcome dialog
Click Next to continue the installation.
The end-user license agreement dialog will appear:
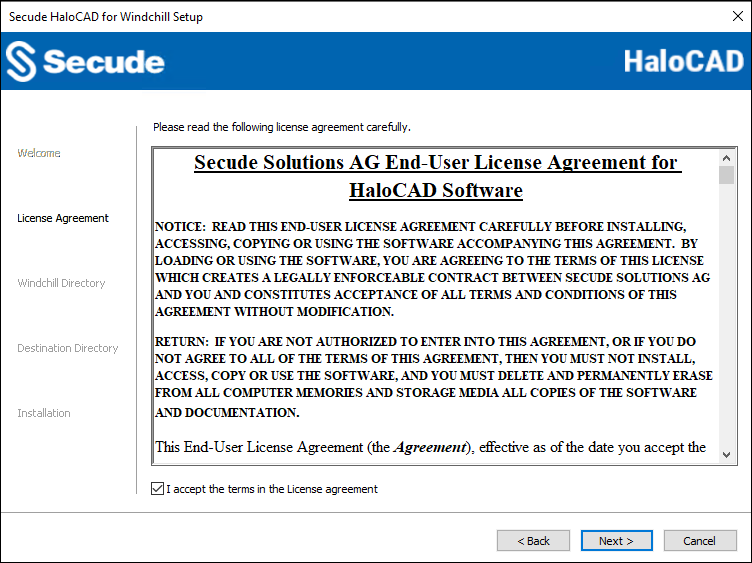
End-User License Agreement dialog
Read the End-User License Agreement. If you agree, select I accept the terms in the License Agreement and click Next.
The Windchill Home Directory Location dialog will appear:
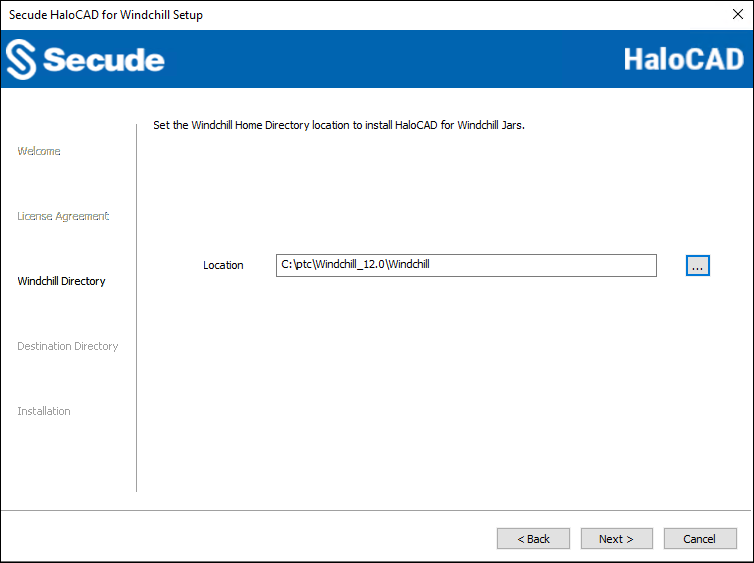
Windchill Home Directory Location dialog
Select the Windchill server's home directory in your system and click Next. For example,
C:\ptc\Windchill_12.0\Windchill. Please enter the correct home directory path; otherwise, the installation fails with the error message "Windchill Home Directory path is incorrect. So please and install enter the correct path." To return to any point in the installation process, click the Back button (optional).The destination folder selection dialog will appear:
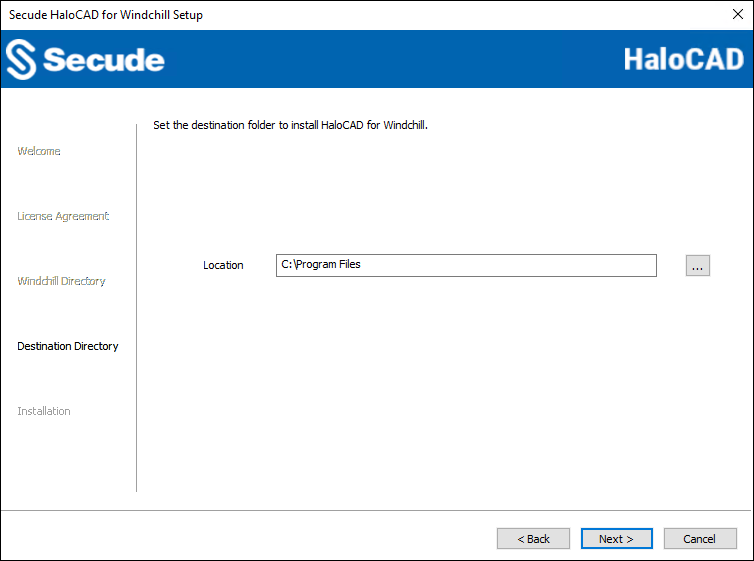
Destination folder selection dialog
By default, application files are stored in the program files directory (
C:\Program Files). If you would like to choose an alternate location, click the Browse button and select your location preference.The installation begins and progress is shown in the dialog.
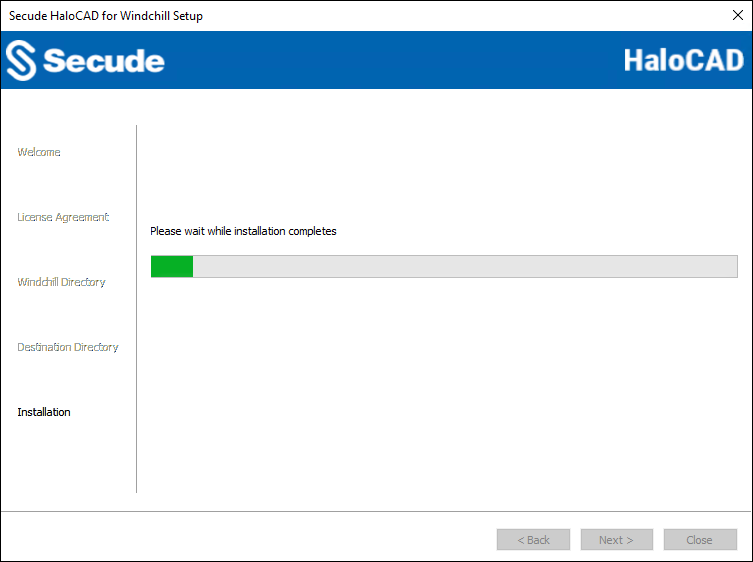
Installation progress dialog
When the installation is completed, you will see a message confirming that the HaloCAD component has been successfully installed.
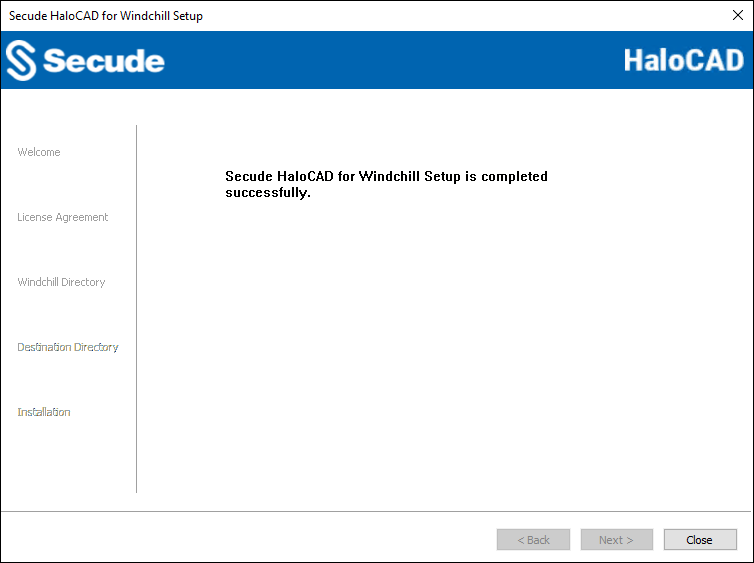
Installation completed dialog
Click Close to close the installation wizard.
Post Installation files:
Windchill-related HaloCAD Jar files are placed in the home directory (
Windchill\lib) of the Windchill server that you provided.The configuration tool is stored in the path
C:\Program Files\Secude\HaloCADWindchill\config.
Silent Mode
Besides graphical mode, the HaloCAD component can be installed in silent mode, which does not require user involvement or display a user interface. It is a convenient way to streamline the installation process using commands at once.
Open the Command Prompt with elevated rights (Run as Administrator).
Navigate to the directory of the HaloCAD component installer.
To know the list of options available in silent mode, follow the steps given below:
TypeHaloCAD_Windchill_Setup.exe -help
PressEnter
Output
...HaloCAD_Windchill_Setup.exe -install -wdir <Windchill_Home_Directory> -dir <destination_directory>HaloCAD_Windchill_Setup.exe -uninstallThe following command illustrates how to install the HaloCAD component.
HaloCAD_Windchill_Setup.exe -install -wdir "C:\ptc\Windchill_12.0\Windchill" -dir "C:\Program Files"Press
Enter.The installation is complete.
Configuration Methods
This section describes two methods (command line and GUI) for configuring the parameters of HaloCAD and HaloENGINE.
Configuration Using Tool (GUI)
Prerequisite: Ensure that HaloCAD for Windchill has been installed.
Follow the steps below to configure settings using the GUI.
Step 1. Stop Windchill.
Launch Windchill Shell.
Type the stop command
windchill stopand press Enter.Result: You will receive a confirmation message
− Server Manager stopped.
Step 2. Run the HaloCAD Configuration Tool.
Navigate to the destination folder you specified during installation. The default folder is
C:\Program Files\Secude\HaloCADWindchill\config.Double-click the jar file or type
java -jar halocad-windchill-config-X.X.X.X.jarand press Enter either in the Windows command prompt or Windchill Shell with administrative privileges.Example:
C:\Program Files\Secude\HaloCADWindchill\config>java -jar halocad-windchill-config-X.X.X.X.jarThe HaloCAD for Windchill Config Tool UI will appear.
Step 2a. Enter the following information under the Windchill Configuration tab.
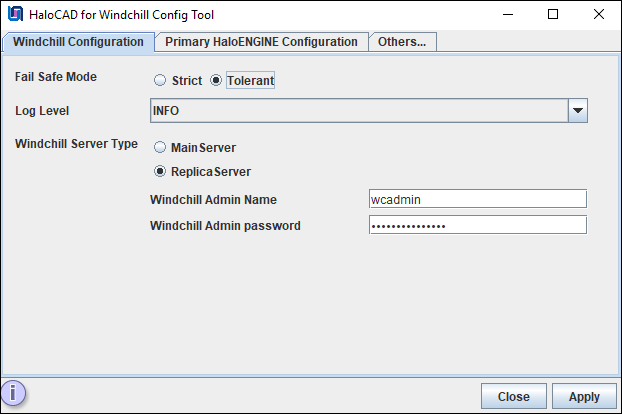
Windchill configuration tab
Fail-Safe Mode: The Fail-Safe Mode controls the system's behavior in case of inconsistencies that prevent the specified protection from being applied (conflicting configuration, server component unreachable, or returning an error message, etc.). You can define any one of the following:
Strict: The file upload or download will be blocked, whenever any error occurs.
Tolerant (default): The file upload or download will be allowed, even when an error occurs.
Log Level: Select a log level as per your choice.
INFO (default): A standard log level that highlights the progress of the application.
ERROR: Logs error events that prevent program execution.
DEBUG: Logs detailed tracing messages. It should be used for information required for diagnosing issues and troubleshooting.
Windchill Server Type: Choose one of the following options based on your environment.
Main Server: If you only have the Main Server, choose Main Server in Windchill Server Type. The UI shows Disable Windchill REST, indicating that the REST service for Windchill is disabled by default. However, you can enable it to retrieve application data from the Main Server. To do so, choose Enable Windchill REST in the list. Note: Enabling REST service is only required when the Main Server is linked to a Replica Server and files are downloaded from it.
Replica Server: This option applies to the Windchill File Server/Windchill Content Cache Server, which serves as a remote site for the Windchill environment. It is a lightweight server with master data storage but no Windchill database. Here, the master server controls the database metadata and holds details about the files that are present on the File Server. If you choose this option, you must configure the following:
Windchill Admin Name: Enter the administrator's name for the Main Server. For example,
wcadmin.Windchill Admin password: Enter the administrator password.
Click Apply. Any missing values will be indicated with a red tool tip message. This indicates that you need to enter and click Apply.
Results:
A confirmation message dialog box will appear.
Click OK on the confirmation dialog box.
The configuration files will be generated in the installation directory.
Step 2b. Enter the following information under the Primary HaloENGINE Configuration tab.
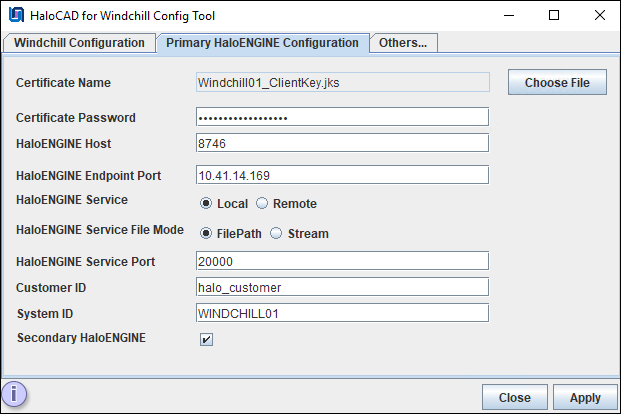
Primary HaloENGINE configuration tab
Certificate Name: Click Choose File to browse and select the client Keystore in JKS format, generated by the HaloENGINE Admin Portal [through which communication is established between HaloENGINE (primary) and Windchill]. For example,
Windchill01_ClientKey.jksCertificate Password: Enter the password of the selected client Keystore. For example,
Key$T#123HaloENGINE Host: Enter the IP address/FQDN of HaloENGINE. For example,
10.41.14.169HaloENGINE Endpoint Port: Enter the endpoint port from which HaloENGINE can be accessed. For example,
8746HaloENGINE Service: Select the location where the HaloENGINE Service is installed.
Remote: Select if HaloENGINE Service and HaloCAD for Windchill are installed on different machines.
Local (default): Select if HaloENGINE Service and HaloCAD for Windchill are installed on the same machine on which Windchill PLM is installed. If you choose Local, you must select the file transmission method in the HaloENGINE Service File Mode (Filepath/Stream) and then enter the port number in the HaloENGINE Service Port text box.
FilePath (default): File stored in a local temporary location for encryption and decryption process. Here, file path information is used for transferring.
Stream: File as a sequence of bytes.
HaloENGINE Service Port: Enter the port assigned to the HaloENGINE Service during the installation. By default, HaloENGINE Service uses port
20000.Customer ID: Enter the Customer ID that is assigned for Single Customer mode or Multi-Customer mode in the admin portal. For example,
halo_customer.System ID: Enter the Windchill Server’s hostname and the same must be entered in the System Unique ID (HaloENGINE admin portal). For example,
WINDCHILL01Secondary HaloENGINE: If you want to set up a failover mechanism in your environment, select this check box. HaloCAD supports connection failover between two HaloENGINEs. For more information, please refer to the section “Failover Mechanism for HaloENGINE in HaloCAD for PLM”.
Click Apply. Any missing values will be indicated with a red tool tip message. This indicates that you need to enter and click Apply.
Results:
A confirmation message dialog box will appear.
Click OK on the confirmation dialog box.
If you have selected the Secondary HaloENGINE option, you can notice that the Secondary HaloENGINE Configuration tab has been added to the configuration tool as shown below in Step 2c.
Step 2c. Enter the following information under the Secondary HaloENGINE Configuration tab.
If you haven't selected the Secondary HaloENGINE option in the Windchill Configuration tab, skip this step. This step is only necessary if you want to use the failover mechanism.
Prerequisite: Ensure that the secondary HaloENGINE uses the same configuration profiles and rules as the primary HaloENGINE. Thus, when the primary HaloENGINE fails, the secondary HaloENGINE immediately takes over, assuring continuous operation.
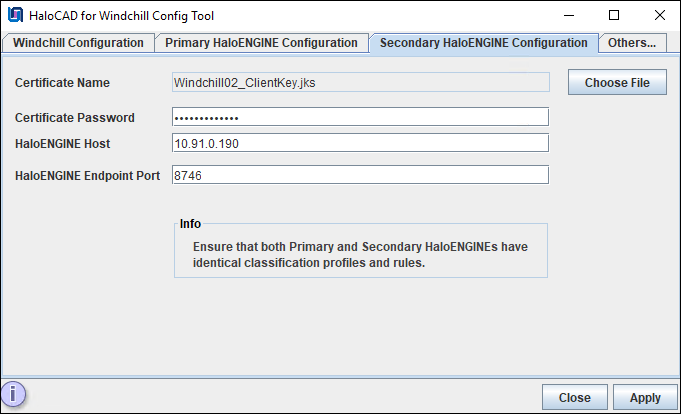
Secondary HaloENGINE configuration tab
Certificate Name: Click Choose File to browse and select the client Keystore in JKS format, which is generated by the HaloENGINE Admin Portal [through which communication is established between HaloENGINE (secondary) and Windchill]. For example,
Windchill02_ClientKey.jksCertificate Password: Enter the password of the selected client Keystore. For example,
Key$T#1234HaloENGINE Host: Enter the IP address/FQDN of HaloENGINE. For example,
10.91.0.190HaloENGINE Endpoint Port: Enter the endpoint port from which HaloENGINE can be accessed. For example,
8746Click Apply. Any missing values will be indicated with a red tool tip message. This indicates that you need to enter and click Apply.
Results:
A confirmation message dialog box will appear.
Click OK on the confirmation dialog box.
Step 2d. Enter the following information under the Others tab.
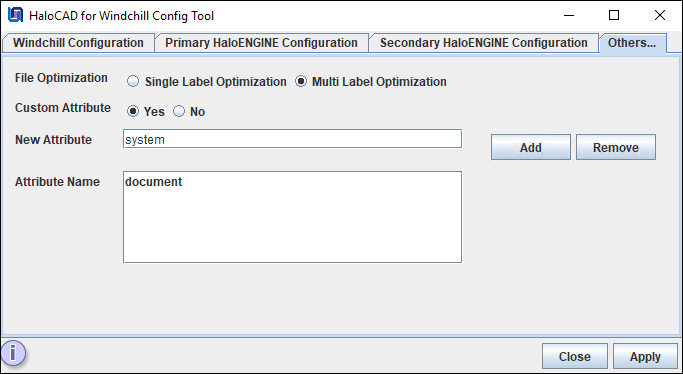
Others tab
File Optimization: Choose one of the following options for file optimization. By default, Single Label Optimization is set.
Single Label Optimization: The top-level file label is taken into account and applied to all dependent files.
Multi-Label Optimization: Each file type group label defined in the classification engine is taken into account and assigned to the appropriate group with ASM optimization.
Custom Attribute (Global Attribute)
If you do not want to use custom attributes, simply click Apply and Close the configuration tool window.
If you want to use custom attributes, choose Yes in Custom Attribute, and then fill out the following information.
New Attribute: Enter the name of an attribute and then click Add. For example, the document is a new attribute added to the list.
The attribute will be added to the Attribute Name list.
Click Apply. Any missing values will be indicated with a red tool tip message. This indicates that you need to enter and click Apply.
Results:
A confirmation message dialog box will appear.
Click OK on the confirmation dialog box.
Click Close to close the configuration window.
Related Task: If you wish to remove an attribute from the list, first select it, then click Remove, and then click Apply to save the configuration.
Step 3. Start Windchill.
Close and reopen the Windchill shell.
Type the start command
windchill startand press Enter.Results:
You will receive a confirmation message as "wt.manager.ServerLauncher - Starting Server Manager".
During the initialization phase, you can see the following messages in the "
MethodServer" log which confirms the successful configuration.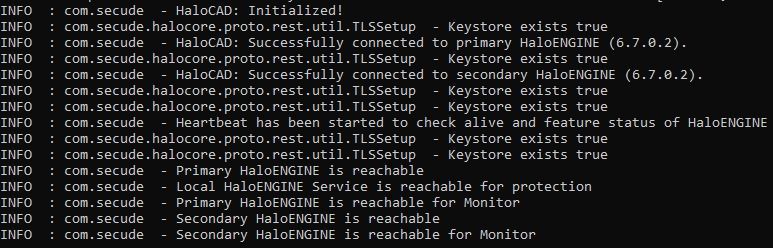
Sample log file output
Related Tasks
The same logs can be seen in the
MethodServer-xxx-log4j.logfile.HaloCAD component-related activities are logged in
%WINDCHILL_HOME%\Windchill\logs.
Configuration Using the Command Line
This is an alternative method of configuring the HaloCAD and HaloENGINE parameters using the command line.
Prerequisite: Ensure that HaloCAD for Windchill has been installed.
Follow the command-line instructions. A sample is provided below:
Open the Windchill Shell window, type
java -jar halocad-windchill-config-<version no>.jar -shell, and press Enter.CODEC:\Program Files\Secude\HaloCADWindchill\config>java -jar halocad-windchill-config-<version no>.jar -shell -------------------------------------------------------------------------------- HaloCAD for Windchill Config Path: C:\Program Files 1. Windchill Configuration 2. Primary HaloENGINE Configuration 3. Others... 0. Exit Note: If an invalid value is entered, the default value will be applied. Please choose an option: 1 -------------------------------------------------------------------------------- Windchill Configuration: -------------------------------------------------------------------------------- Fail Safe Mode: (Default:Tolerant) 1. Tolerant 2. Strict Please choose an option: 1 Log Level: (Default:INFO) 1. INFO 2. DEBUG 3. ERROR Please choose an option: 2 Windchill Server Type: (Default:MainServer) 1. MainServer 2. ReplicaServer Please choose an option: 1 Windchill REST: (Default:Disable Windchill REST) 1. Disable Windchill REST 2. Enable Windchill REST Please choose an option: 1 Saved Successfully. -------------------------------------------------------------------------------- Windchill Configuration: Fail Safe Mode :Tolerant Log Level :DEBUG Windchill Server Type :MainServer Windchill REST :Disable Windchill REST 1. Modify all configuration 2. Modify the particular configuration 3. Back to main menu 0. Exit Please choose an option: 3 -------------------------------------------------------------------------------- 1. Windchill Configuration 2. Primary HaloENGINE Configuration 3. Others... 0. Exit Note: If an invalid value is entered, the default value will be applied. Please choose an option: 2 -------------------------------------------------------------------------------- Primary HaloENGINE Configuration: -------------------------------------------------------------------------------- Enter the Certificate Path: C:\Users\Administrator\Desktop\Windchill01_ClientKey.jks File name:Windchill01_ClientKey.jks. Enter the Certificate Password: Secondary HaloENGINE: (Default:Disable Secondary HaloENGINE) 1. Disable Secondary HaloENGINE 2. Enable Secondary HaloENGINE Please choose an option: 2 Enter the HaloENGINE Host: 10.41.14.169 Enter the HaloENGINE Endpoint Port: (Default:8746) 8746 Enter the Customer ID: halo_customer Enter the System ID: WINDCHILL01 HaloENGINE Service: (Default:Local) 1. Remote 2. Local Please choose an option: 1 Saved Successfully. ------------------------------------------------------------------------------- Primary HaloENGINE Configuration: Certificate Name :Windchill01_ClientKey.jks HaloENGINE Host :10.41.14.169 HaloENGINE Endpoint Port :8746 HaloENGINE Service :Remote Customer ID :halo_customer System ID :WINDCHILL01 Secondary HaloENGINE :Enable Secondary HaloENGINE 1. Modify all configuration 2. Modify the particular configuration 3. Back to main menu 0. Exit Please choose an option: 3 -------------------------------------------------------------------------------- 1. Windchill Configuration 2. Primary HaloENGINE Configuration 3. Secondary HaloENGINE Configuration 4. Others... 0. Exit Note: If an invalid value is entered, the default value will be applied. Please choose an option: 3 -------------------------------------------------------------------------------- Secondary HaloENGINE Configuration: -------------------------------------------------------------------------------- Enter the Certificate Path: C:\Users\Administrator\Desktop\Windchill02_ClientKey.jks File name:Windchill02_ClientKey.jks. Enter the Certificate Password: Enter the HaloENGINE Host: 10.91.0.190 Enter the HaloENGINE Endpoint Port: (Default:8746) 8746 Saved Successfully. -------------------------------------------------------------------------------- Secondary HaloENGINE Configuration: Certificate Name :Windchill02_ClientKey.jks HaloENGINE Host :10.91.0.190 HaloENGINE Endpoint Port :8746 1. Modify all configuration 2. Modify the particular configuration 3. Back to main menu 0. Exit Please choose an option: 3 -------------------------------------------------------------------------------- 1. Windchill Configuration 2. Primary HaloENGINE Configuration 3. Secondary HaloENGINE Configuration 4. Others... 0. Exit Note: If an invalid value is entered, the default value will be applied. Please choose an option: 4 -------------------------------------------------------------------------------- Others... File Optimization :Single Label Optimization Custom Attribute :No 1. File Optimization 2. Custom Attribute 3. Back to main menu 0. Exit Please choose an option: 1 -------------------------------------------------------------------------------- File Optimization: (Default:Single Label Optimization) 1. Multi Label Optimization 2. Single Label Optimization Please choose an option: 1 -------------------------------------------------------------------------------- Others... File Optimization :Multi Label Optimization Custom Attribute :No 1. File Optimization 2. Custom Attribute 3. Back to main menu 0. Exit Please choose an option: 2 -------------------------------------------------------------------------------- Custom Attribute: (Default:No) 1. No 2. Yes Please choose an option: 1 Custom Attribute Disabled Successfully. -------------------------------------------------------------------------------- Others... File Optimization :Multi Label Optimization Custom Attribute :No 1. File Optimization 2. Custom Attribute 3. Back to main menu 0. ExitClick Close to close the Windchill Shell.