
Operations Manual
About this Manual
This manual provides comprehensive guidelines and step-by-step instructions for working with HaloCAD solutions (Monitor and Protect). For installation and configuration instructions, please refer to the "Installation Manual" shipped with the product package.
How does it Work?
At a high level, HaloCAD workflow involves the following steps:
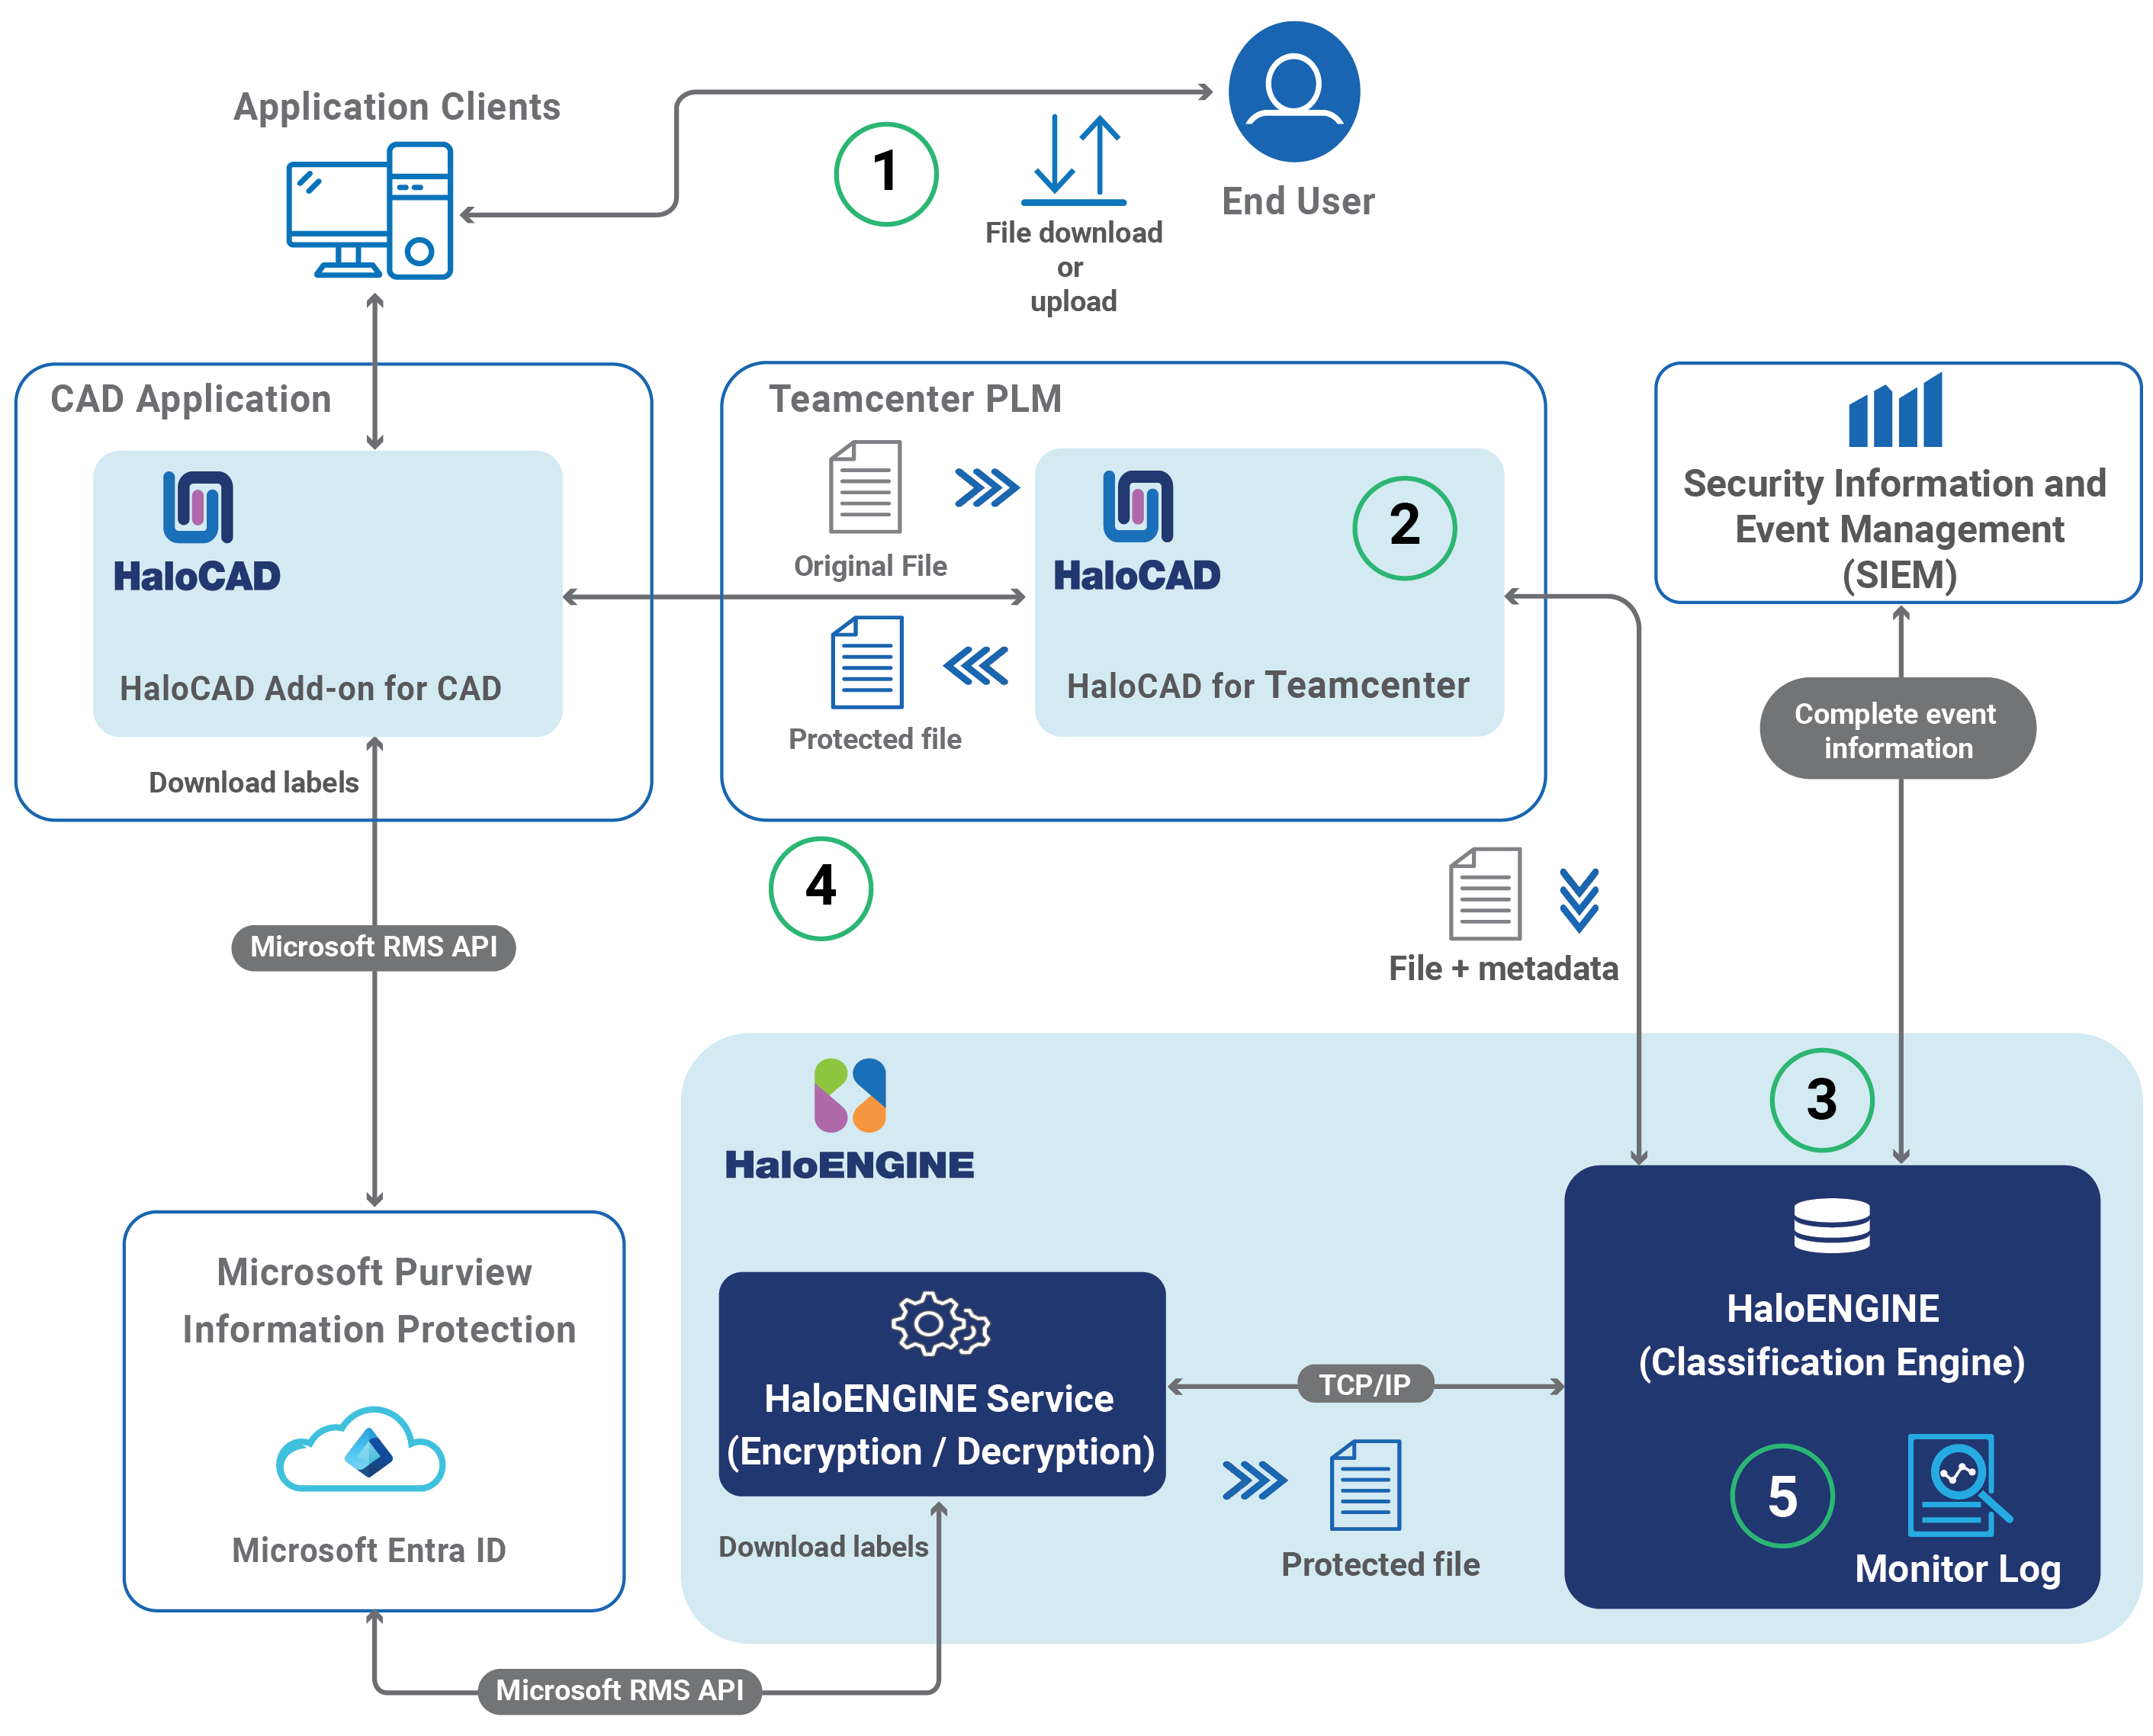
HaloCAD for Teamcenter
Step 1: File check-out/check-in
A user creates a new CAD / Office document or opens an existing workspace object, from an AWC browser session or a Rich Application Client session.
Applies, check-out (download), or check-in (upload).
Step 2: File transfer through the PLM HaloCAD component
HaloCAD for Teamcenter collects the metadata and retrieves the action derivation from the HaloENGINE. File processing is based on the following parameters:If HaloENGINE Service=Local, send the file directly to the (local) HaloENGINE Service for file handling either in “File path” or “Stream”.
If HaloENGINE Service=Remote, the metadata and label information from the HaloENGINE is sent to the remote HaloENGINE Service for file processing.
Step 3: Encryption/decryption
According to the metadata collected, the action is executed in the file.The file will not be processed if any inappropriate action is present or no action is available. It will be downloaded without any changes.
If a suitable action with a label is found, the file is sent to the HaloENGINE in local mode or to the HaloENGINE Service in remote mode to further file processing. Note: In the check-in case, the label is removed, and then the decrypted file is stored in Teamcenter PLM.
HaloCAD prevents file downloads if a block action rule in HaloENGINE is properly configured.
Step 4: Processed file sent to the user
The file is encrypted with the derived label and returned to the user through HaloCAD for Teamcenter.Step 5: Monitor log
The event is captured by the HaloCAD component and forwarded to the monitor log of the HaloENGINE.
How to Protect a CAD File?
This section describes how to protect NX, Creo, and office files via PLM. Note: We recommend referring to the "Operations Manual of HaloCAD Add-on for NX and Creo" to know more about standalone HaloCAD protection scenarios.
Fulfill the Requirements
HaloCAD for Teamcenter needs to be installed and set up.
HaloENGINE Service must be installed and configured.
HaloENGINE must be installed and configured.
The Classification Engine must be configured. For illustration purposes, a simple classification profile is explained here.
Step 1: Enter a name for the profile.
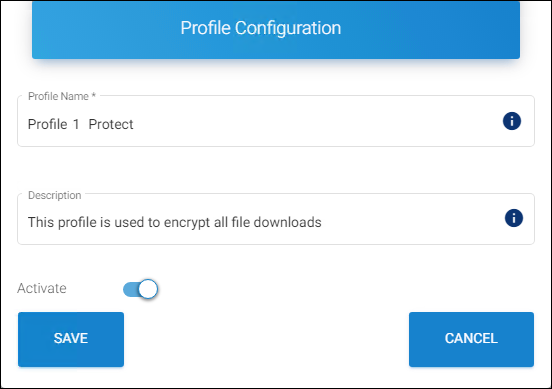
Sample profile
Step 2: Configure classification properties and their values.
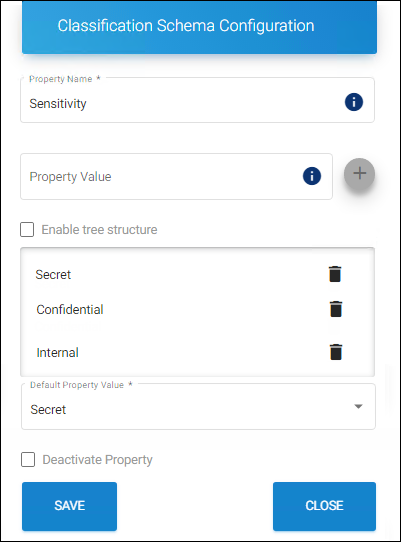
Classification properties
Step 3: Create classification rules based on metadata types. Note: If you want to use your metadata, specify it on the Custom Metadata page of the HaloENGINE admin portal. Please refer to the Custom Metadata section of the HaloENGINE Installation and Configuration manual.
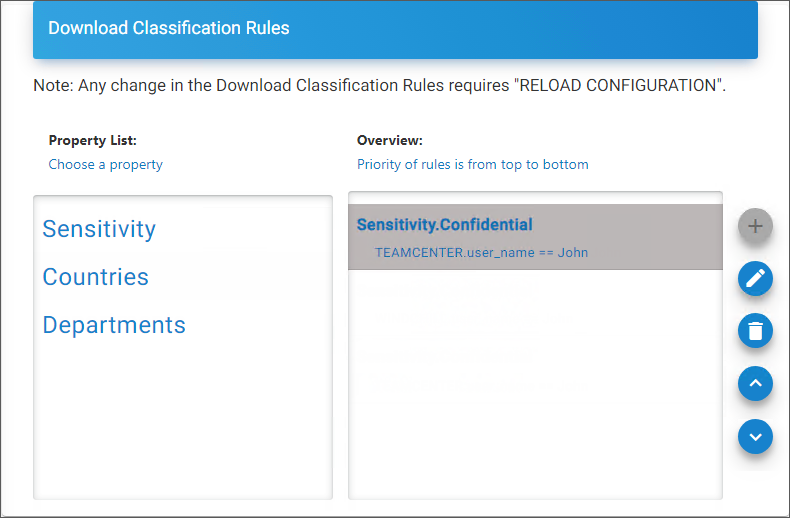
Rules
Step 4: Create an action rule to label and block.
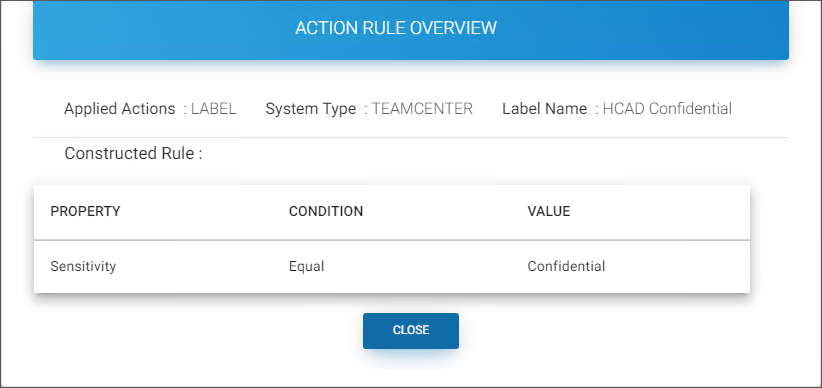
Action rule for labeling
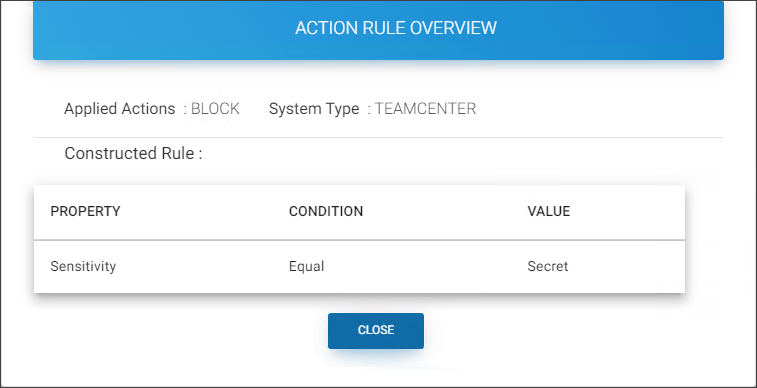
Action rule for blocking
Step 5: Assign Systems to the profile.

Assign Systems
HaloCAD add-on must be installed.
Protecting a NX File
Follow the instructions below to download CAD files via PLM:
Download a NX/MS Office file via the following options:
Open an AWC browser session > select a file (assembly/part) via Open in NX option.
A file named
openinnx.nxtcxmlwill be downloaded.Open the file to see the actual permissions that are applied to the file.
Open an AWC browser session > select an office file:
Click Open in Office, file with an extension
.awoaiwill get downloaded.Click Download File, word file will get downloaded.
Open the downloaded file and click View Permission to see the actual permissions that are applied to the file.
Open a Rich Application Client session, download a NX/Office file via Named References, and click Download.
Results:The downloaded file is labeled as defined in the HaloENGINE.
The encryption settings from the label are enforced and remain with the file wherever it is stored.
What to do next:
If you are an authorized user, you can modify the label and save the file.
If you wish to view the audit log, you can view the export event in the HaloENGINE monitor log.
Blocking a file download
Download a file using an AWC browser session or through other methods.
Results:
The action rule for block configured in HaloENGINE prevents file download. As a result, no file download occurs.
Refer to the monitor log for further information.
Protecting a Creo File
Prerequisites:
Need to install a plugin (
Teamcenter Integration for Creo.bat) to integrate with Teamcenter PLM.As a best practice, remove the files that are about to be uploaded/downloaded that are already present in the default directory and cache directory, if available in:
C:\Users<username>\Siemens\creocache\Default WorkspaceC:\Users<username>\FCCCache<username>
Follow the instructions below to download CAD files via PLM:
Double-click the Teamcenter Integration for Creo icon on the desktop.
Go to Teamcenter tab, click Open > login to Teamcenter > and select a Creo file on Teamcenter Open (infodba (infodba) - dba/DBA [IMC] screen and click Open.
Again, select the file in Teamcenter Open Infodba Dependencies (infodba (infodba) - dba/DBA [IMC] screen, and click Open.
Results:The protected file is downloaded as defined in the HaloENGINE. The encryption settings from the label are enforced and remain with the file wherever it is stored.
The export event is logged in the HaloENGINE audit log.
Common Scenarios
This section presents some common scenarios for illustrative purposes and is meant to provide general guidelines.
How to Open a Protected CAD File?
Prerequisite: Before opening the protected file, make sure the HaloCAD Add-on for NX is installed.
Click on the protected file.
The first time when you try to open a labeled file, HaloCAD will prompt you about the Microsoft Sign-In Assistant.
Click OK when prompted, "Microsoft Sign-In Assistant will be invoked and the user credentials will be cached."
Follow the on-screen prompts to complete the authentication process.
Results:On successful confirmation, the file will open.
Users could experience different access results for the same document based on the policy settings. For more details, refer to the "Operations Manual of HaloCAD Add-on for NX".
Example 1 (NX): Application ID as the Owner of the File
The following figure shows an example of an Application ID that is used to initialize HaloENGINE Service. This Application ID will be the owner of the document by default, however, a static email or login user can also be an owner of the downloaded file if specified in HaloENGINE. Please refer to sections Example 2 and Example 3.
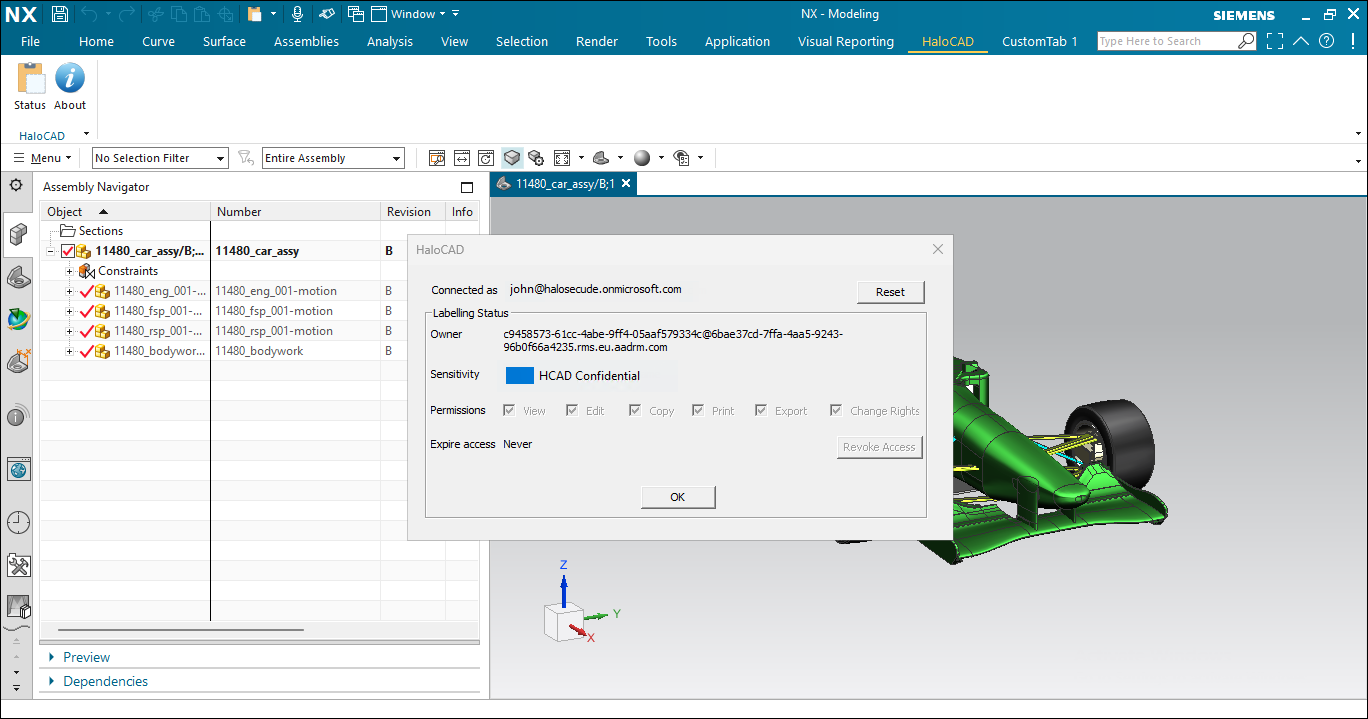
Application ID as the Owner of the File
Example 2 (NX): Static Email as the Owner of the File
The following figure shows an example of an email address configured in the HaloENGINE. This email address will be the owner of the exported document.
Static Email as the Owner of the File
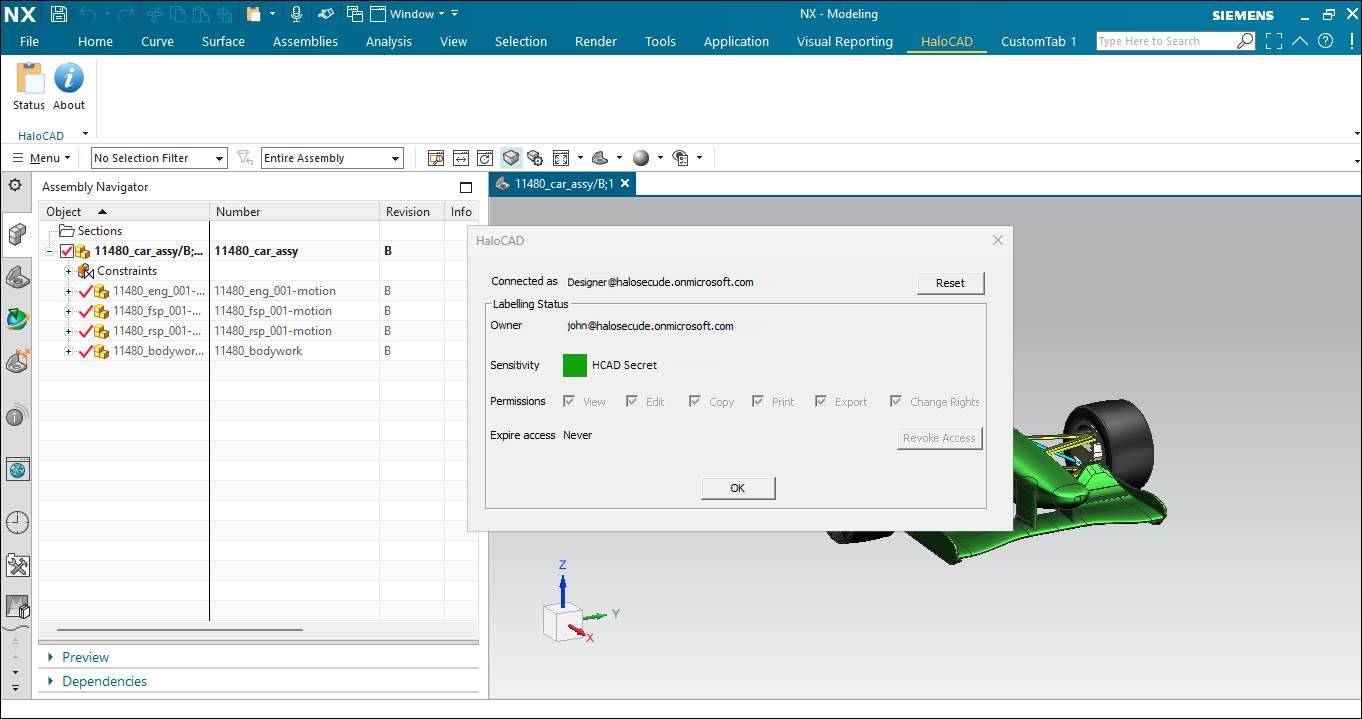
Example 3 (NX): Teamcenter Logged-in User as the Owner of the File
The following figure shows an example of a PLM logged-in user who has become the owner of the document. To achieve this, the Owner configuration must be set to "user" on the HaloENGINE Admin portal. The exported document will have the email address of the currently logged-in user as its owner.
Step 1: Teamcenter PLM
Login to your Teamcenter as a dba user.
Open the Organization application, click on Persons, and from the list select a user to modify and update the details, like email id. For example,
Designer@halosecude.onmicrosoft.com.Once the mail ID is updated, click on Modify button to save it.
Step 2: HaloENGINE Admin Portal
Login to the admin portal.
Navigate to Download Rules > Action Rules > Owner Configuration, select the User option, and save the configuration.
Step 3: Download a file from Teamcenter.
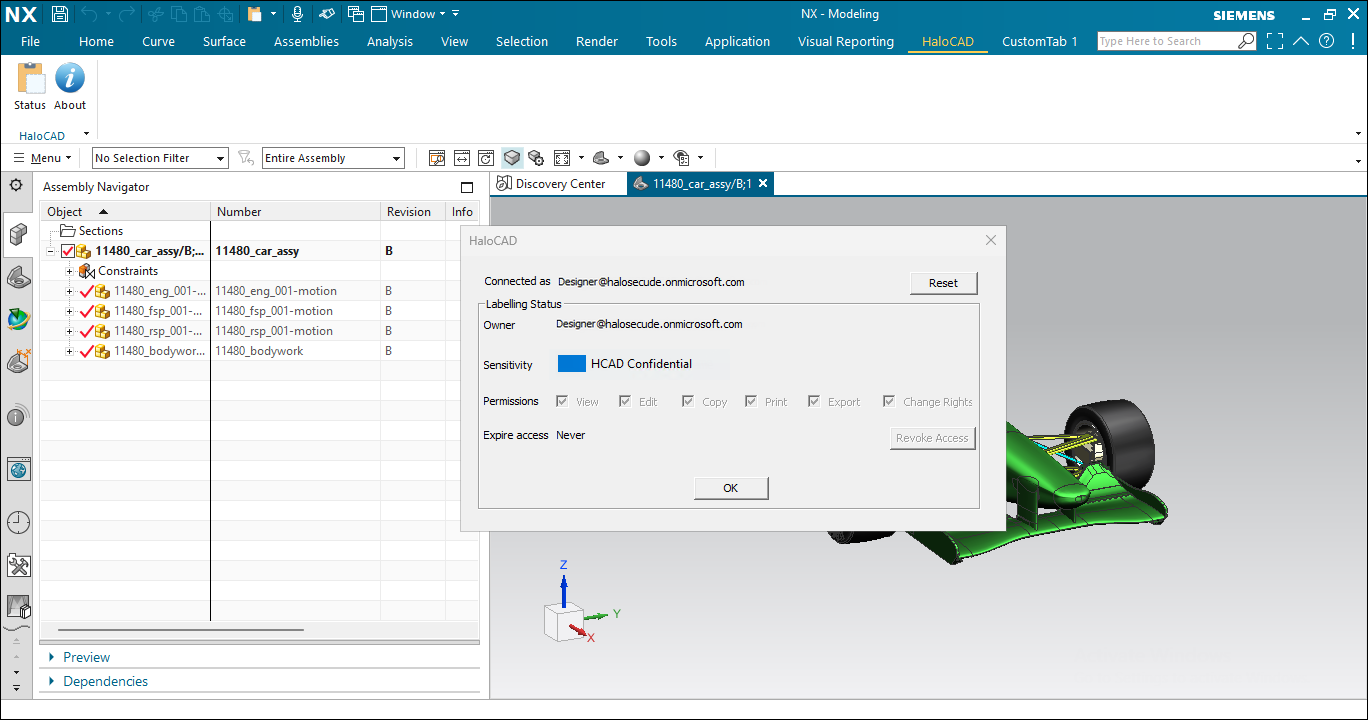
Teamcenter logged-in user’s email the Owner of the File
Result: The logged-in user is the document's owner.
Example 4: File Upload and Download
File Upload and Download of an Office File
The following is an example of an upload and download sequence in Teamcenter PLM integrated with HaloCAD. Note: Non-office files are also supported (e.g.,
.txtand.PDF). For illustration purposes, an Excel file is used here.Login to the Rich Client session.
Go to the Home directory.
Create a new item (via Home directory > File > New > select item in Business Object Type > enter a name > click Next and Finish).
Select a revision, go to File > New > Dataset.
On the New Dataset dialog, select MS ExcelX > Import > select a non-office file. [Please note, in this example, the file (
Bill Of Materials.xlsx) which is going to be uploaded is already protected with the HaloCAD_INTERNAL label].Click Apply.
Results:The file is uploaded to Teamcenter.
During the upload/check-in sequence, the original label HaloCAD_INTERNAL is removed, and the decrypted file is stored (checked-in) in Teamcenter PLM.
The upload/checked-in event is logged in the HaloENGINE.
Check-out sequence: Right-click the previously uploaded item, choose Named References, and then click Download.
Results:The file is downloaded to the default location.
During the download/check-out sequence, the file is exported from Teamcenter with a new label HCAD Confidential which is defined in the Classification Engine.
The download/check-out event is logged in the HaloENGINE.
The following figure shows the difference between the uploaded file into Teamcenter and the downloaded file from Teamcenter.
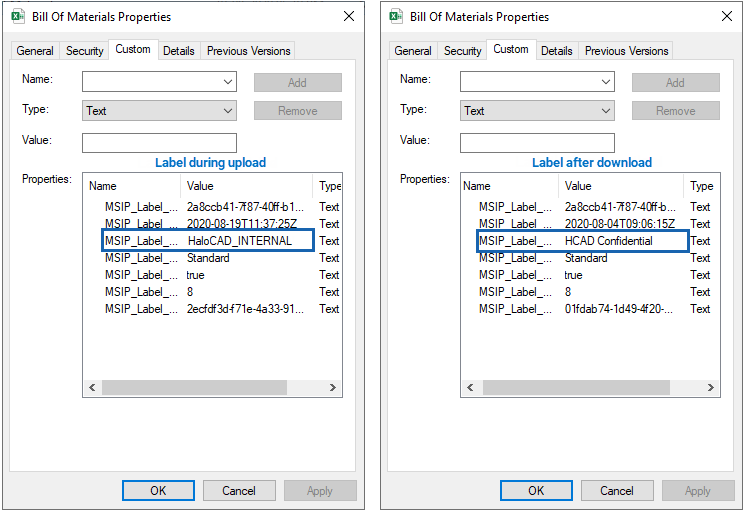
File upload and download Sequence #1
File Upload and Download of a Creo File
Check-in sequence:
Open the Creo application, create a new document, or open an existing document.
Select a sensitivity label and click Save. (For example, select the least restrictive template, such as Public or General).
Move this file to the Default Workspace directory.
Now, double-click the Teamcenter Integration for Creo icon on the desktop.
Go to Teamcenter tab, click Save > login to Teamcenter > and select a Creo file on Teamcenter Save (infodba (infodba) - dba/DBA [IMC] screen and click Save.
Again, select the file in Teamcenter Save Infodba Dependencies (infodba (infodba) - dba/DBA [IMC] screen and click Save.
Results:During the upload/check-in sequence, the original label is removed, and the decrypted file is imported to Teamcenter PLM.
The upload/checked-in event is logged in the HaloENGINE.
Check-out sequence:
Remove the files related to the previously uploaded file that is present in the Default Workspace directory, if available.
Login to Teamcenter, if you have not already done so.
Go to the Teamcenter tab, click Open > login to Teamcenter > and select the same file that is uploaded in the previous section on Teamcenter Open [infodba (infodba) - dba/DBA [IMC] screen and click Open.
Again, select the file in Teamcenter Open Infodba Dependencies (infodba (infodba) - dba/DBA [IMC] screen, and click Open.
Results:During the download/check-out sequence, the file is exported from Teamcenter with a new label that is defined in the Classification Engine.
The download/check-out event is logged in the HaloENGINE.
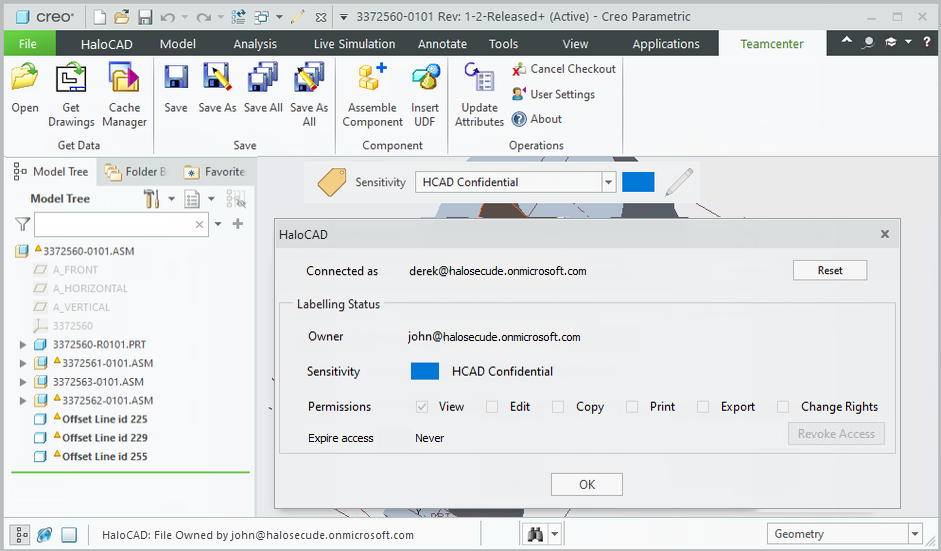
File upload and download Sequence #2
Customer Support
Please be ready with the below-listed information before contacting our team to help you with the issue you are experiencing. The data that you provide will help us to serve you better.
Full contact details.
HaloCAD component and HaloENGINE build version.
Date, time, and description of the error (if possible, provide screenshots).
What (if any) third-party products (software or other) were used in conjunction with our product?
Any other information necessary to reproduce the error.
Secude offers help and support through
Technical support email: support@secude.com
If you choose the email option to contact us, please provide your company details with a detailed description of the issue and attach the log file (if any). Our representative will respond to your email inquiry.Phone support: Call +41 41 510 70 70 to talk to our representative to diagnose and resolve the technical problem.
Other resources
Please visit https://secude.com to know about upcoming events, press releases, and to download whitepapers.
Documentation Feedback
Secude understands the importance of technical content when attempting to gain product knowledge and strives to continuously improve product documentation to ensure that users receive the information they want. To provide feedback on the documentation, please send an email to documentation@secude.com. Please include the following details in your feedback:
Product name and version
Documentation topic
Details of the suggestion or error
The technical documentation team will consider your feedback and address it in future documentation updates.