
Installation Manual
Introduction
Companies across industries, such as automotive, aviation, high tech, and even fashion, create and manage their intellectual property (IP) based on drawings. These drawings are created digitally using computer-aided design (CAD) applications and are shared with users outside the organization owing to business considerations. It's essential to understand the potential risks associated with sharing business information. By implementing comprehensive security measures you can significantly reduce the risks and safeguard your data.
How does HaloCAD protect your Data?
HaloCAD effortlessly integrates Microsoft Purview Information Protection (MPIP), formerly known as Microsoft Information Protection (MIP), the leading technology for Enterprise Digital Rights Management (EDRM). It acts as a shield for your CAD files by automatically labeling them with MPIP and managing data assets across your environment.
It offers access to MPIP-protected files, including label handling and privilege enforcement. CAD users will not notice any differences in the handling of CAD files because they take place in the background. By seamlessly attaching MPIP labels to the CAD files while they are being created, it provides end-to-end security for those files.
What is HaloCAD for SOLIDWORKS PDM?
The HaloCAD for SOLIDWORKS Product Data Management (PDM) solution integrates with the respective PDM application and includes the functionality of HaloCAD PROTECT and HaloCAD MONITOR. Files in SOLIDWORKS PDM folders are closely monitored. When a file is cut or copied to a non-SOLIDWORKS PDM folder, HaloCAD intercepts it and protects it in the background on the fly before reaching the destination folder. Furthermore, any previously protected SOLIDWORKS application files or PDF files copied to the SOLIDWORKS PDM folder will be decrypted and saved. Thus, the data is always secure, no matter where the file is saved outside of SOLIDWORKS PDM. The cut or copy events are monitored and logged in a log file.
About this Manual
This manual walks you through the installation and configuration procedures unique to HaloCAD for SOLIDWORKS PDM.
Quick Start Installation Summary
The following image shows the high-level idea of setting up HaloCAD.
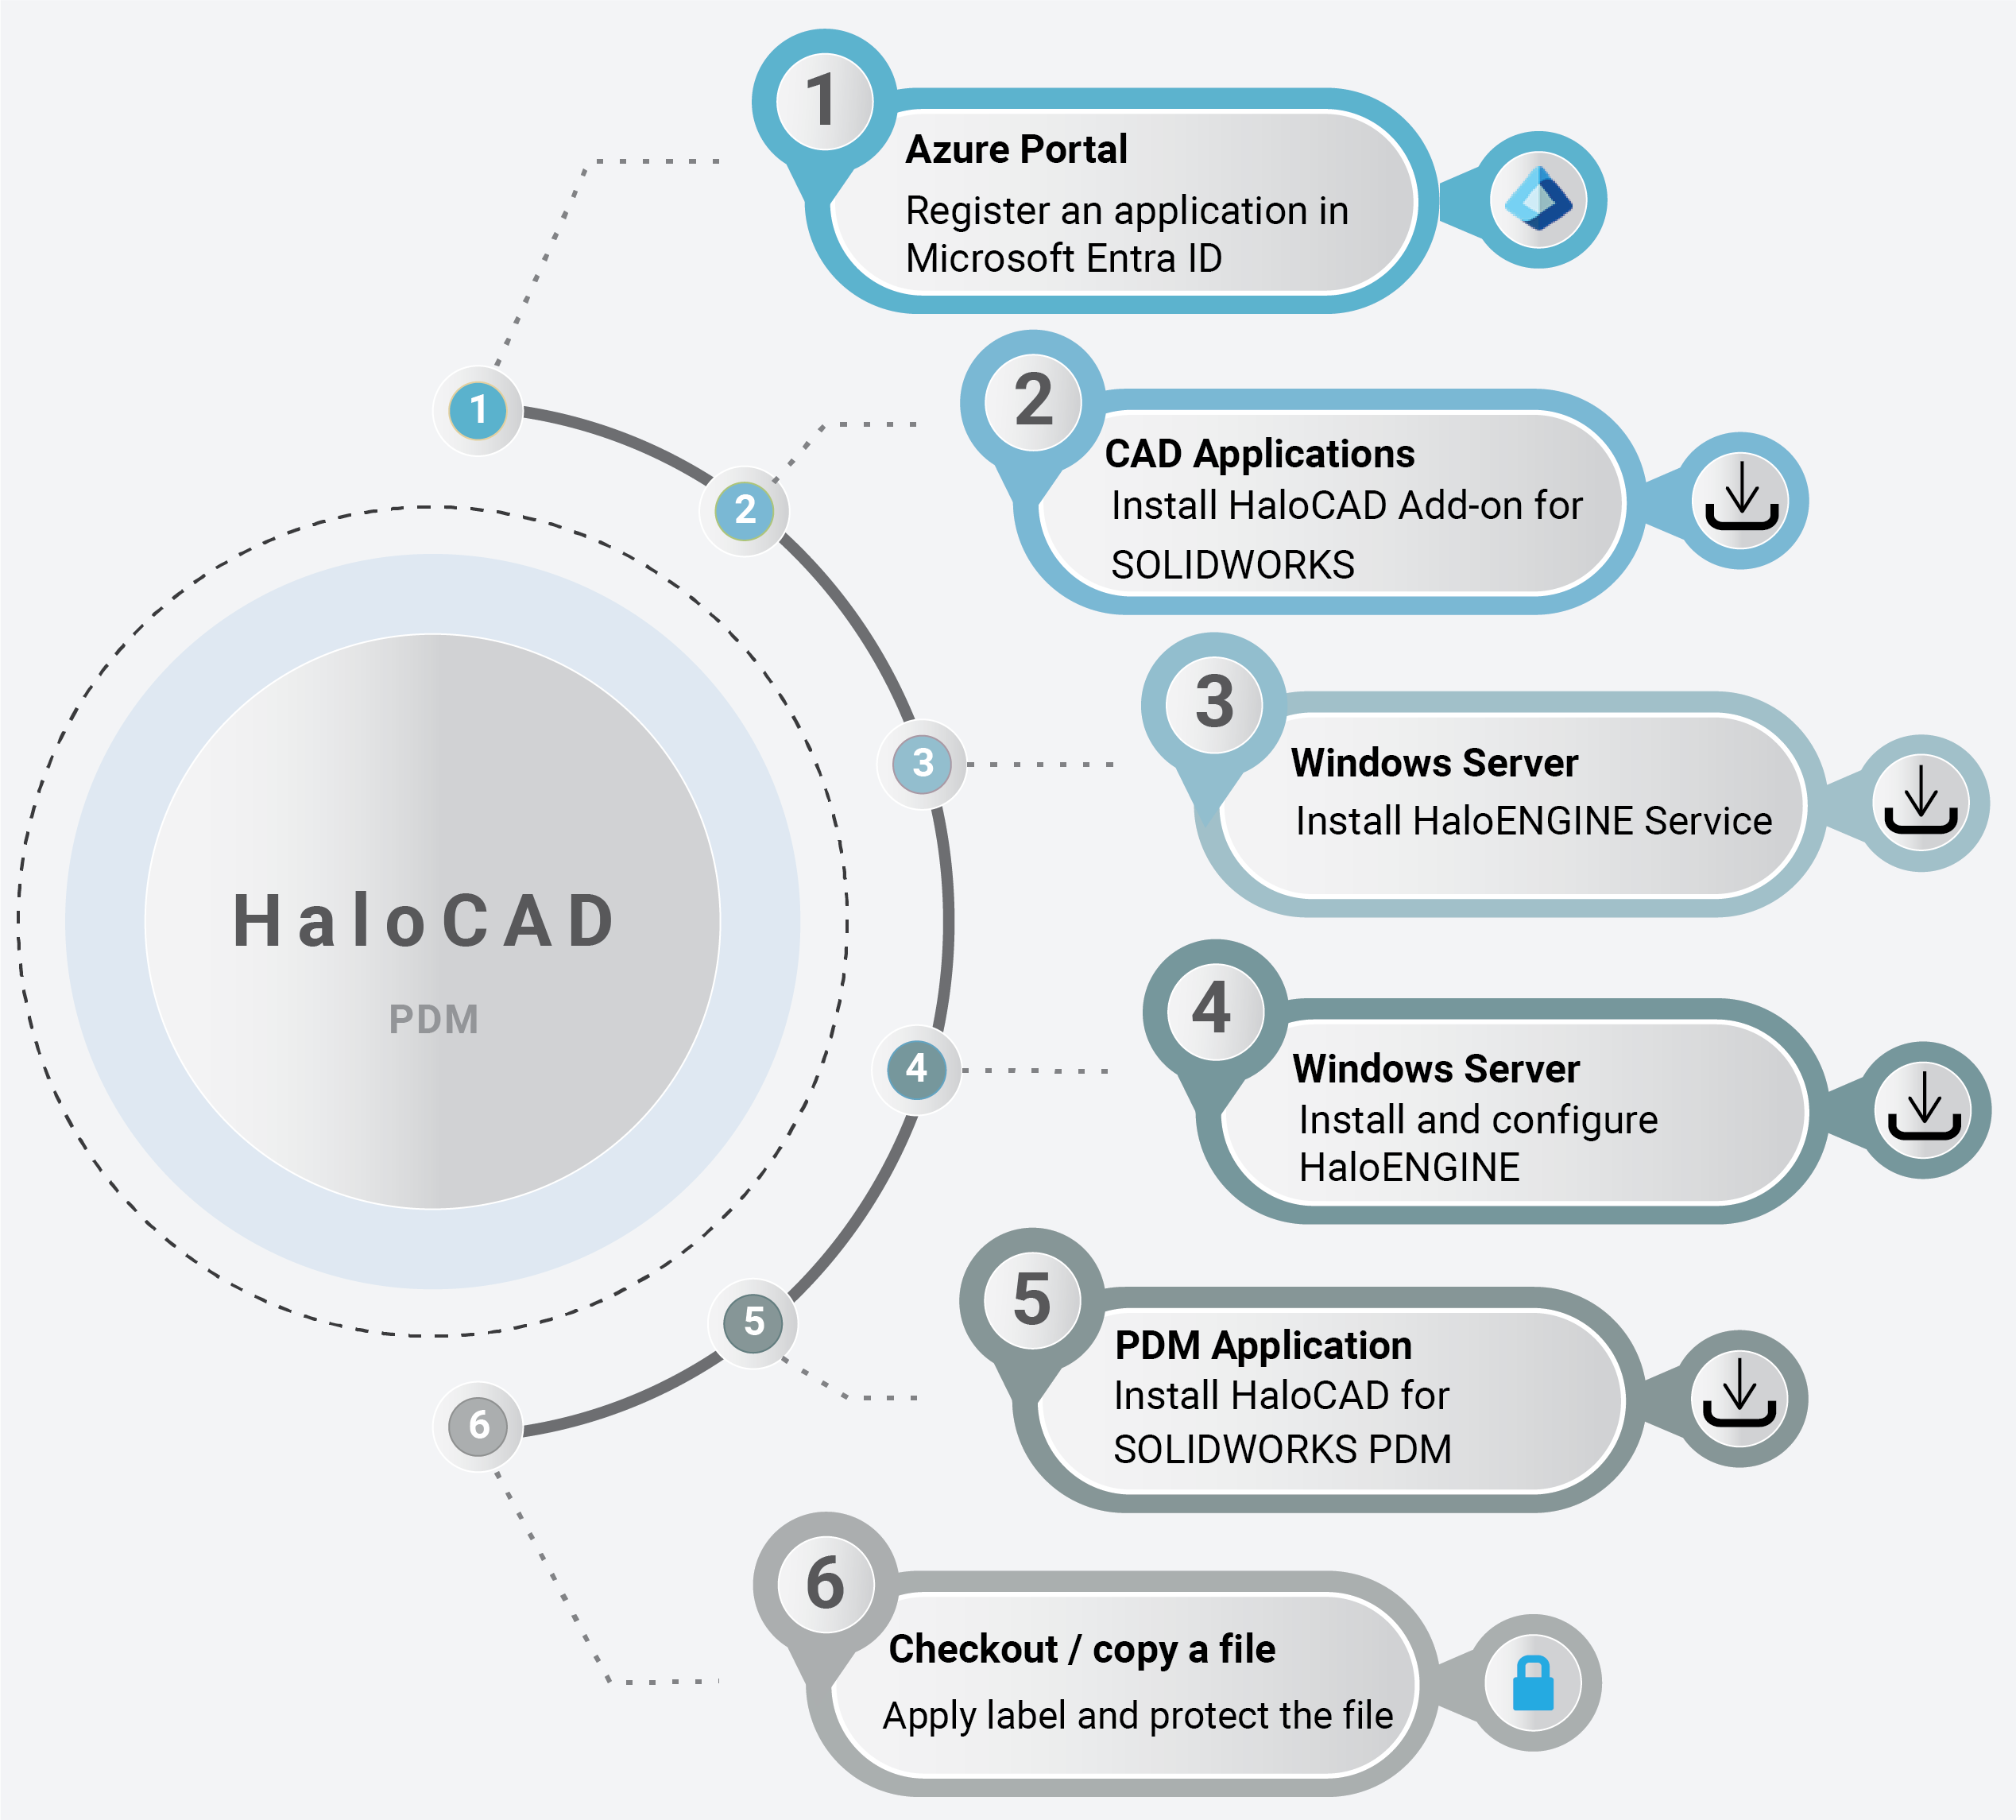
HaloCAD quick start installation steps with SOLIDWORKS PDM
Reference Manuals
The table below describes where to obtain information in the HaloCAD documentation set.
Component | Refer to |
|---|---|
Step 1 – How to register an application in Entra ID. |
|
Step 2 – How to install HaloCAD Add-on for SOLIDWORKS. |
|
Step 3 – How to install HaloENGINE. |
|
Step 4 – How to install HaloENGINE Service. |
|
Step 5 – How to install HaloCAD for SOLIDWORKS PDM. | Refer to the current manual. |
Step 6 – How to download a protected file. |
|
HaloCAD documentation
HaloCAD Architecture
HaloCAD is available in three variants:
HaloCAD Add-on for CAD—A standalone solution that contains the HaloCAD PROTECT feature. It enables CAD applications to use MPIP directly with user interaction.
HaloCAD for PDM—This solution includes HaloCAD PROTECT and MONITOR capabilities and interacts with the respective PDM application. Files in SOLIDWORKS PDM folders are closely monitored. When a file is cut or copied to a non-SOLIDWORKS PDM folder, HaloCAD intercepts and protects it before reaching the destination folder. Also, any previously encrypted SOLIDWORKS application files or PDF files copied/moved to the SOLIDWORKS PDM folder will be decrypted and saved.
HaloCAD Extension—HaloCAD extends its support to read the MPIP-protected files through a free-of-charge standalone HaloCAD Reader Add-on.
Components of HaloCAD
The following section explains the components of HaloCAD.
HaloCAD for SOLIDWORKS PDM—contains the functionality of HaloCAD PROTECT and MONITOR.
HaloCAD Add-on for SOLIDWORKS—reads the protected files, enforces corresponding privileges, and changes MPIP labels.
HaloENGINE Server—Significant role where business logic is located. Note: HaloENGINE versions 6.4 and higher are compatible with HaloCAD for SOLIDWORKS PDM.
HaloENGINE Service—Downloads labels, which are then used by the Classification Engine in the HaloENGINE.
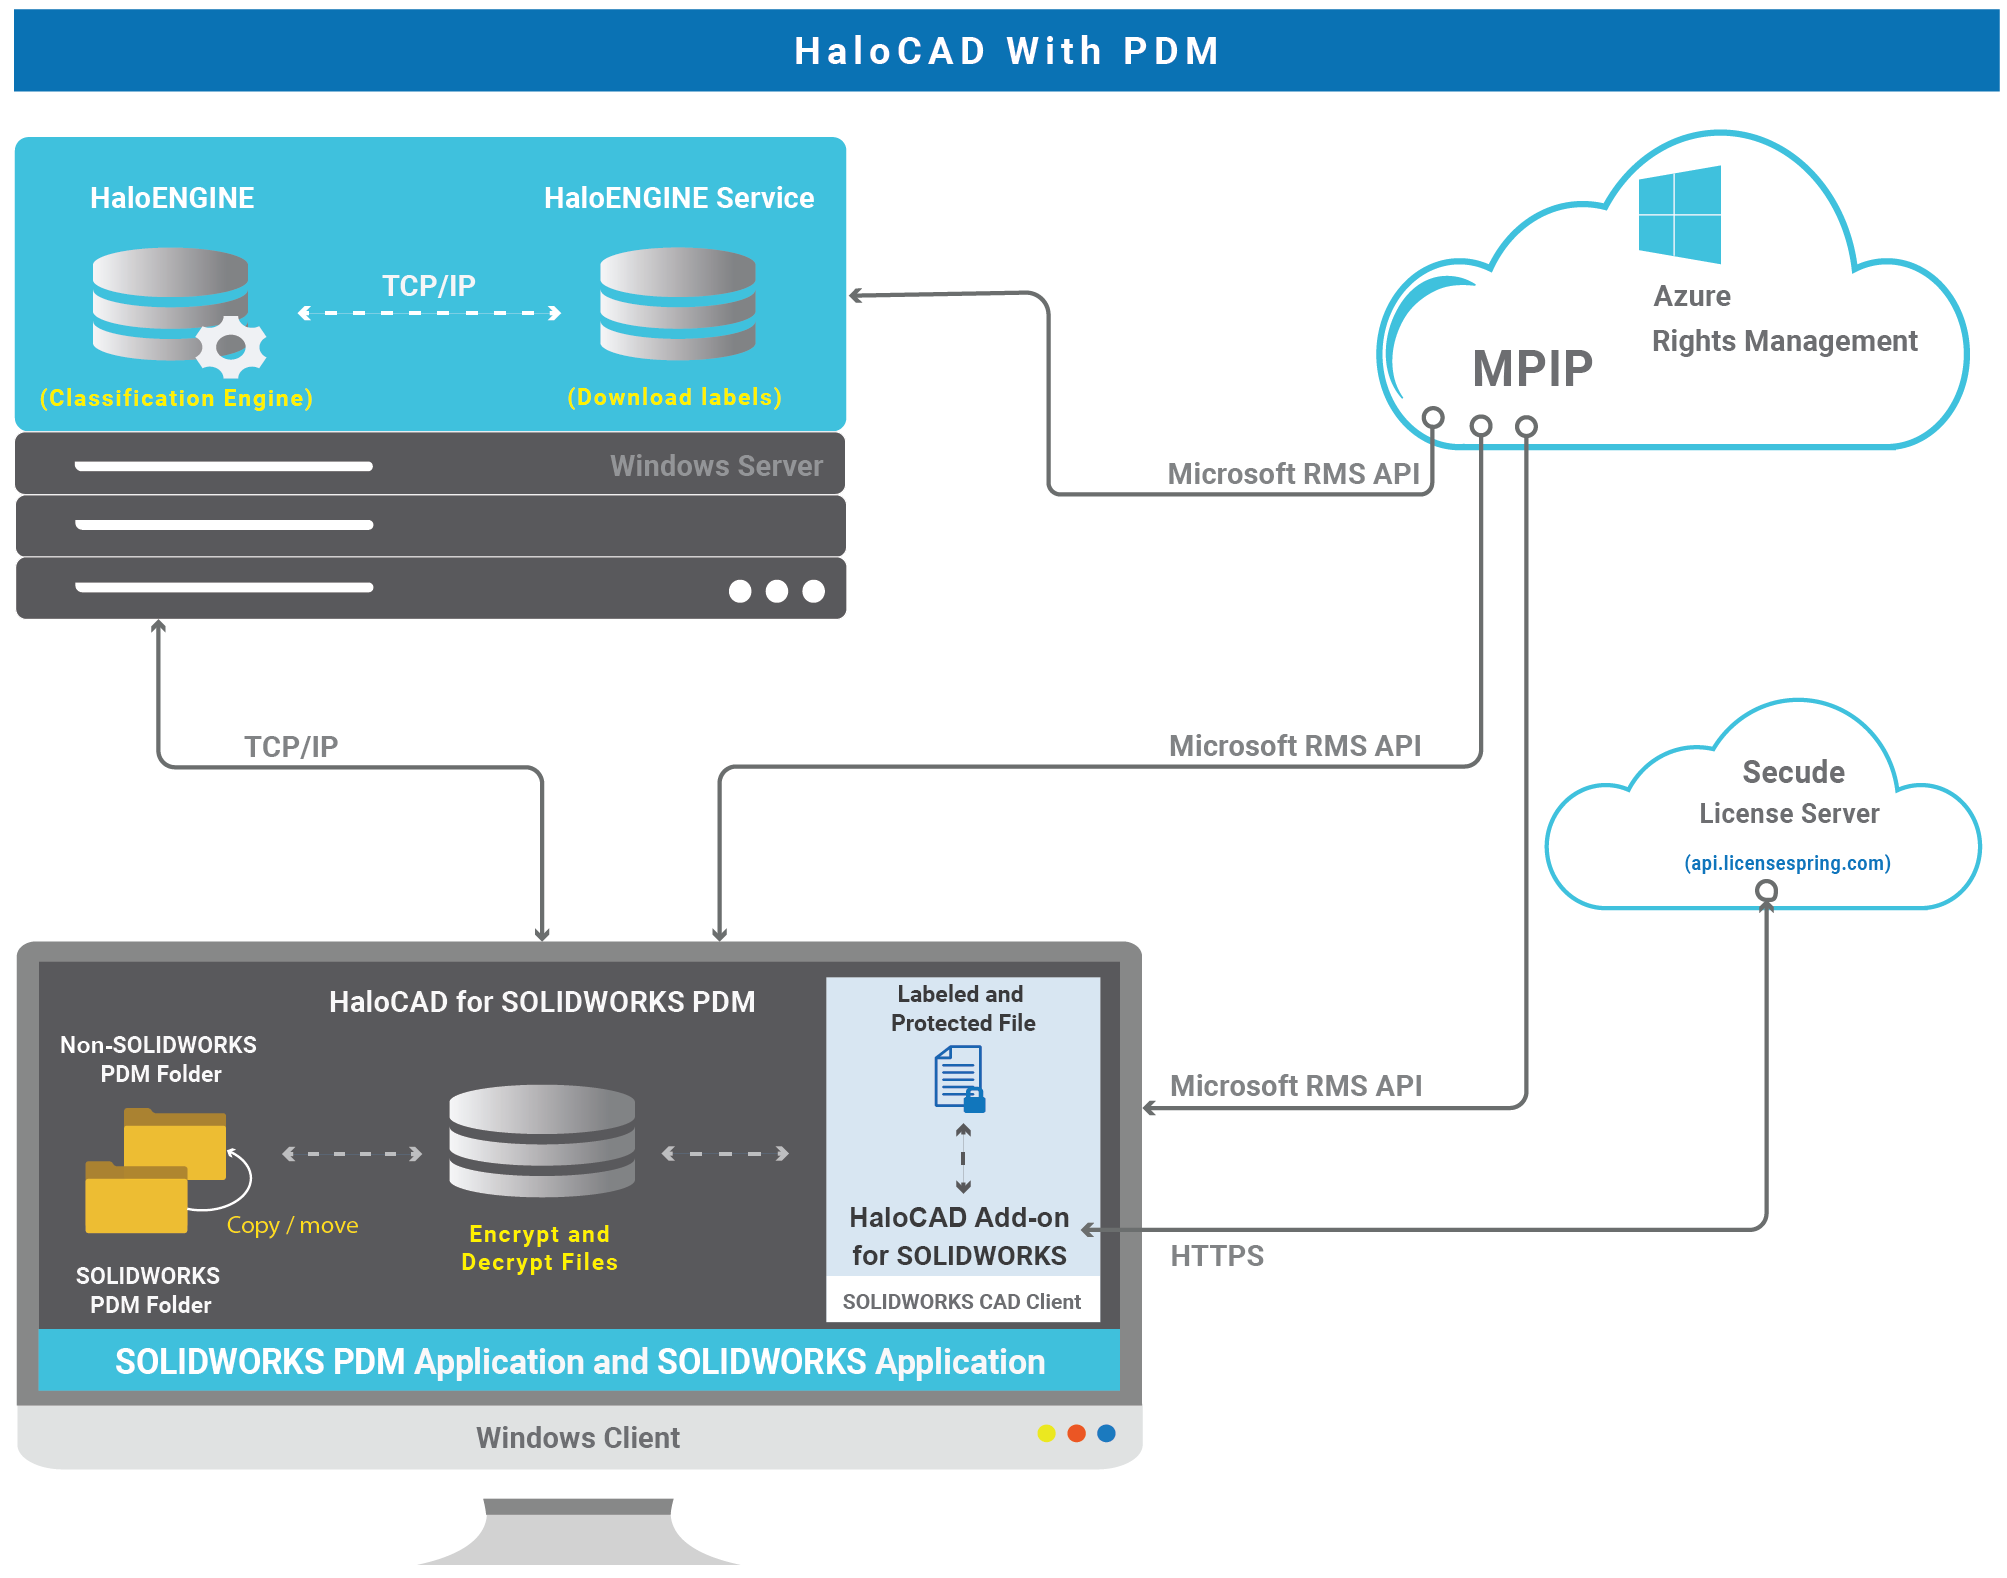
HaloCAD with PDM
HaloCAD for SOLIDWORKS PDM performs the following functions:
Resides in the SOLIDWORKS PDM Client.
Watches for cut/copy/paste/send to events in File Explorer (
explorer.exe).Responsible for obtaining metadata and label information from the HaloENGINE.
Responsible for labeling and encrypting files.
Responsible for logging HaloCAD component activities to the local log and also for sending monitor logs to the HaloENGINE.
HaloCAD Add-on for SOLIDWORKS performs the following functions:
Resides in Dassault Systemes SOLIDWORKS application.
It is responsible for protecting newly created files that are exported or saved to non-SOLIDWORKS PDM folders and displaying the permission label with enforcement.
Responsible for logging the add-on-related activities.
HaloENGINE performs the following functions:
HaloENGINE is a Java-based server component that exposes a web service to HaloCAD for SOLIDWORKS PDM.
Responsible for business logic. The HaloENGINE (classification engine) interprets the metadata collected in SOLIDWORKS PDM and makes all decisions. The action derivation is based on the rules generated with metadata, which are captured during a file download.
Responsible for retrieving label information from the HaloENGINE Service.
Responsible for logging events sent by HaloCAD for SOLIDWORKS PDM.
HaloENGINE Service performs the following functions:
HaloENGINE Service, a Windows service, is responsible for communicating with HaloENGINE via TCP/IP. It is the only component that directly communicates with the Azure Right Management Service (Azure RMS). It retrieves MPIP labels from RMS and transmits them to the HaloENGINE.
Microsoft Purview Information Protection
HaloCAD solution effortlessly integrates Microsoft Purview Information Protection to protect your sensitive documents. Microsoft Purview Information Protection is an industry document security solution that enables businesses to ensure that only authorized users can open the protected content while also regulating what they can do with it such as print, edit, or save. Even if sensitive data is leaked accidentally or maliciously, unauthorized parties cannot view it in clear text, thus leaving it useless.
Microsoft documentation
This manual assumes that you already have a complete setup of Microsoft Purview Information Protection and you are familiar with using the Microsoft Purview portal and related concepts. If you are new, you can refer to Microsoft's online documentation for setup and configuration.
Prerequisites
This section summarizes the prerequisites and dependencies for the installation and configuration of HaloCAD add-ons.
Register an Application in Microsoft Entra ID
This section will guide you through registering an application, obtaining the Client ID and Directory ID, and assigning permissions to the application.
Microsoft documentation
Registering an application in Microsoft Entra ID establishes a trust connection between your application and the identity provider, the Microsoft identity platform.
The information in the Microsoft documentation overrides any information published in this section. For a comprehensive description, refer to Microsoft documentation.
Create an Application
Follow the instructions below to register an application:
Log in to the Microsoft Entra admin center using an account that has administrator privileges.
If you have access to multiple tenants, click the Settings icon in the top menu and select the tenant for which you want to register the application from the Directories + subscriptions menu.
You will be directed to the homepage.
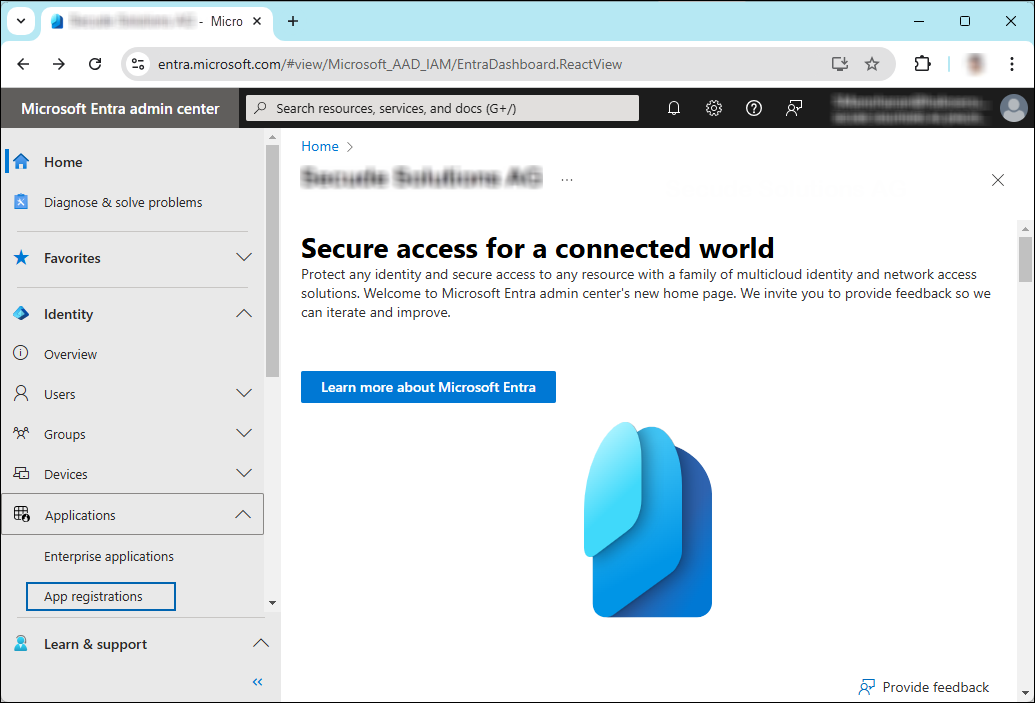
Selecting Microsoft Entra ID
Click Identity > Applications > App registrations on the left of the navigation pane.
On the App registrations page, click the New registration page or Register an Application button (this button appears only if no applications have already been created).
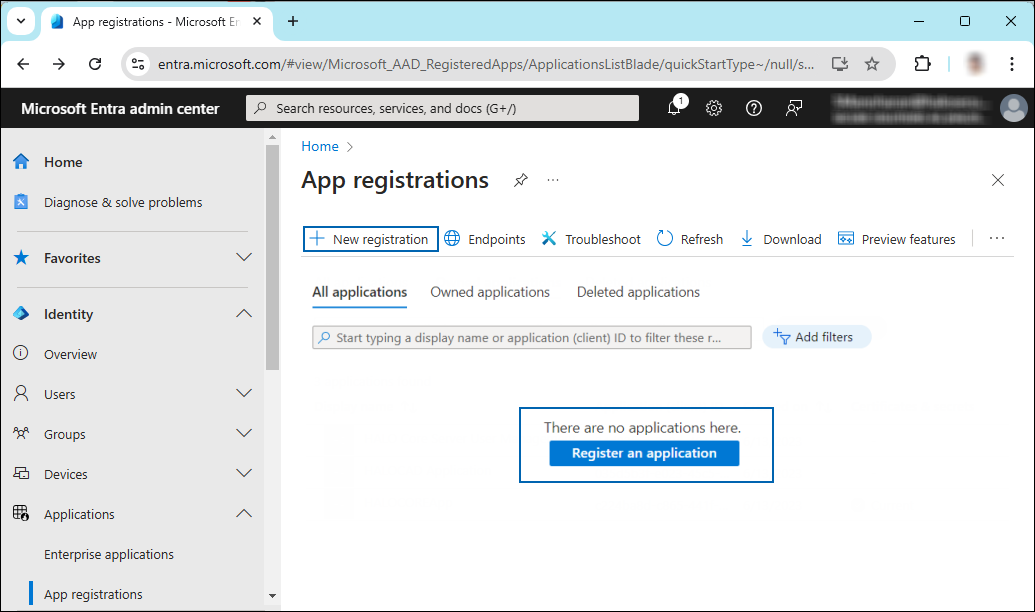
New application registration
On the Register an application page, enter the registration details for your application.

Application details
In the Name field, enter an appropriate application name.
Under Supported account types, select which account you would like your application to support. For detailed information on these types, please see Microsoft documentation.
To target only accounts that are internal to your organization, select Accounts in this organizational directory only.
To target only business or educational customers, select Accounts in any organizational directory.
To target the widest set of Microsoft identities and to enable multitenancy, select Accounts in any organizational directory and personal Microsoft accounts.
To target the widest set of Microsoft identities, select Personal Microsoft account only.
Under Redirect URI: Select Public client/native (mobile & desktop), and then type a valid redirect URI for your application. For example,
https://localhost.When finished, click Register.
The home page of the new application is created and displayed.
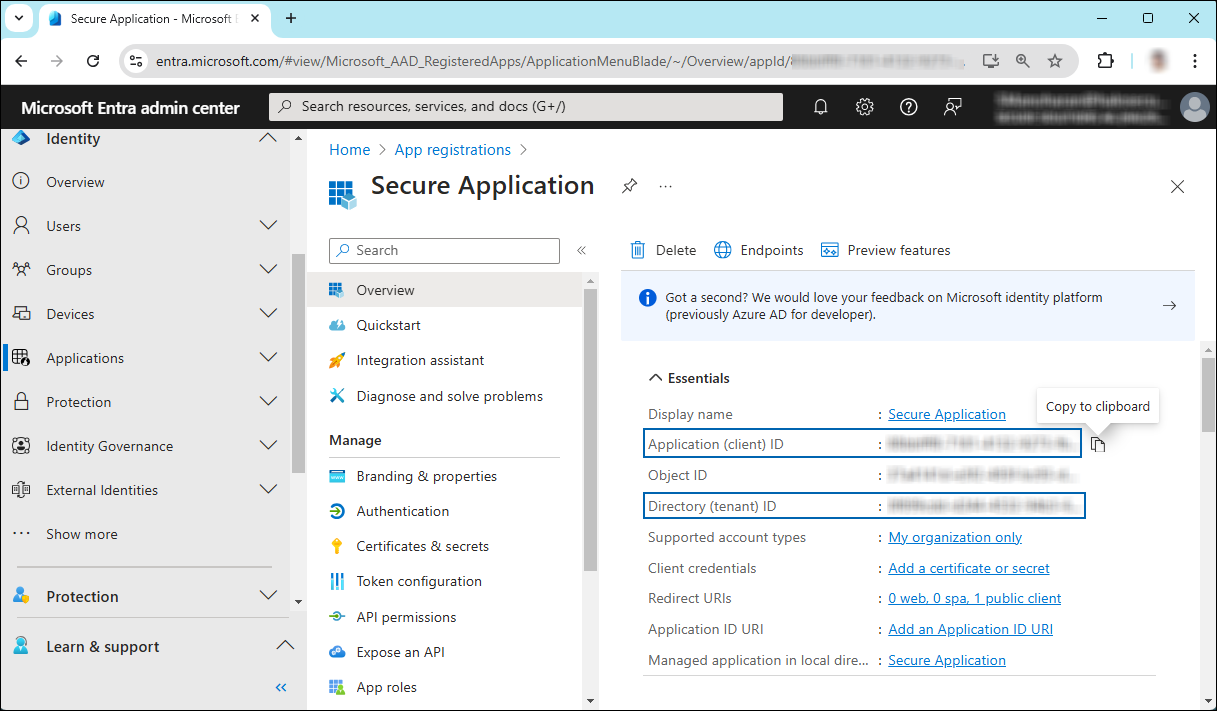
Application ID and Tenant ID
Once registration is complete, the following values are shown on the portal. To copy and save the ID value in a text editor, hover your cursor over it and click the Copy to clipboard icon.
Application ID – It is also referred to as Client ID.
Directory ID – It is also referred to as Tenant ID.
Save the authentication parameters
In a text editor (such as Notepad), copy the values of Application (client) ID, Directory (tenant) ID, and Redirect URI, and save them for initializing the HaloCAD application. The Directory (tenant) ID is needed only for single-tenant applications.
Add Required Permissions
To protect content using MIP SDK, you need to provide the following API permission(s) for the created application ID.
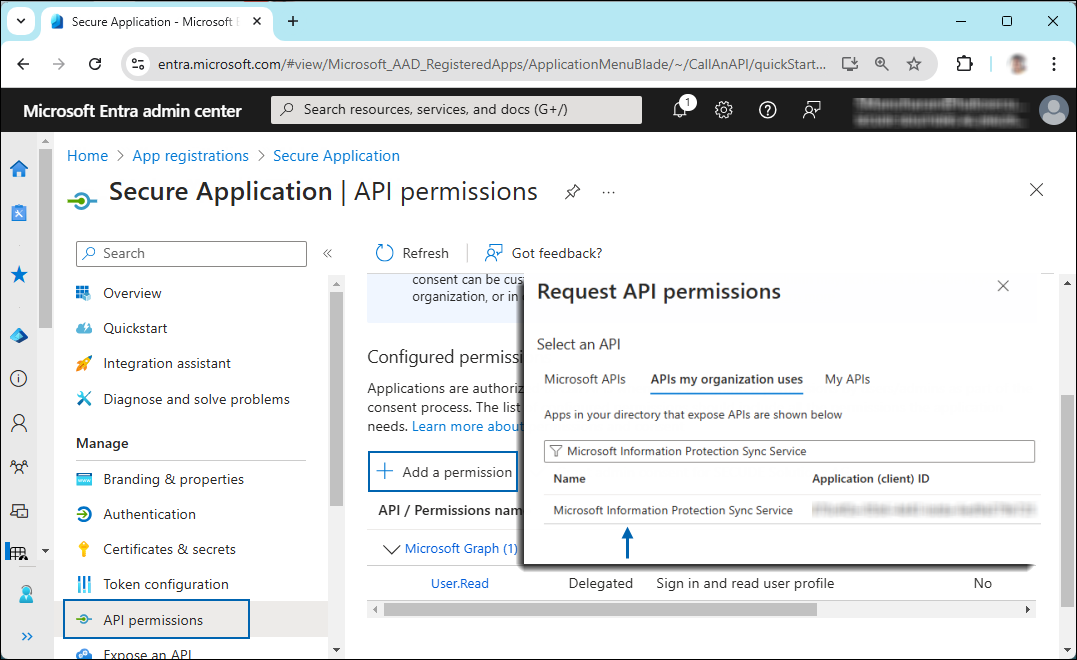
In the sidebar of the new application page, select API permissions. The API permissions page for the new application registration will appear.
Click Add a permission button. The Request API permissions page will appear.
Under the Select an API setting, select APIs my organization uses. A list appears, containing the applications in your directory that expose APIs.
Type in the search box or scroll to find the required API that is mentioned in the below table “Required Permissions”.
For example, type Microsoft Information Protection Sync Service. You can see the API listed as shown in the below figure:
Searching for permissions
Now, click on the displayed API. You can see two permissions on the page − Delegated permissions and Application permissions.
Click Delegated permissions button and then, under the Permission section, select the check box against "Read all unified policies a user has access to".
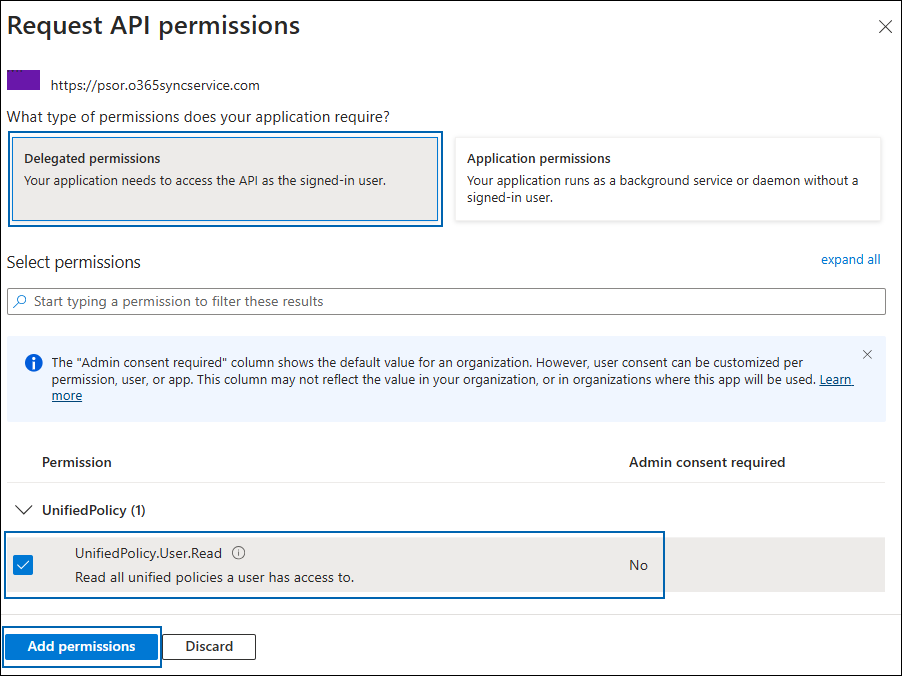
Adding permission
Click Add permissions. (Repeat the steps outlined above to add the other required permissions listed in the table below.)
You will return to the API permissions page, where the permissions have been saved and added to the table. Please note that administrator consent is not necessary for Delegated permissions.
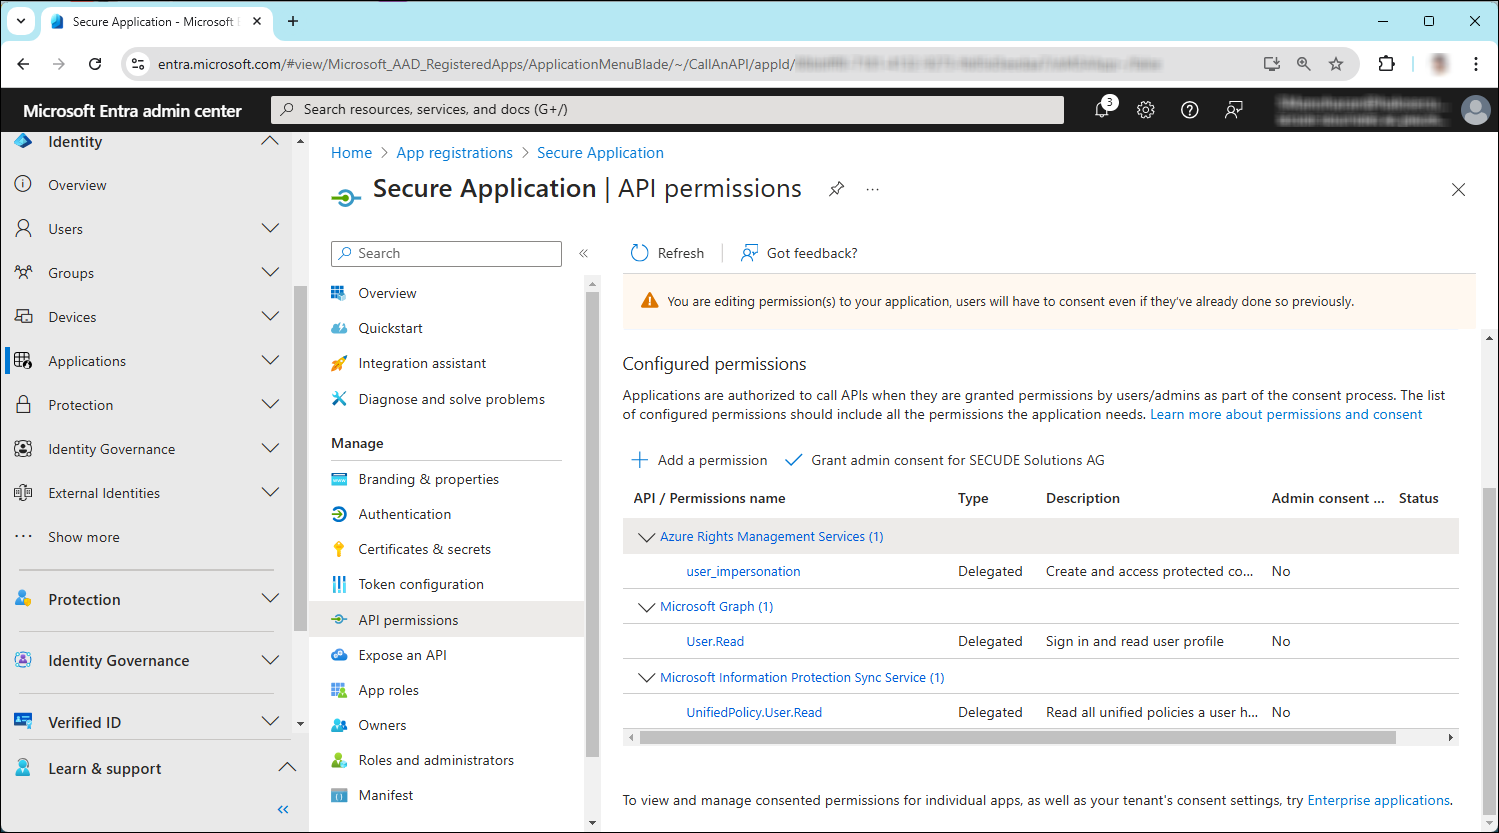
API Required permissions
The following table lists the required permissions.
API / Permission name | Display Name | Type | Description |
|---|---|---|---|
Azure Rights Management Services (Microsoft Rights Management Services) |
| Delegated | Create and access protected content for users |
Microsoft Graph |
| Delegated | Sign in and read user profile (will be added by default) |
Microsoft Information Protection Sync Service |
| Delegated | Read all unified policies a user has access to. |
Required permissions
Create and Configure the Sensitivity Labels
As an administrator, you can create, configure, and publish sensitivity labels for various levels of content sensitivity based on your organization's classification taxonomy. Use names or terms that are familiar to your users. Consider starting with label names like Personal, Public, General, Confidential, and Highly Confidential if you don't already have a taxonomy in place. For more details, please refer to Microsoft online documentation.
Requirements
The following system requirements table specifies the minimum and recommended technical specifications, such as software and network resources, necessary to run the product.
Components | Details |
|---|---|
SOLIDWORKS PDM | SOLIDWORKS PDM Server:
Supported SOLIDWORKS PDM Clients:
|
Office 365 Subscription |
|
Supported file types |
|
Other components | HaloENGINE (supported from >6.4) and HaloENGINE Service |
Requirements
Recommended URLs, addresses, and ports for MPIP
MIP SDK doesn't support the use of authenticated proxies. So, make sure you set the Microsoft 365 endpoints to bypass the proxy. View a list of endpoints at “Microsoft Online Documentation”. However, Microsoft recommends the following:
Addresses | Ports |
|---|---|
| TCP 443 |
| TCP 443, 80 |
For event logging
| TCP 443 |
National Cloud | Microsoft Entra ID authentication endpoint |
Microsoft Entra ID for the US Government |
|
Microsoft Entra ID (global service) For details on Microsoft Entra ID endpoints, please refer to “Microsoft Online Documentation”. |
|
Recommended endpoints